Moto G Play FRP Bypass without PC step-by-step free guide is finally here. Bypass Google account verification from Motorola Moto G Play Android 12, 11, and 10. This guide works best for all Moto G Play devices, including the Moto G Play 2023 and 2021.
Factory Reset Protection aka FRP lock works as a security feature to protect the important data of our phone. This lock automatically gets into action once a device gets a Hard Factory Reset. As it is a security patch feature, we have to provide the correct Gmail account details to use our phone.
In general, the Google account login details are the most important credentials to remember. As just after you Hard Reset a Motorola Moto G Play device, it automatically activates the FRP lock. Now there are only 2 ways to remove this FRP lock. The first one is quite straightforward, you enter the correct Gmail ID and password of the synced Google account to your device.
Jump to
Moto G Play FRP Bypass without PC – Android 10, 11, 12
Secondly, the only option left is to bypass the Google account lock from Motorola Moto G Play 2023 and 2021 devices. Now, if somehow you don’t remember the Gmail ID or Password of your previously synced Google account. Then, I would suggest you use this free FRP bypass method for Motorola G Play devices.
Moreover, this method works for all Android versions from the latest Android 10, 11, 12, and 13. And if you are using an old Moto G Play device with Android 6, 7, 8, and 9. Then, still, you can use this 1 guide to easily bypass the FRP lock.
In this guide, we are going to use the PIN and Pattern lock method to bypass Google lock from our device. This is a unique method and it works for almost all Android versions. You can simply use this 1 guide to unlock FRP from any Motorola device. That means, it does not only work for Motorola G Play but it works for all the Motorola smartphones.
FRP Bypass 2019, 2022, 2023 Models – Universal Method
This is a universal method to easily bypass Google lock from Motorola Moto G Play 2019, 2022, and 2023 devices. As I already mentioned, it works for all Motorola devices with any Android version. Whether you are using a Motorola device with an old or latest Android version. Simply, follow the below steps to completely remove the FRP lock from your device.
Generally, this is the best method to easily bypass Google account lock from Android devices. We are going to dial the Emergency Number of our country to activate the Google map location feature.
Well, the Emergency Number is different for most countries, so you should dial your Emergency Number of yours. The Emergency Number in my country is “112”, and when you dial the emergency number it will send your current location. To share the location, it will activate the Google Map application.
Fortunately, here is the trick to open Google Maps directly from the Emergency Call feature. By doing this, we will be able to open the Google Chrome Browser to proceed further with our bypass Google account lock from the Motorola Moto G Play method.
Motorola Moto G Play FRP Bypass Without PC – Android 10, 11, 12, & 13
1. Start by connecting to the Wi-Fi network and when you face the “Verify your account” screen. Then go back to the “Hi there” welcome page.
2. Tap on the “Emergency Call” and the dialer will appear on the screen of the Motorola Moto G Play device.
Now, dial the emergency number of your country, for me it’s “112”. Every country has different Emergency Numbers, so make sure to dial the correct emergency number to activate the Google Maps location.
Once you dial the Emergency Number, it will automatically share your location with the Helpline Sector.
Luckily, we can open the Google Map app by tapping on it once it appears on the screen.
3. Next, the “Make it your map” screen appears, tap on SKIP. Push the “Share” button from the bottom and then select “Messages” as the sharing medium.
4. Select “New Message” from the popup window and then type any random number to open the chat box.
5. Next, select and remove the sharing URL and then type “www.YouTube.com” and push the send button.
After that, tap on the “Load Preview” button and the YouTube application logo will appear. Simply tap on it to open the YouTube application.
(Make sure to type “WWW” with YouTube.com, otherwise, it will not open the YouTube app.)
6. Next, tap on the “Account Icon” from the top right corner and then open “Settings”.
Inside settings, go to the About section.
Google Chrome Browser and Internet Access
7. Tap on the “YouTube Terms of Service” and this brings up the Google Chrome Browser for you.
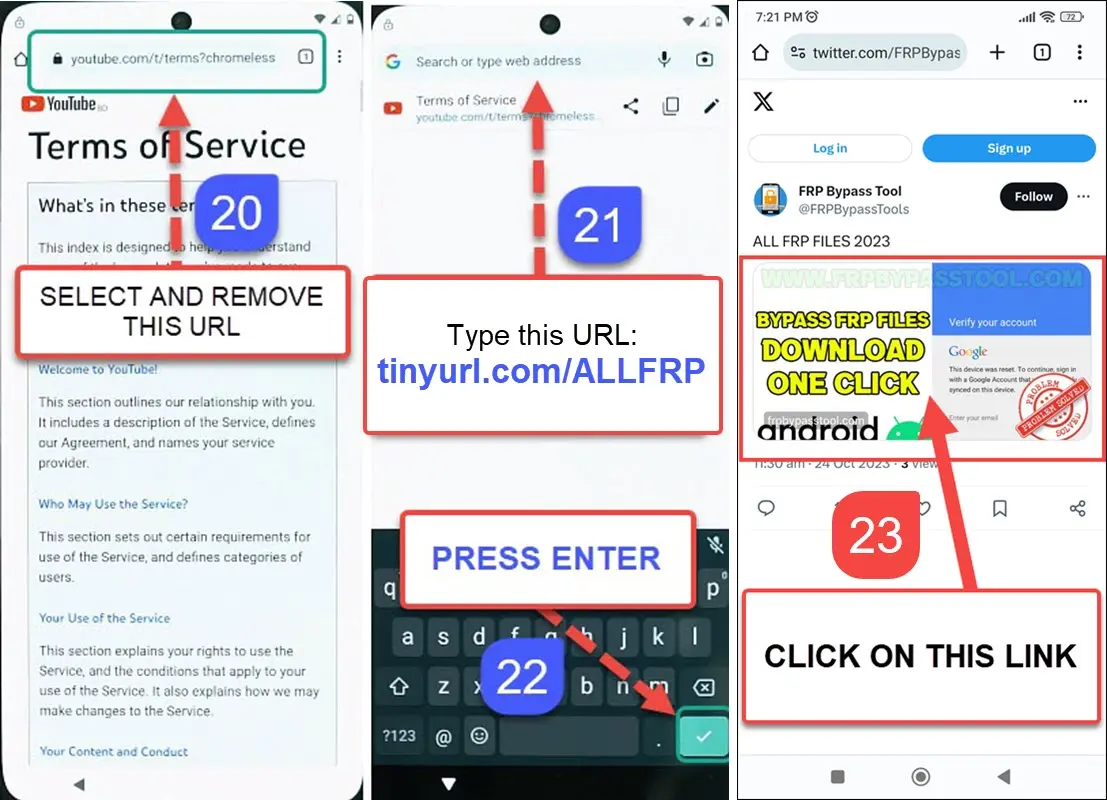
8. Next, select and remove the “Youtube.com/terms” URL.
Then type this URL “tinyurl.com/ALLFRP” and hit the “Enter” button.
Mirror Link: tinyurl.com/allfrpfiles
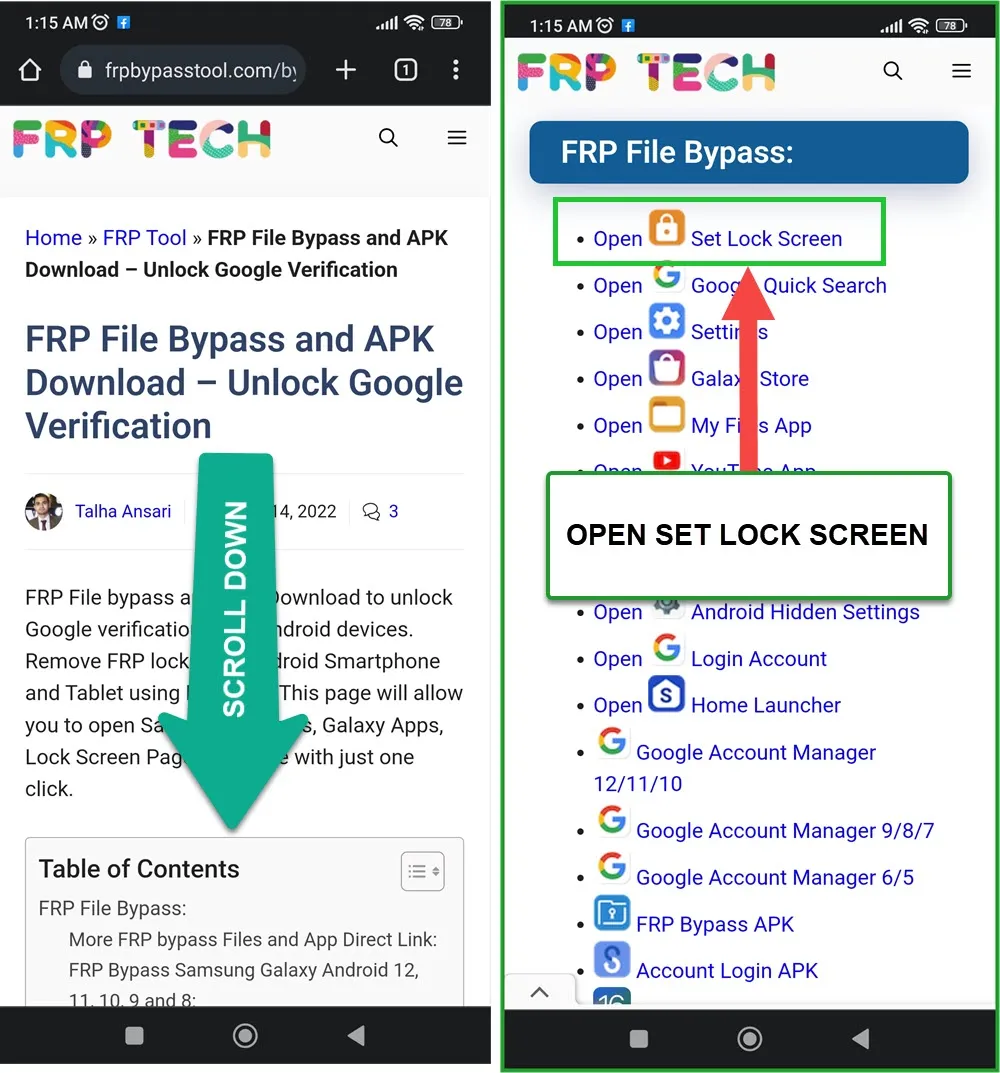
9. Afterwards, the FRP bypass files page will appear with complete bypass files and APKs.
10. Once the page appears, scroll down and then tap on the “Open Set Lock Screen” app.
This will directly open the “Lock Screen” settings of your phone.
IMPORTANT STEPS TO SET LOCK SCREEN SUCCESSFULLY
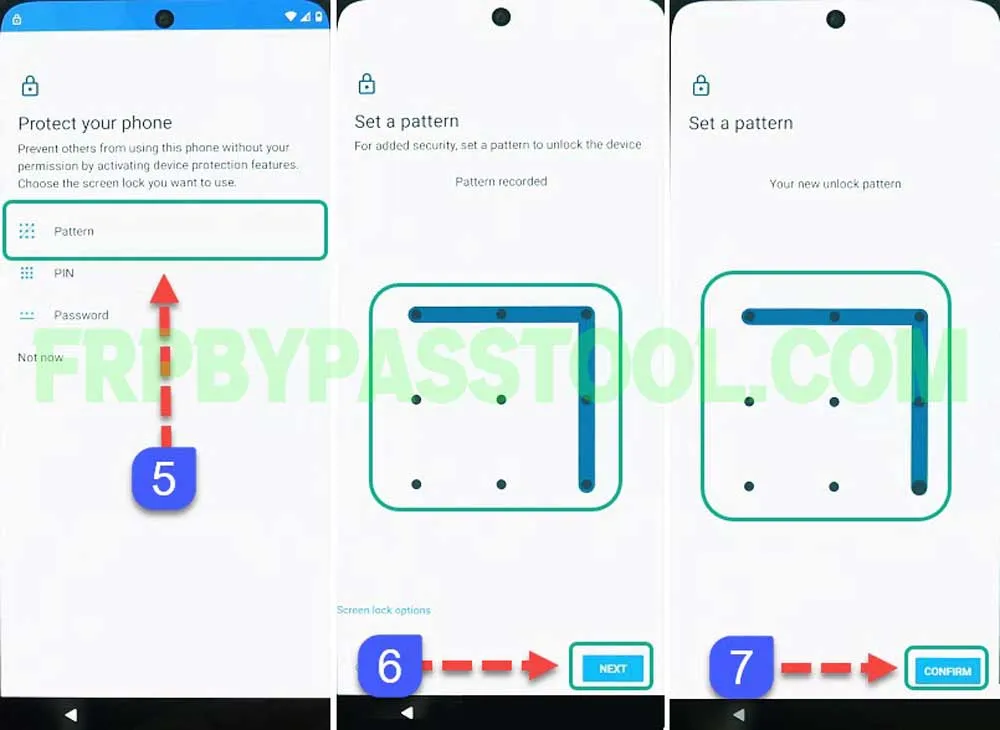
11. Next, select “Pattern” as the security lock and then draw any pattern you want.
(Remember, you may need to try it multiple times until the phone’s settings accept the new screen lock.)
12. Once you see the “Settings keep stopping” popup on your screen. Simply, tap on the “Close app” button.
Then a blank screen will appear, Tap on the back button and then open the “Set Lock Screen” app again.
13. Now again, you need to draw the same pattern multiple times until you see the “Keep your device unlocked” screen.
14. Finally, when the “Keep your device unlock” screen appears. Tap on the “SKIP” button and push the “< Back” button until you reach the “Hi there” welcome screen of your phone.
15. After that, we only need to complete the initial setup of our phone. During the setup, you will not face a Google account verification lock or FRP lock.
16. When you see “Verify Pattern”, then simply draw the same pattern which you set before the previous steps of this guide.
Google Sign-in page will appear on the screen after you draw the pattern. For now, SKIP is signing into the Google account.
(We can Sign in to any of our Google Accounts. But we are Skipping this step for now to complete the initial setup. You can Sign in to any of your Google accounts later on by going into Settings.)
17. Complete the rest of the initial setup steps, and also SKIP the “Unlock with your Fingerprint” screen.
18. Finally, after completing the initial setup, your phone is ready to use just like before. And we did this all without losing the data of our device.
Conclusion
Motorola Moto G Play FRP Bypass Without PC method is one of my favorite guides to unlock FRP. This guide is super easy, and it makes it useable for most of our visitors. That’s what we are always looking forward to, to help our visitors and save them money and time.
Anyways, if you find this guide helpful, share it with your friends. In case you are facing any difficulties, feel free to contact me or you can also comment down below this post.
