VIVO FRP bypass without PC Android 11, 12, and 13 method is the best guide to use in 2023. If you are looking for a VIVO FRP Bypass method that works without a PC or Computer, then you are at the right place.
In general, this is a great method that does not require to use of a Computer/PC to bypass Google account verification. Although, bypassing FRP lock from VIVO Android 11, 12, and 13 smartphones is a bit difficult but not impossible.
VIVO FRP Bypass Without PC Android 13, 12, 11 – Free Guide
However, we also have a free method to bypass Google lock from VIVO Android smartphones using an FRP Tool. Multiple FRP Tools are available online but most of them are paid. To use the premium features of the paid FRP Tool you may have to buy a subscription or credits.
Fortunately, we have already created a Free VIVO FRP unlock Tool guide. That will save you money, and time, and give you full authority over unlocking your VIVO smartphone.
On the other hand, this is a new method and it works without using any FRP Tool and PC. After checking different ways to remove the FRP lock from VIVO without a PC. We finally found a method that works great and gives a smooth experience.
VIVO FRP Bypass Without PC For All Android Versions
Android constantly releases new updates to improve the security level of Android devices. Thus, improving the overall Factory Reset Protection lock and making it more difficult to bypass it.
With that in mind, we first check the accuracy of all the methods posted on our website. That means each FRP bypass method is first tested and checked before posting for our visitors.
VIVO FRP Bypass Android 13 without PC method works for all the Android versions. This includes the long list of Android OS released from the very first Android Lollipop 5.0 to Android Tiramisu 13.
That means, this could also be quoted as a Universal FRP bypass method for VIVO Android smartphones. This guide supports Android 12, 11, 10, and Android 9.
Not only this, but you can also apply this one guide to bypass Google verification from VIVO Android version 8, 7, 6, and 5 devices.
Disclaimer:
This guide is for Educational Purposes only, use this method only to unlock the Android device you own. We highly discourage using this guide to unlock Stolen phones. Do not use this guide to unlock any phone that you don’t legally own. Using this guide to unlock Stolen Android smartphones and tablets is a Serious Crime. If you commit such actions, you may end up in Jail with some serious punishment.
VIVO FRP Bypass Without PC Android 11, 12, 13 – Universal Guide
This is a universal guide to bypass FRP lock from Vivo Android devices. This guide works for all Android versions whether it’s the latest security patch or old.
Not only that, it is a free method and it works without using a PC/Computer. Vivo users don’t have to use the FRP bypass tool to unlock their devices. The success rate of this method is more than 90%, as we first tested and checked it by removing the FRP lock from the VIVO Android device. After that, we created this free guide to help other VIVO Android legal owners.
Follow Step-by-step Guide to bypass FRP lock from VIVO Smartphones
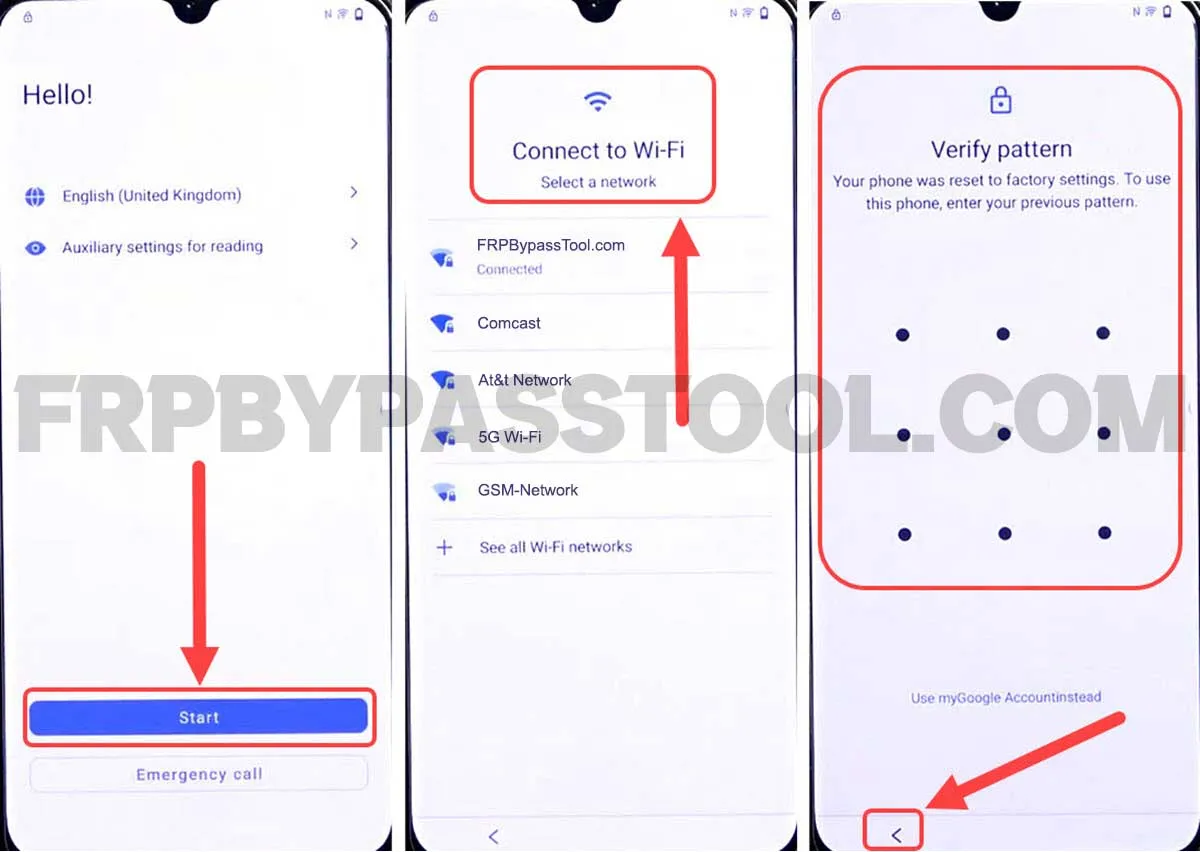
1. Start by connecting to a Wi-Fi network and when you face Verify Pattern or Google verify your account. Go back to the welcome page.
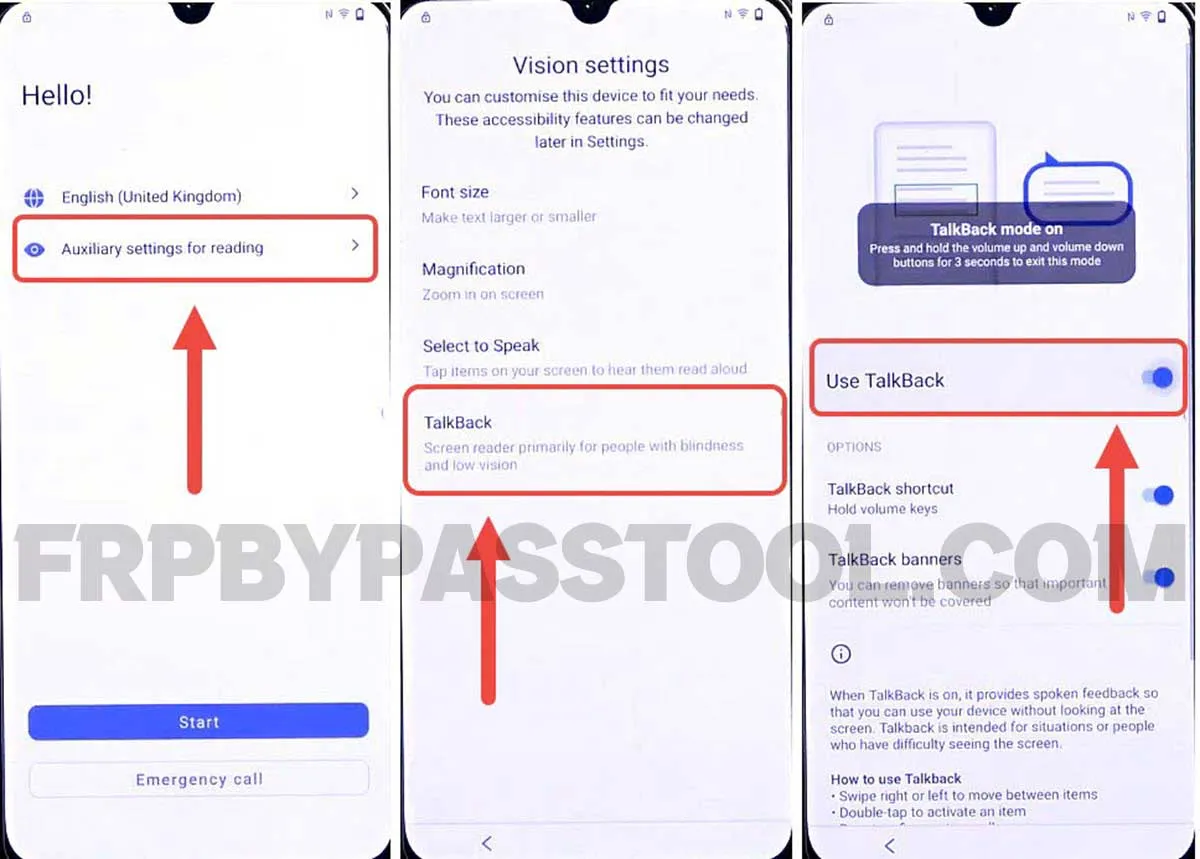
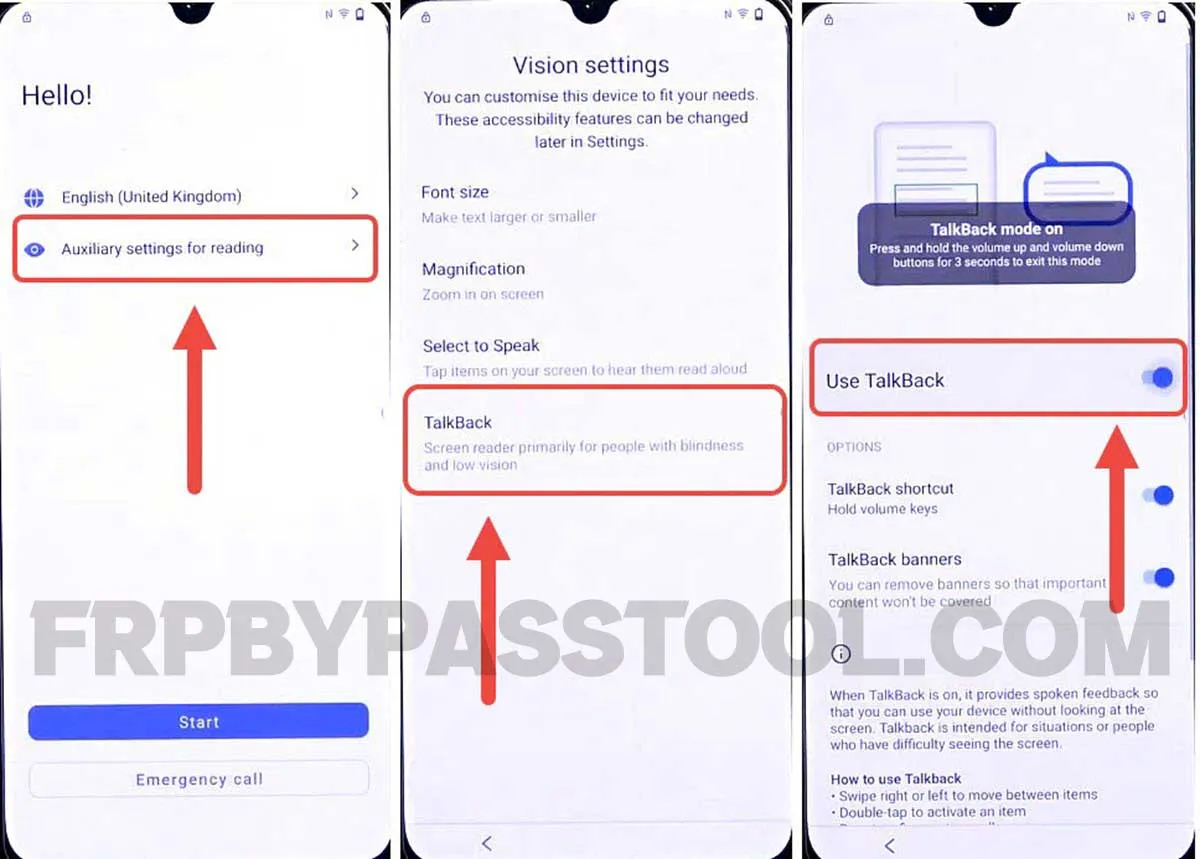
2. Now, tap on “Reading settings”, then select “TalkBack” from the given options.
After that, enable the “Use TalkBack” toggle.
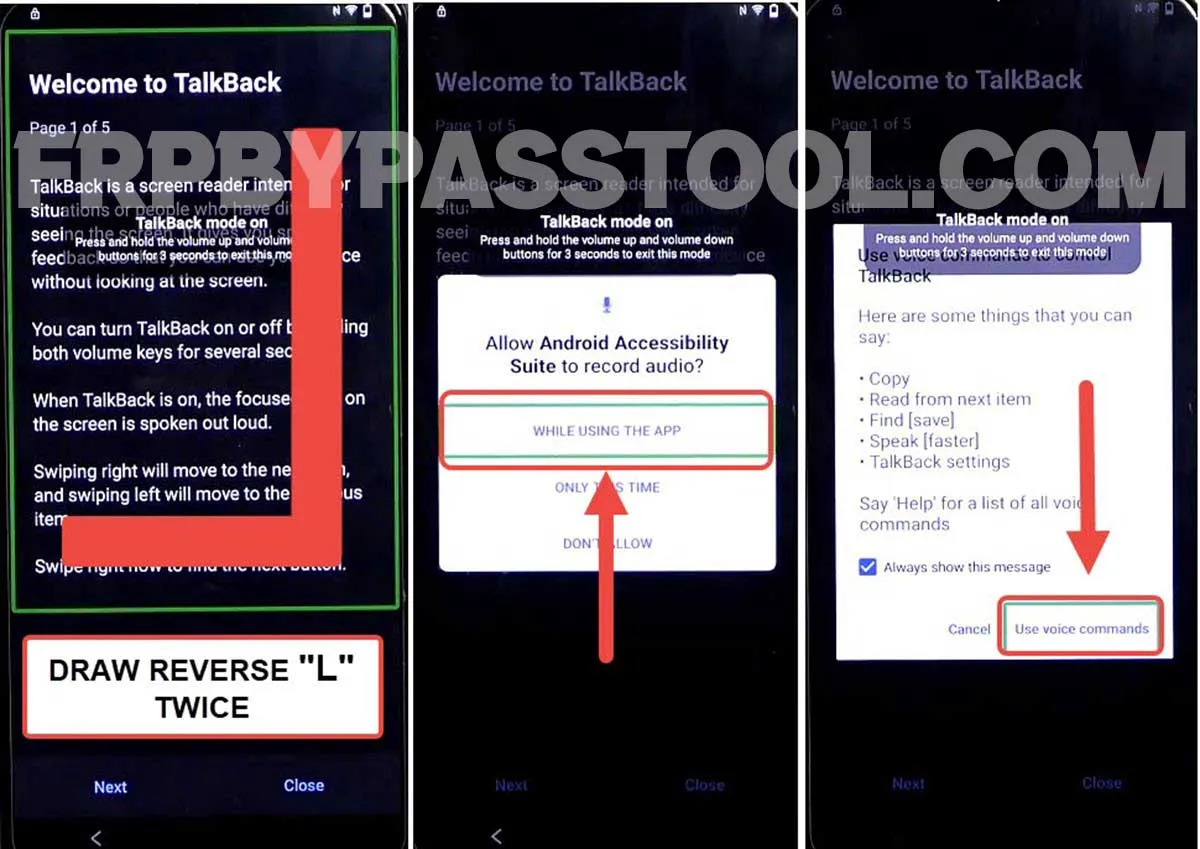
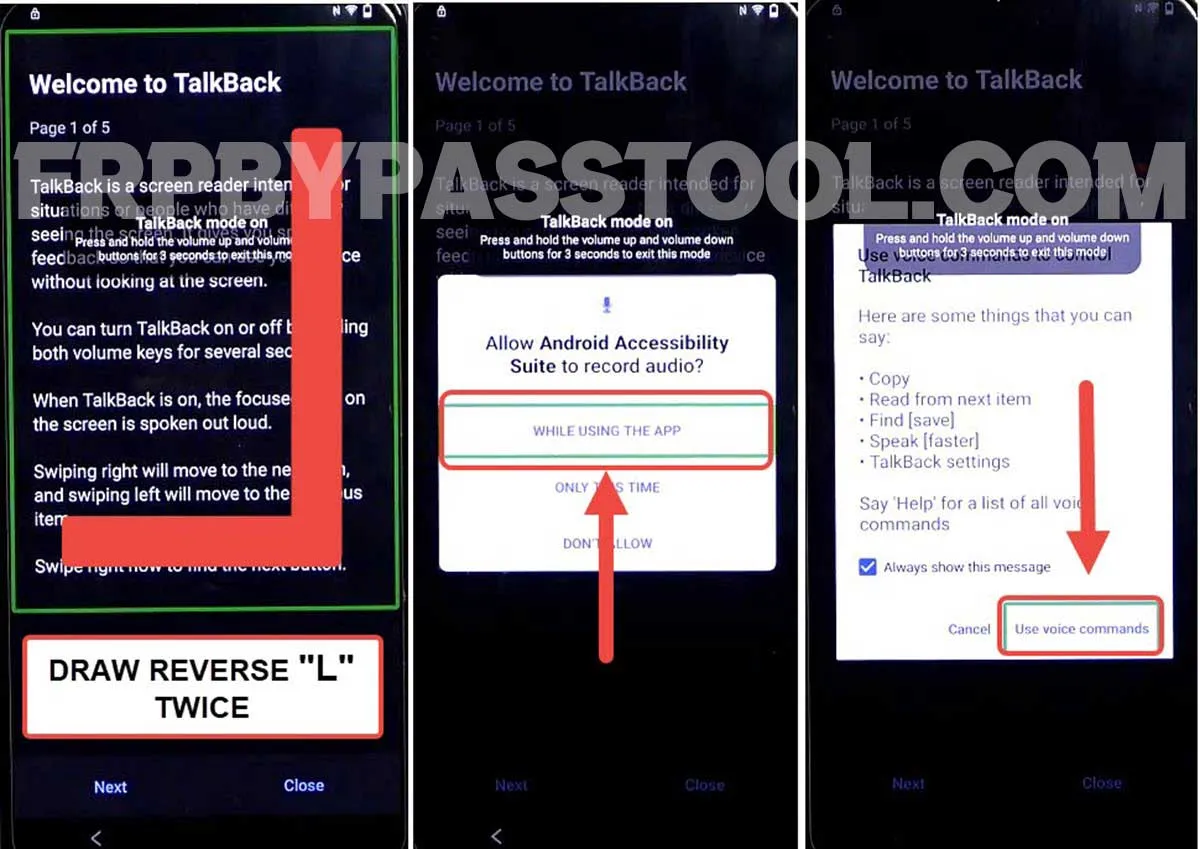
3. Once you do that, it will show a “Welcome to TalkBack” screen. Draw a big reverse “L” twice on the screen.
Then, it will show a popup message with “Allow Android Accessibility”, double tap on the “While using the app” option.
Next, double tap on the “Use voice commands”.
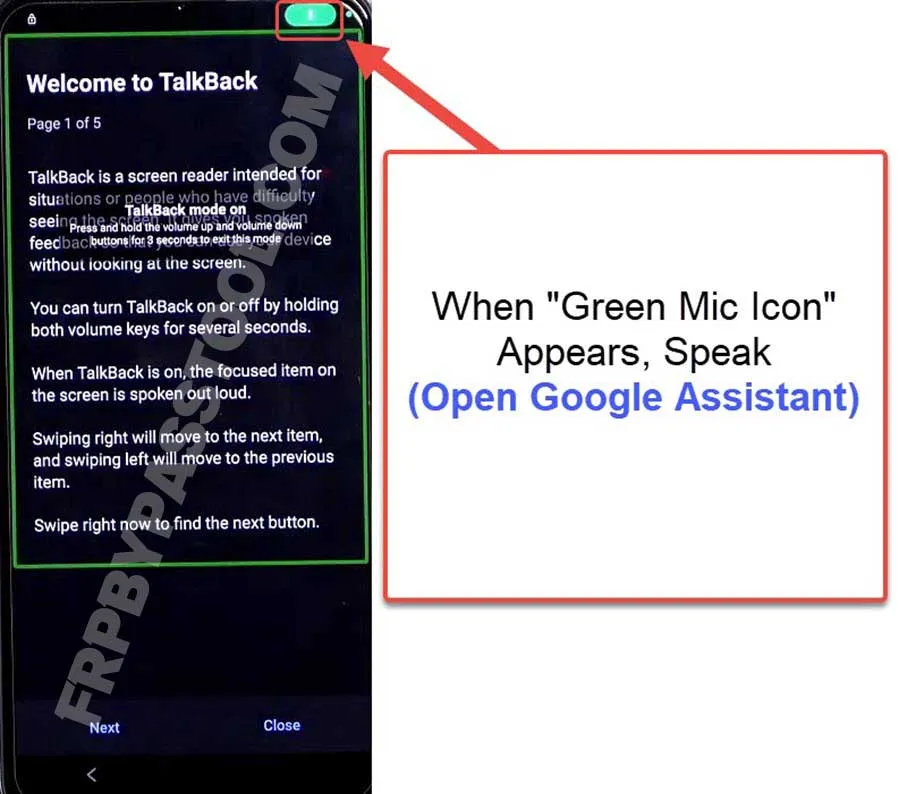
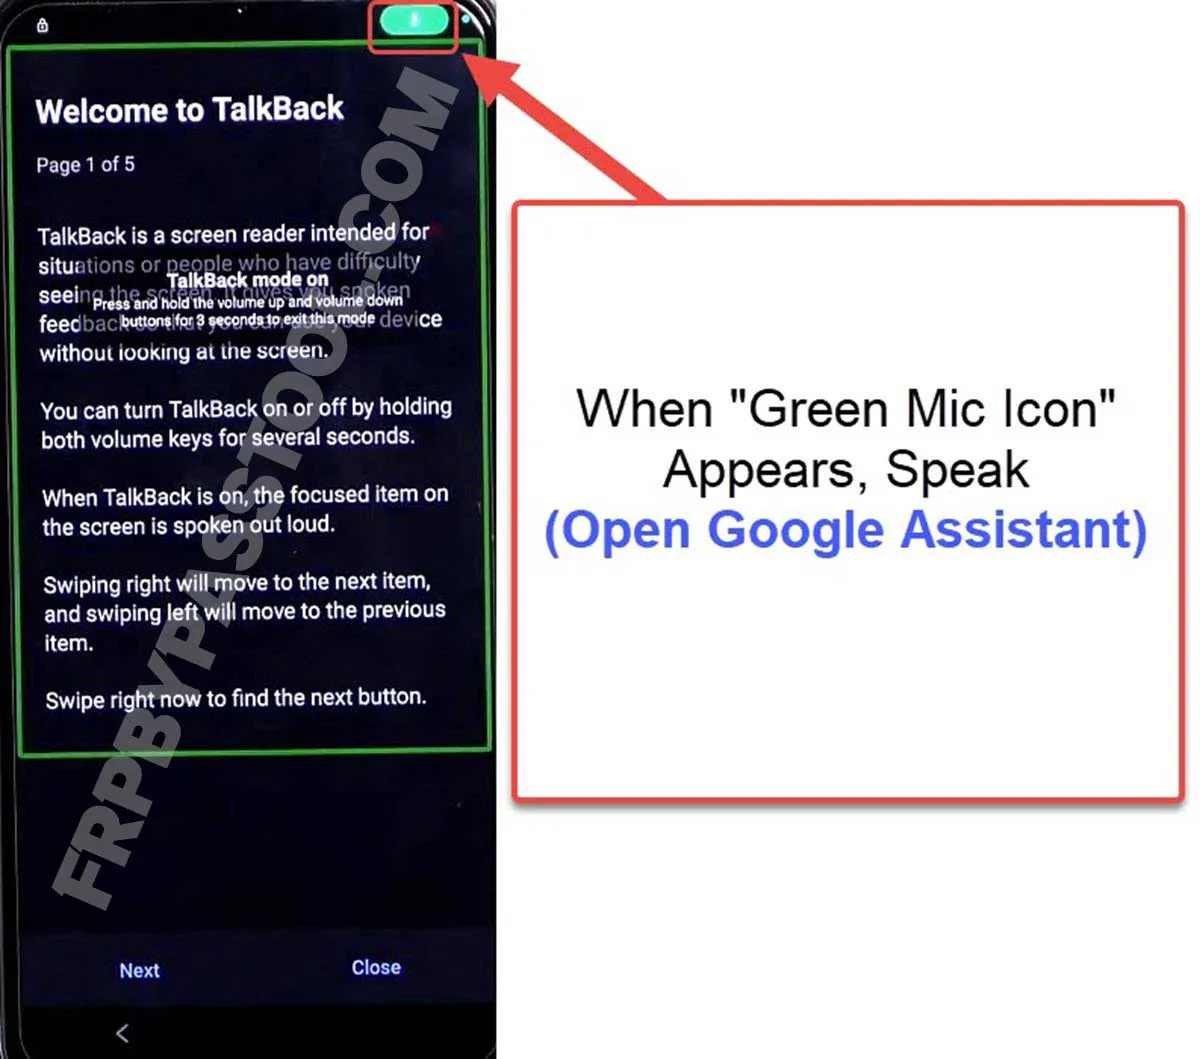
4. Just after selecting “Voice Commands”, the voice commands will activate and you should speak “Open Google Assistant”. Doing this will open the Google Assistant in your VIVO FRP-locked Android device.
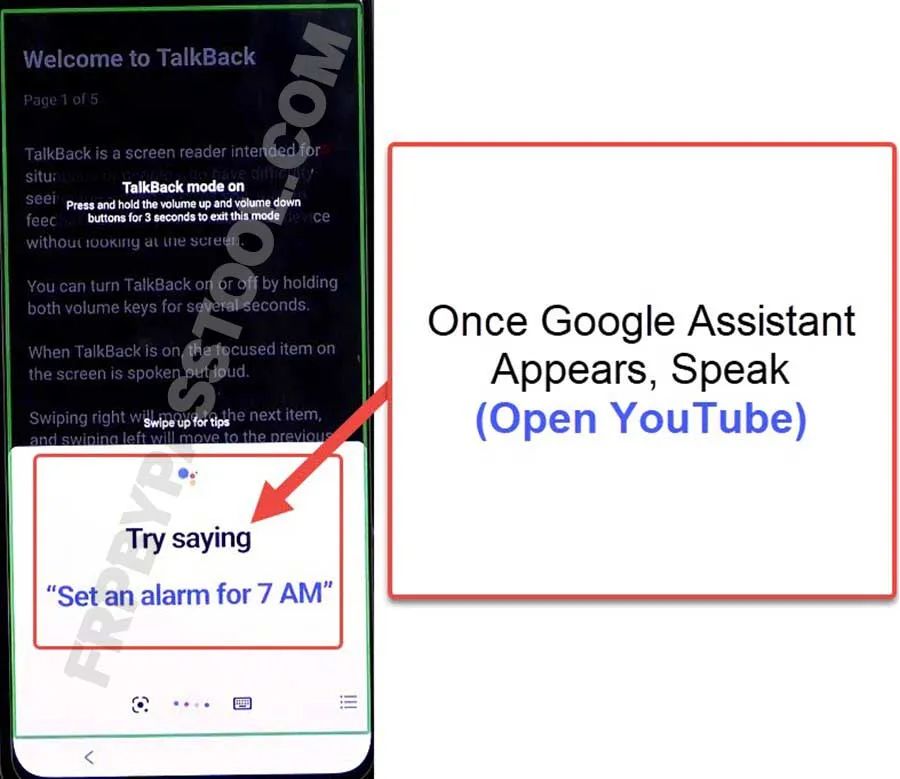
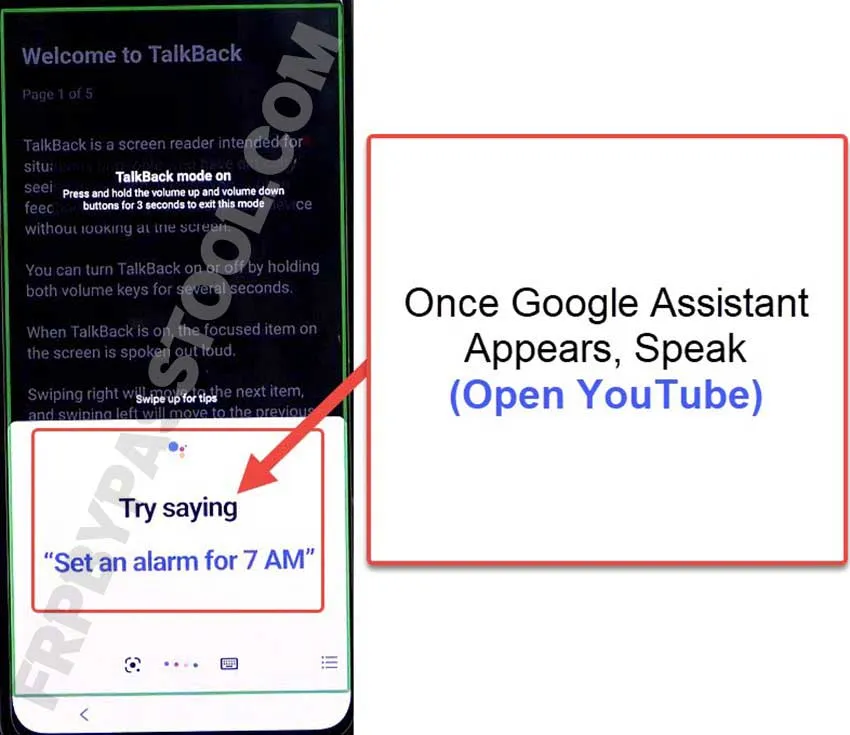
5. Once the Google Assistant appears on the screen, say “Open YouTube”.
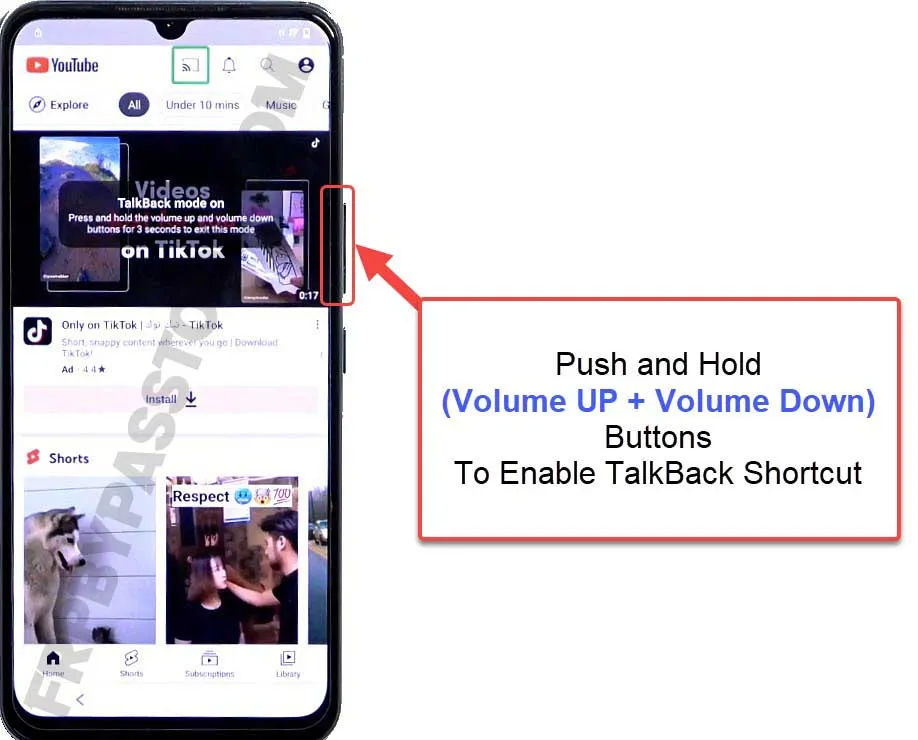
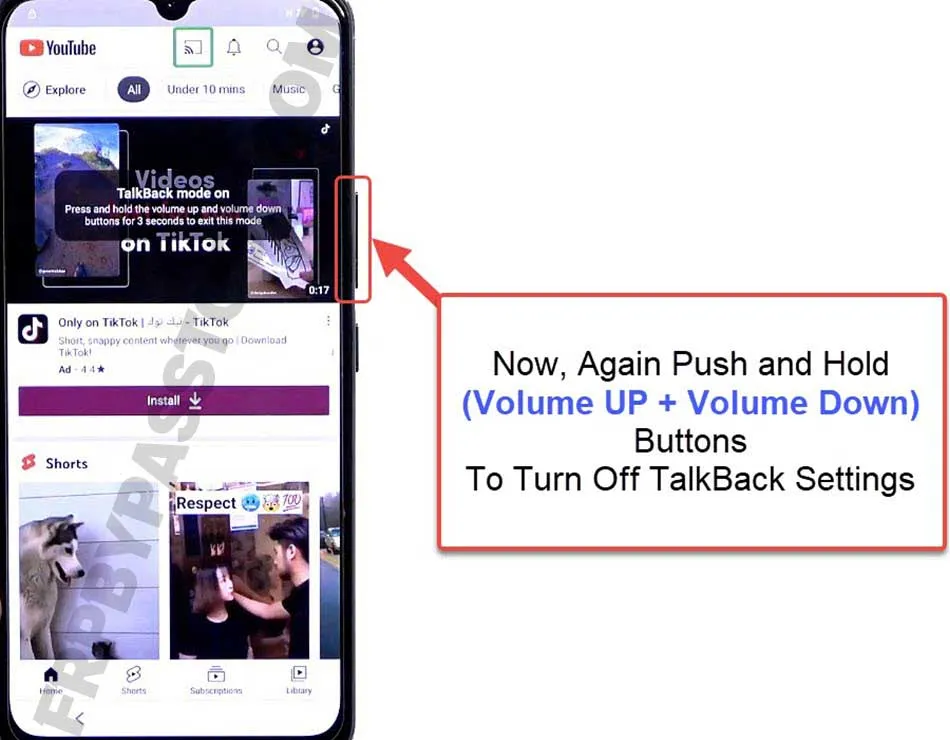
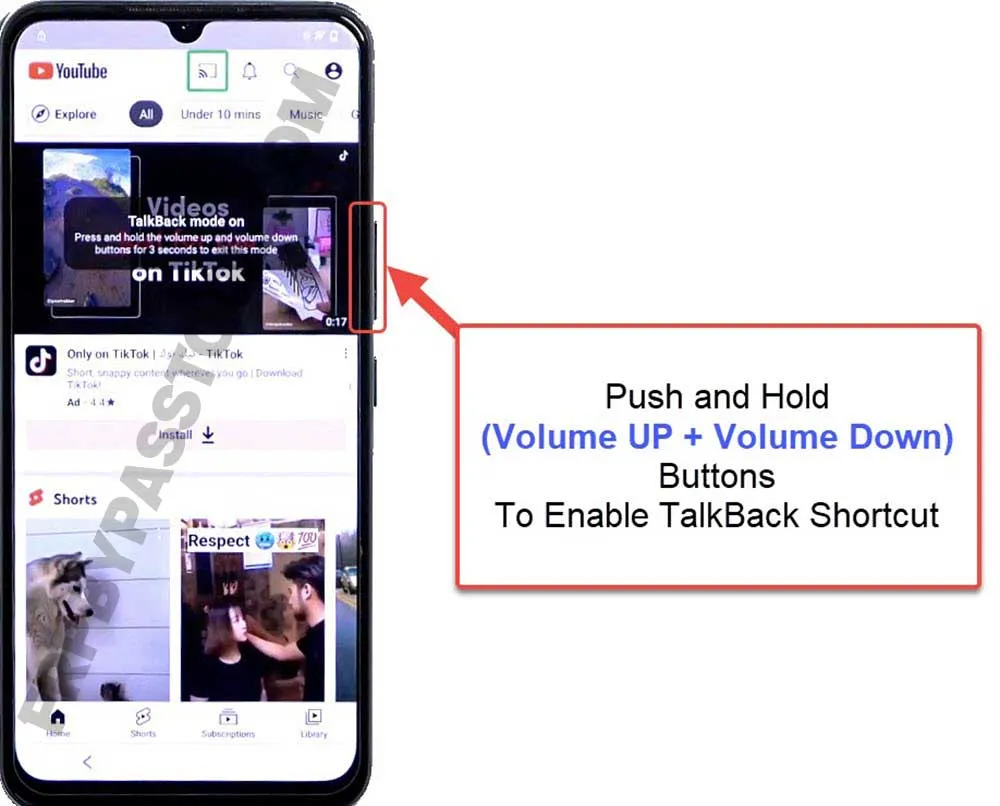
6. Next, this will open the YouTube application. Before proceeding further, we have to turn off the TalkBack Settings.
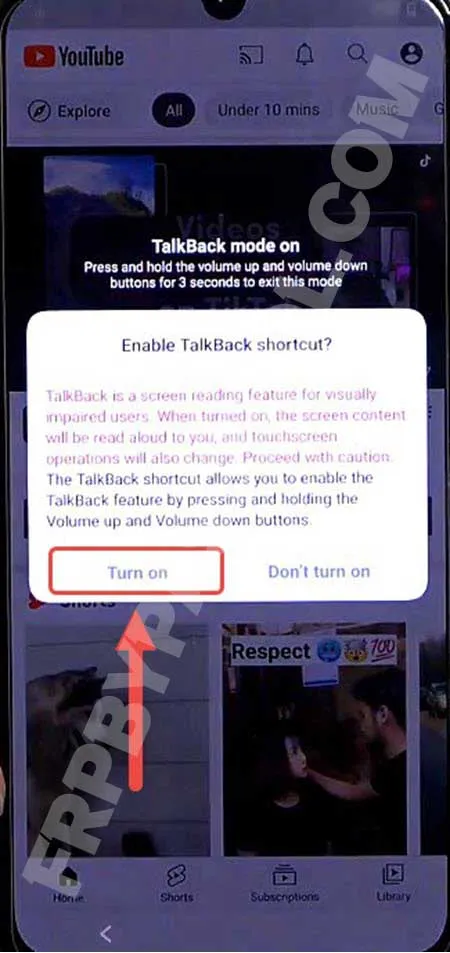
To do that, simply push and hold (Volume UP + Volume Down) both the volume buttons together.
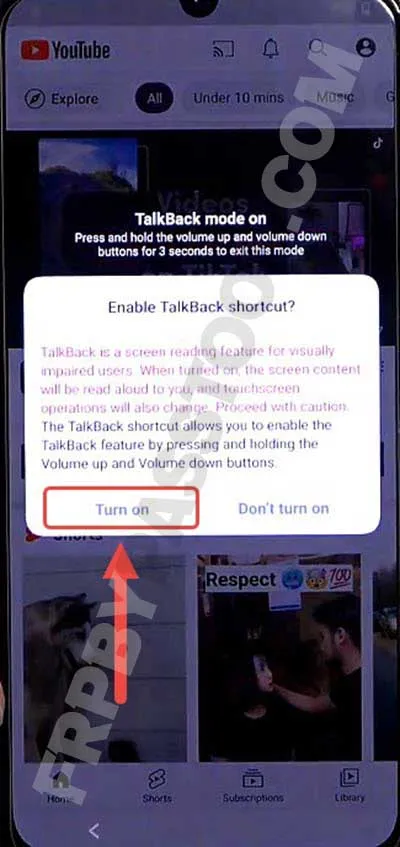
7. Keep holding until you see the “Enable TalkBack Shortcut?” popup window. Double tap on the “Turn On” option.
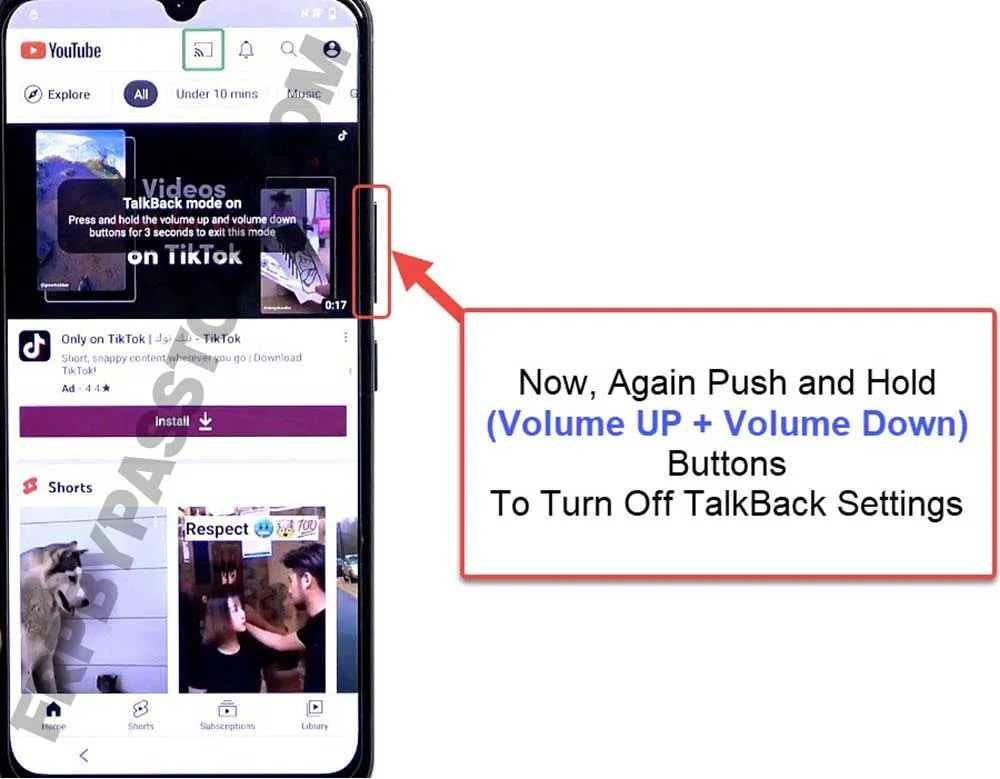
8. After that, again push and hold both the volume buttons to Turn off TalkBack settings.
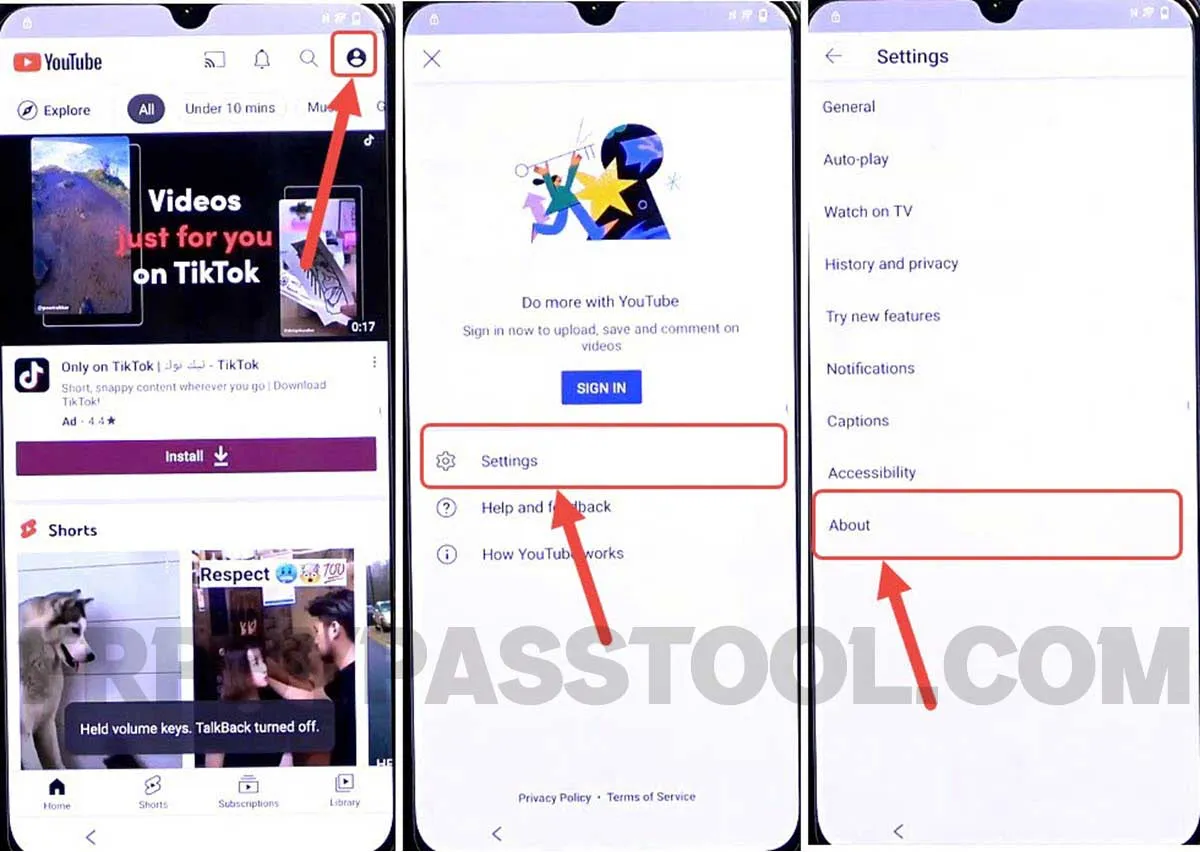
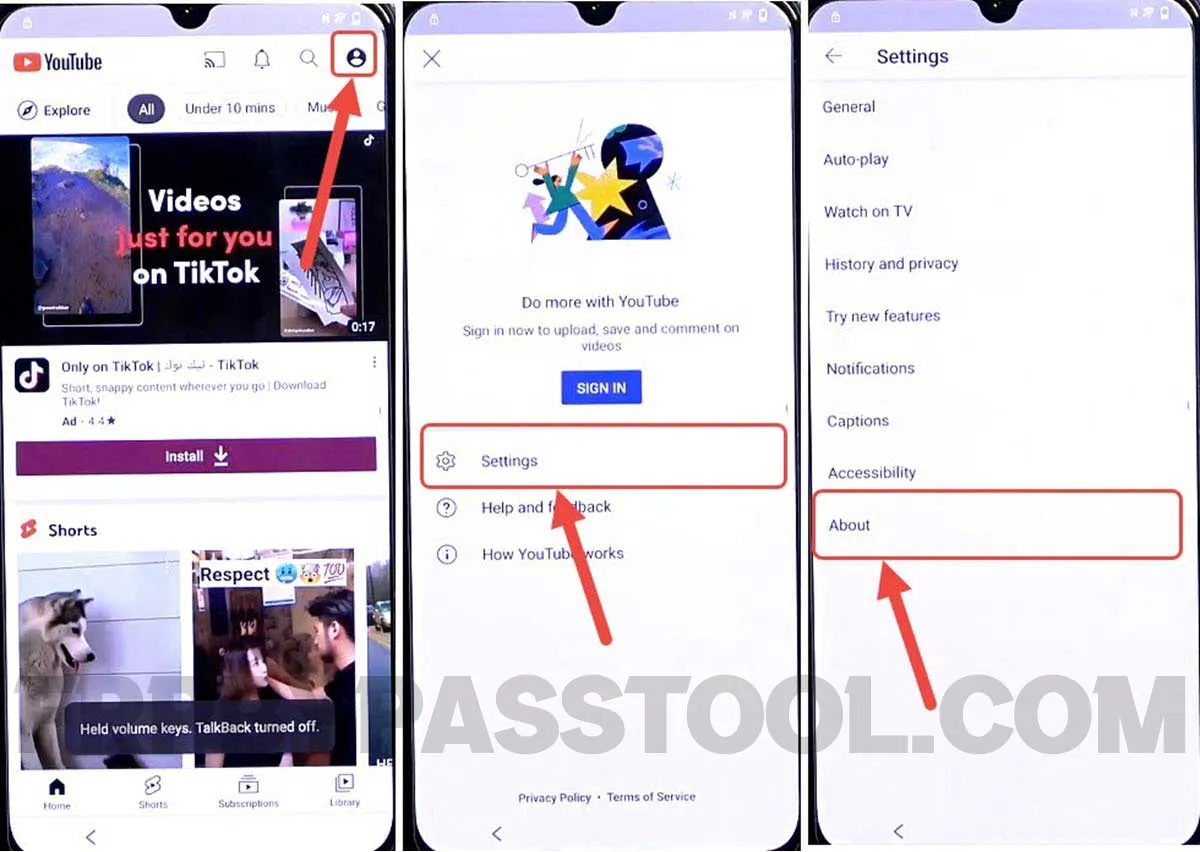
9. Next, tap on the “Account Icon” in the top left corner, and then select Settings.
Inside Settings, tap on the “About” button.
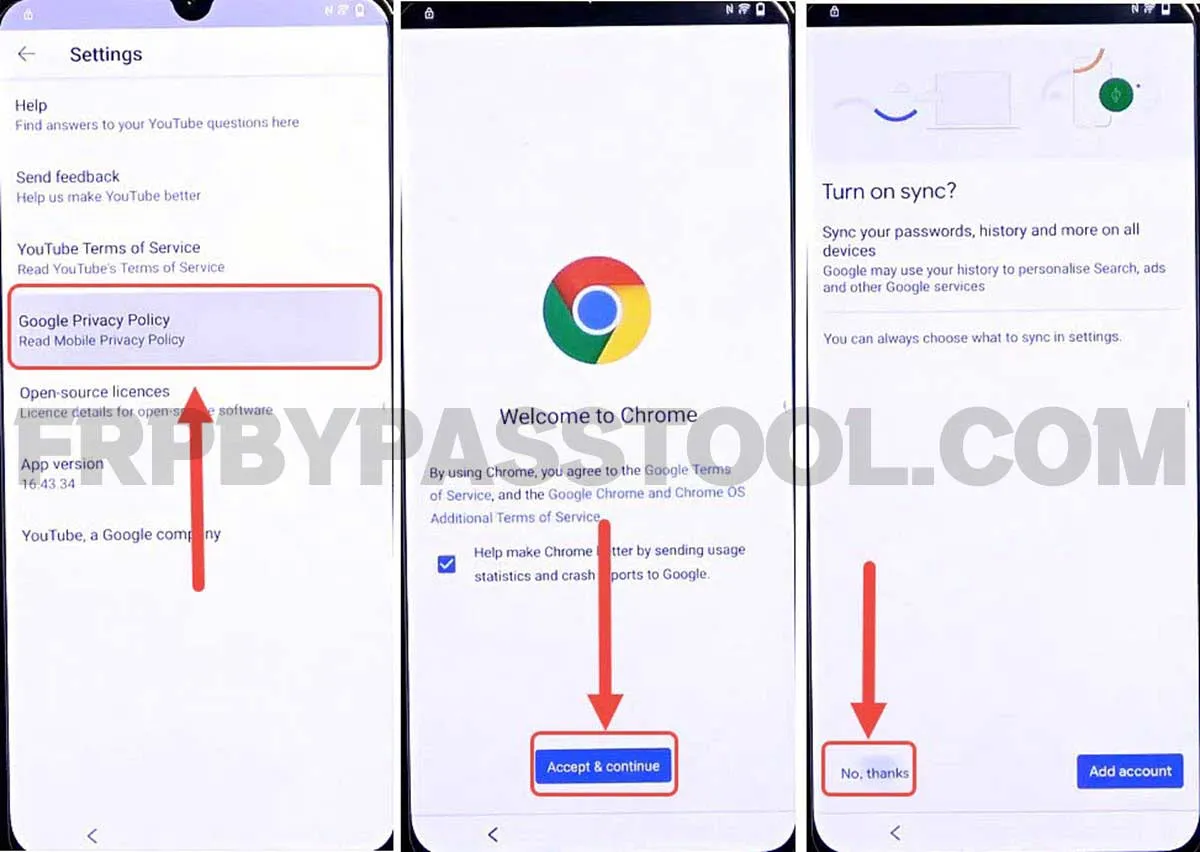
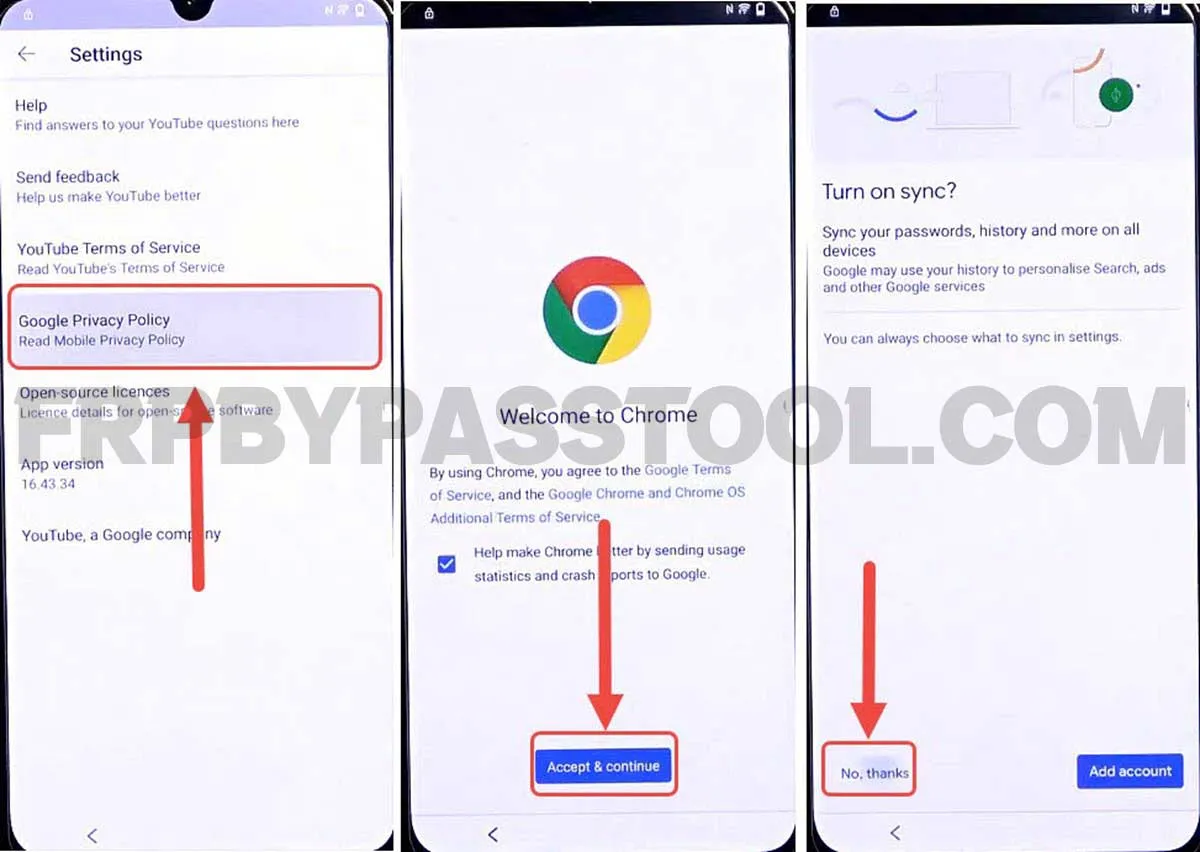
10. Next, select “Google Privacy Policy” and this will open up the Google Chrome browser.
IMPORTANT STEPS
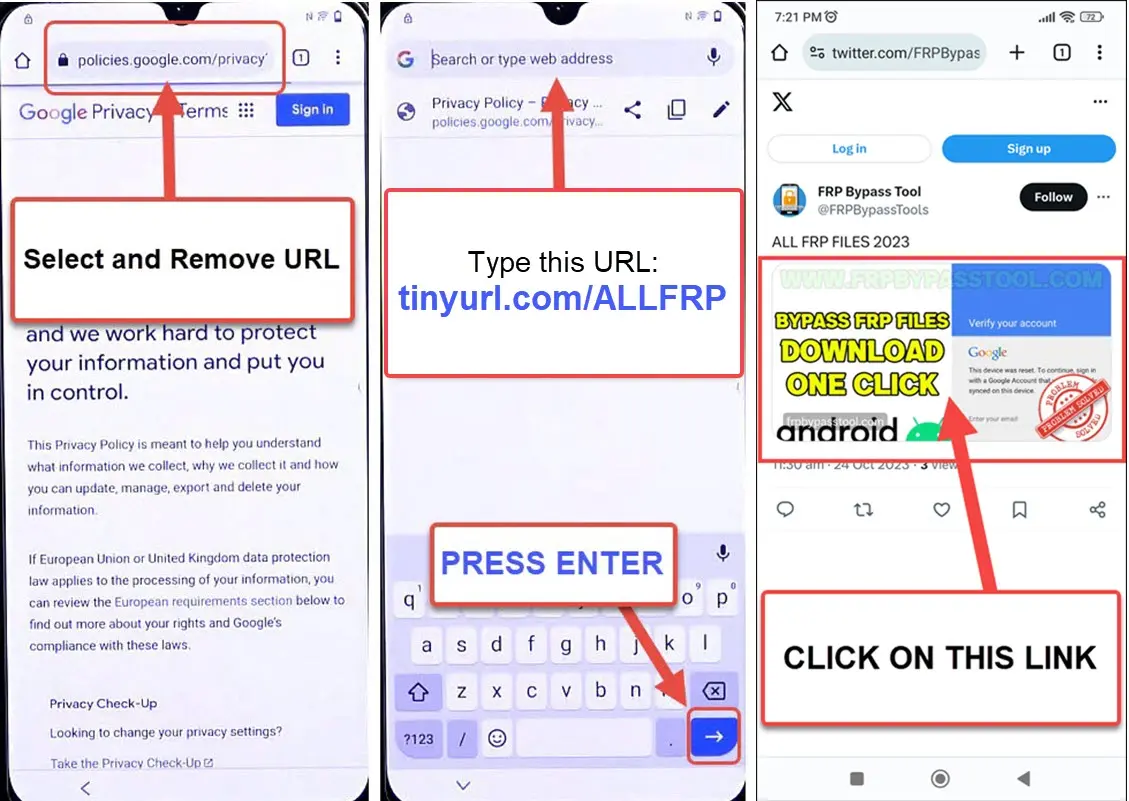
11. Select the URL bar and remove the URL. Then type and search for “Tinyurl.com/ALLFRP” by pressing the “Enter button”.
Mirror Link: tinyurl.com/allfrpfiles
Afterwards, click on the Bypass FRP Files APK link from the Twitter page of our website.
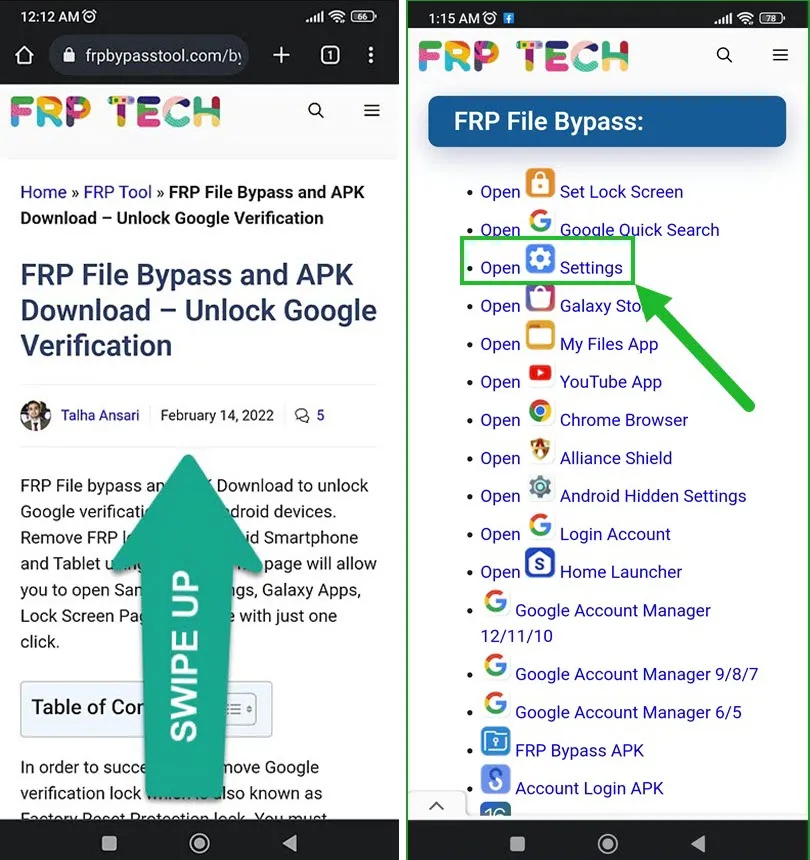
12. This will directly open the page with complete Bypass FRP Files and APKs.
13. Once you open the website, swipe up and click on the “Open Settings” application.
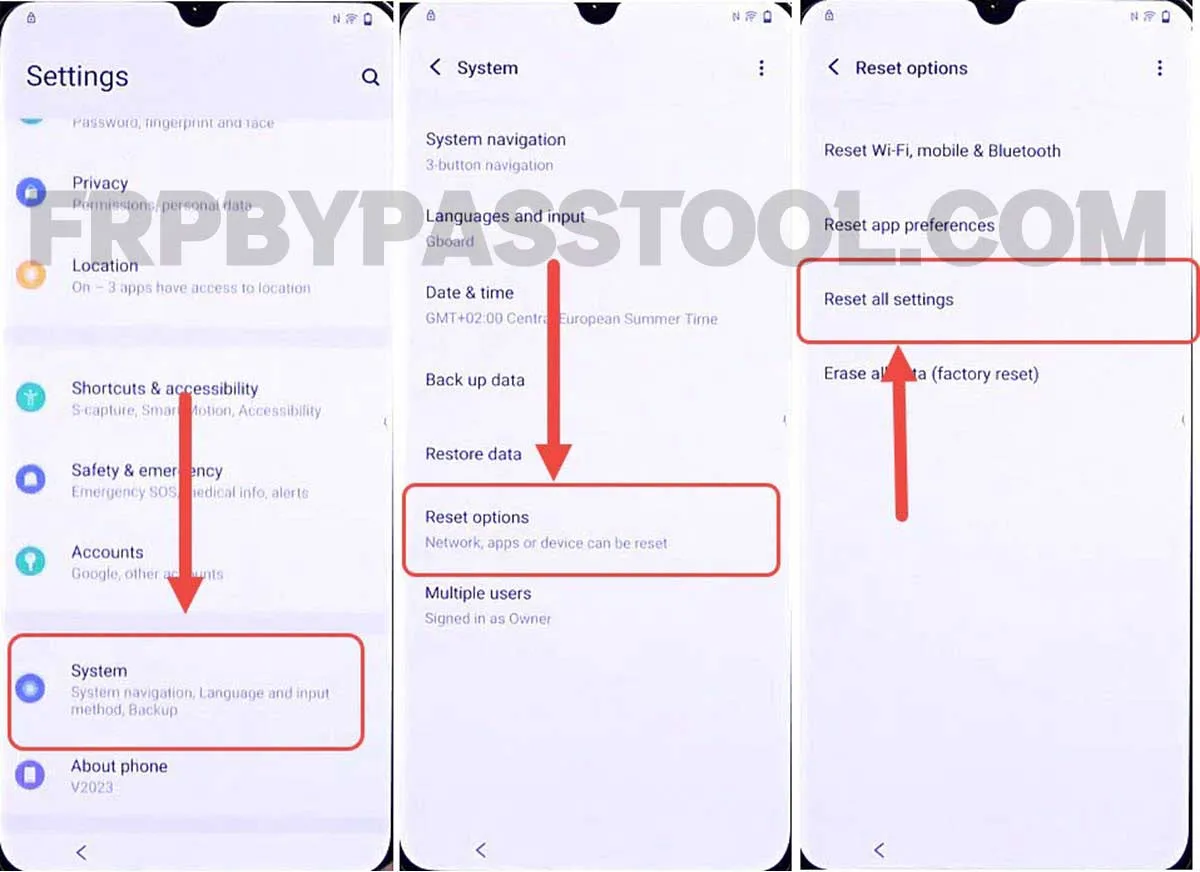
14. This redirects you to the Settings of your VIVO FRP bypass Without a PC device.
Go to the System, then select “Reset Options” and then tap on “Reset all Settings”.
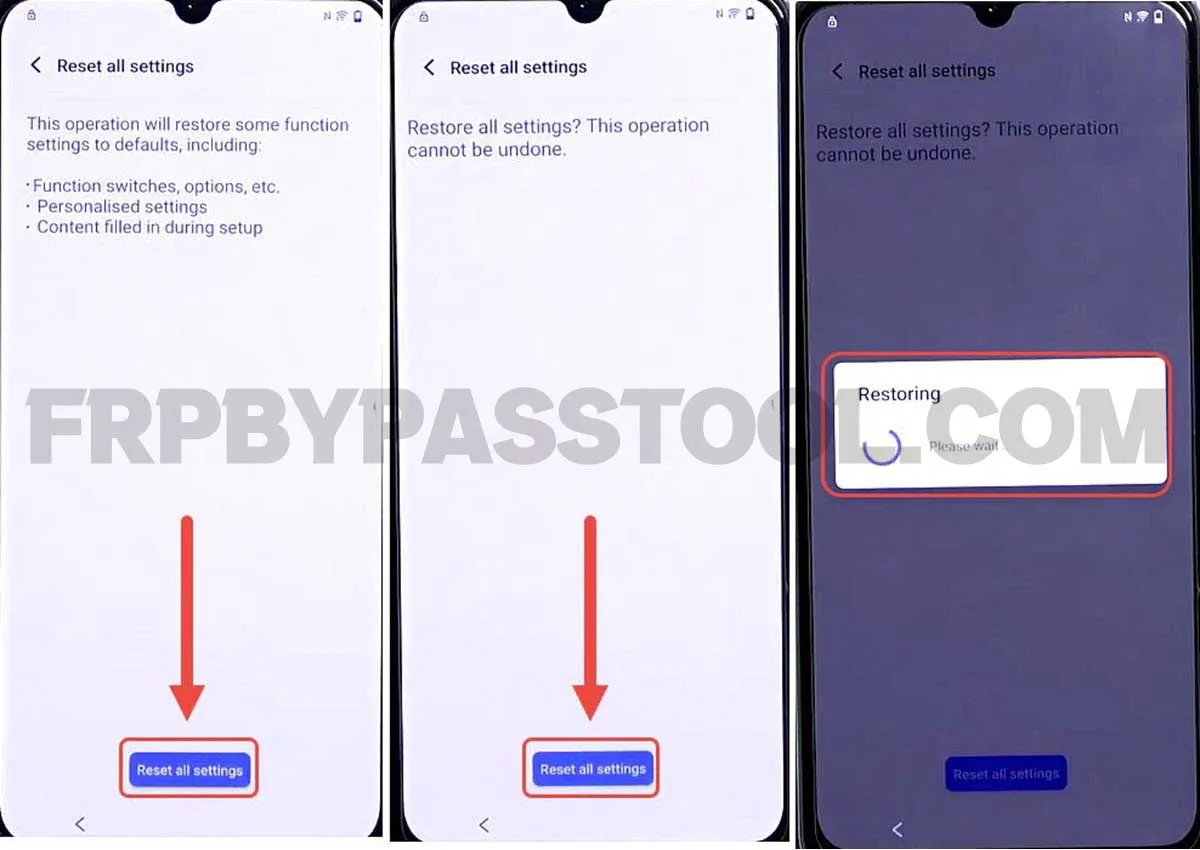
15. Next, tap on “Reset all settings”, again click on “Reset all Settings” and then finally it will start restoring the device.
16. Once the device boots back up, we need to follow the same steps to open the Chrome browser as we opened before.
To do that simply follow the below steps.
Now again, start by connecting to a Wi-Fi network and when you face Verify Pattern or Google verify your account. Go back to the welcome page.
17. Now, tap on “Reading settings”, then select “Talkback” from the given options.
After that, enable the “Use Talkback” toggle.
18. Once you do that, it will show a “Welcome to Talkback” screen. Draw a big reverse “L” twice on the screen.
Then, it will show a popup message with “Allow Android Accessibility”, double tap on the “While using the app” option.
Next, double tap on the “Use voice commands”.
19. Just after selecting “Voice Commands”, the voice commands will activate and you should speak “Open Google Assistant”. Doing this will open the Google Assistant in your VIVO FRP-locked Android device.
20. Once the Google Assistant appears on the screen, say “Open YouTube”.
21. Next, this will open the YouTube application. Before proceeding further, we have to turn off the TalkBack Settings.
To do that, simply push and hold (Volume UP + Volume Down) both the volume buttons together.
22. Keep holding until you see the “Enable TalkBack Shortcut?” popup window. Double tap on the “Turn On” option.
23. After that, push and hold both the volume buttons to Turn off TalkBack settings.
24. Next, tap on the “Account Icon” in the top left corner, and then select Settings.
Inside Settings, tap on the “About” button.
25. Next, select “Google Privacy Policy” and this will open up the Google Chrome browser.
IMPORTANT STEPS
26. After that, select the URL bar and remove the URL. Then type this URL: “Tinyurl.com/AllFRP” and then press enter.
Then click on the “Bypass FRP Files” link from our Twitter page.
27. Now this will open the FRP Tech page with complete Bypass FRP Files apps.
28. Once the website loads up, swipe up and tap on the “Open Set Lock Screen” application.
29. This redirects you to the “Protect your phone” page and from here you can easily set up a screen lock.
Before I was using a Pattern Lock in this device, now I am going to select “PIN” as a screen lock.
If you were also using the Pattern lock then, I would suggest you use “PIN” this time.
Simply, I put “1234” as my PIN lock, put any PIN lock, and then select “Confirm”.
30. Next, tap on the “Yes, I’M IN” button, and then click “GOT IT”.
After that, push the power button and Restart your VIVO FRP-locked device.
31. Now, after the device boots back up, swipe up and enter the PIN lock that you set before.
32. Next, it will redirect you to the initial setup of the VIVO device.
Complete the initial setup, Once you face “Verify PIN” simply enter the same PIN lock that you set before in step “29”.
33. After that, the Google verification lock page appears, simply tap on the SKIP button to skip the Google verification screen.
34. Next, complete the remaining initial setup steps without facing any Google account verification page.
35. Finally, we are back into our device home menu. But we still have to Factory Reset the VIVO device.
Performing Factory Reset is a crucial step to completely bypass Google account verification and Pattern, PIN, or any Screen lock that is synced to the device settings.
Factory Reset VIVO Android 13 Smartphone
1. Swipe down and open the Notification bar, and then tap on the “Gear Icon” to open Settings.
2. Next, open the System and then select “Reset Options”.
3. Now, we need to select the “Erase all data (Factory Reset)” option to completely bypass the FRP lock from the VIVO Android 13 Smartphone.
Summary
In the end, I hope you have successfully bypassed Google verification and FRP lock from the VIVO Android 13 device. This is a straightforward method, yet quite easy to follow and perform on your own. In case, you face any difficulty removing the FRP lock, feel free to comment down below.
