VIVO Y16 FRP bypass method is now live and all the users can use it to remove FRP lock. If you are looking for a working method to unlock FRP from your smartphone, then you are at the right place.
Factory Reset Protection aka FRP lock works as a security feature to protect the important data of all VIVO users. This lock automatically activates once an Android device gets a factory reset.
However, the easiest solution for this problem is to provide the correct Gmail ID and password for the Google account. In case, you don’t remember the email ID or password, then the only solution left is to FRP bypass the Vivo Y16 device.
What’s more, we also have a separate guide to use the FRP unlock tool. If you want to use a FRP tool to unlock your device, then you can use that guide. On the other hand, if you don’t want to use a PC or Computer, then this guide fits best for you.
A working guide for Android 12, 13, and 14 guide is hard to find these days. But, this one guide can easily unlock any Android version from 12 to 14. Initially, this device launched with the Android OS 12 version. But users have been upgrading the version to the latest one and now it is receiving updates for Android 14.
That being said, apply the simple steps given in the guide below to easily bypass the FRP lock from your device.
Jump to
VIVO Y16 FRP Bypass Android 12, 13
1. Connect the VIVO Y16 phone to the Wi-Fi network, and then tap on the “Add New Network” button.
Next, follow these steps to turn on the TalkBack settings in Android 13 and 14.
![VIVO Y16 FRP Bypass Android 12, 13 2024 [LATEST METHOD]](https://frpbypasstool.com/wp-content/uploads/2024/02/1-6.webp)
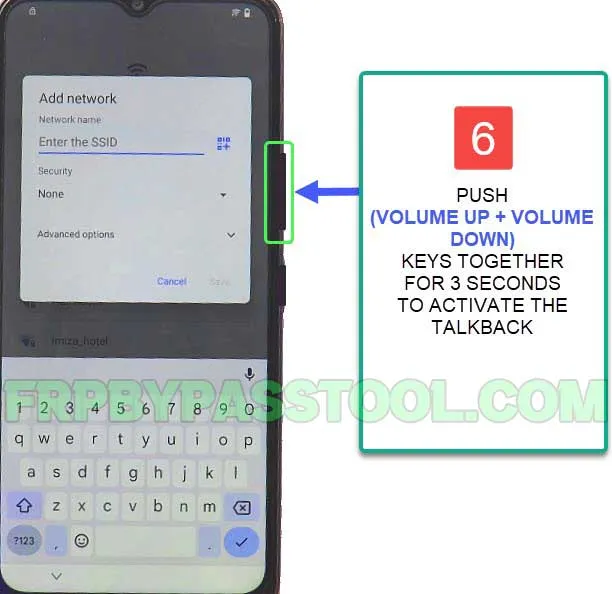
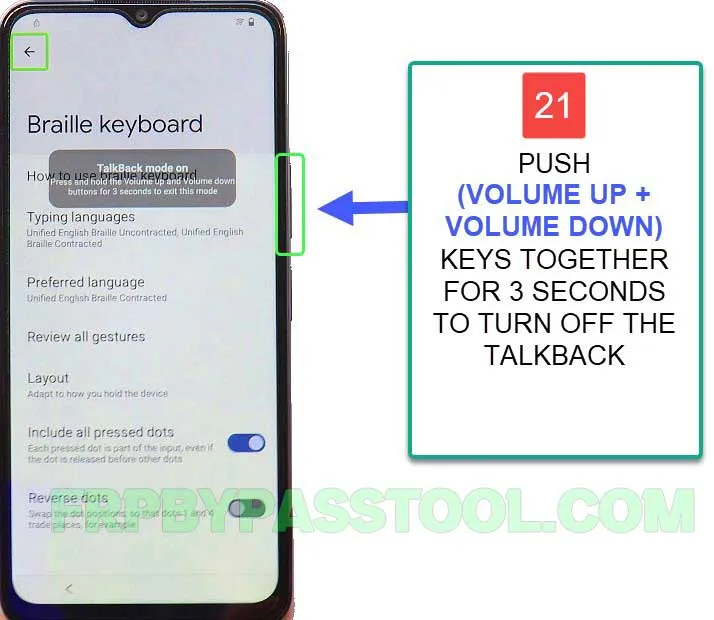
2. Push and hold (Volume UP + Volume Down) keys together for at least 2 to 3 secs.
![VIVO Y16 FRP Bypass Android 12, 13 2024 [LATEST METHOD]](https://frpbypasstool.com/wp-content/uploads/2024/02/2-4.webp)
3. And when you see the “Enable TalkBack shortcut” popup window, hit the “Turn on” button instantly.
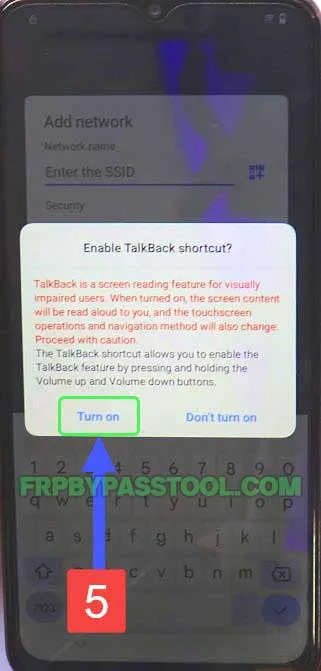
4. Next, push and hold both the (Volume UP + Volume Down) keys to activate the Talkback feature in VIVO Y16.
5. Remember, when Talkback Settings are enabled, you must “Double Tap” to select each option.
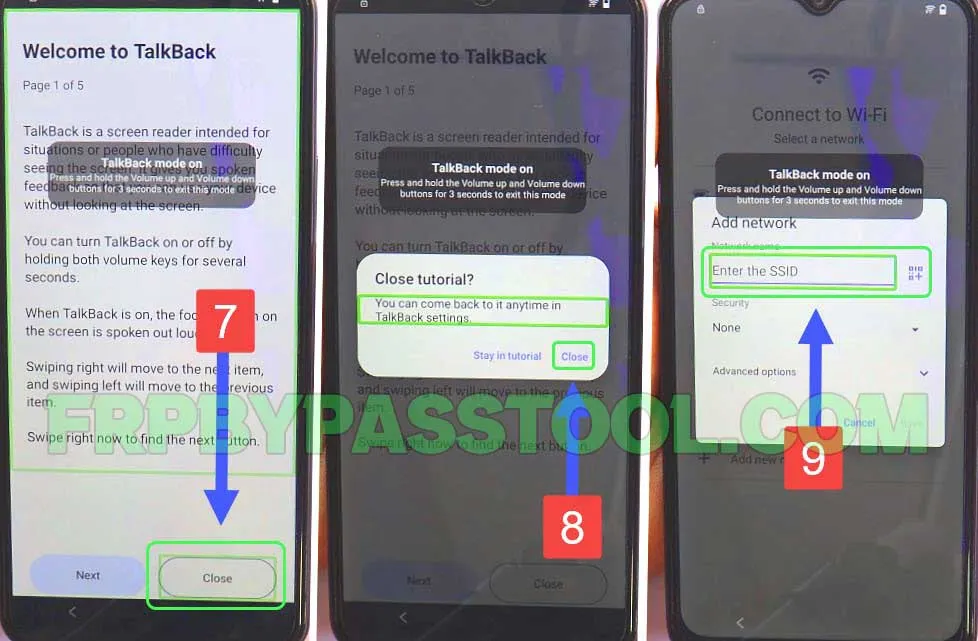
Now double tap on the “Close” option, then you need to again double to close the tutorial of the Talkback Settings.
Next, when you see “Enter the SSID of new network” double tap to select it.
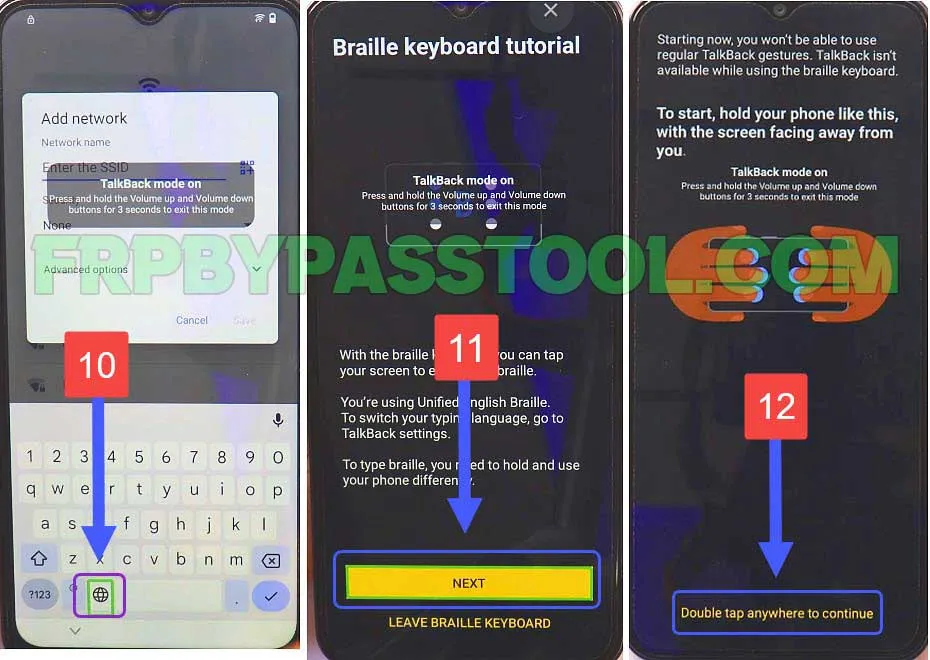
6. The keyboard will appear on the screen, simply double-tap on the “World icon” button to open the “Braille Keyboard Tutorial”.
Next, tap on the “Next” button and then double-tap on the screen of your VIVO Y16 FRP bypass Android 12, and 13 devices.
Enable Talkback Settings in VIVO Y16 Android 13 Smartphone
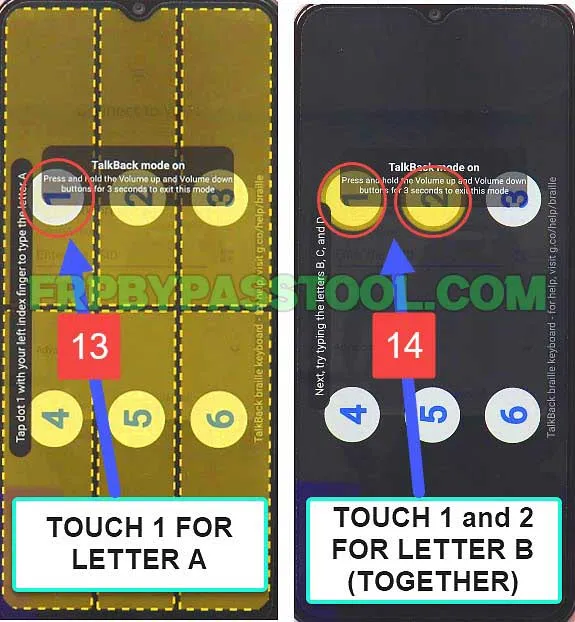
7. After that, follow these steps. We have to type “A, B, C, and D” but with the combinations of different numbers.
For example:
- Number 1 is for Letter A
- Numbers 1 and 2 are for Letter B
- Numbers 1 and 4 are for Letter C
- Numbers 1, 4, and 5 are for Letter D
First, Touch number 1 for the letter A.
Then, Touch both the numbers (1 and 2 together) to write the letter B.
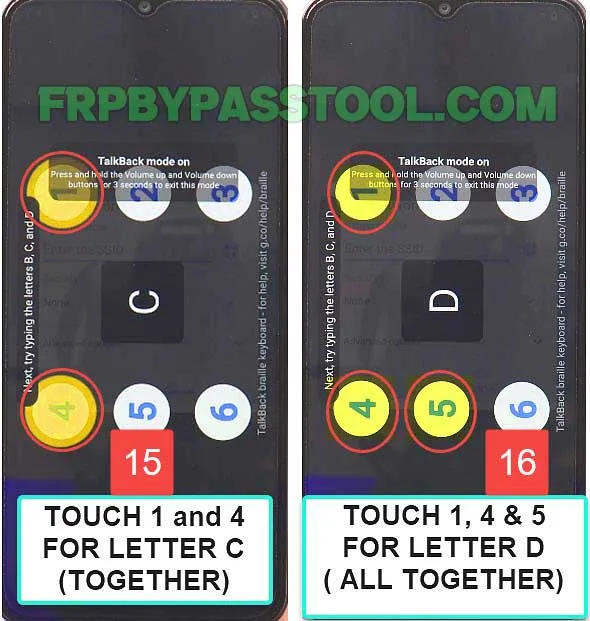
8. Next, tap on numbers (1 and 4 together) for the letter C.
Finally, touch the number (1, 4, and 5 together) to write the letter D.
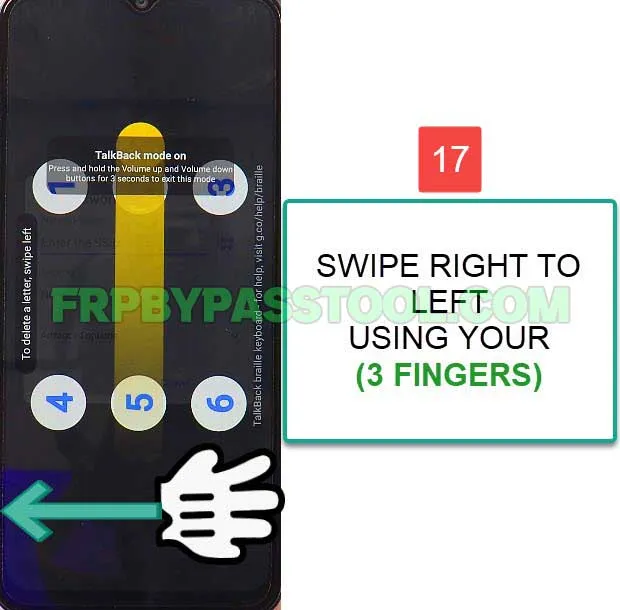
9. After that, simply swipe from (Right to Left) of your VIVO y16 screen using your (3 Fingers). This opens the Braille keyboard options.
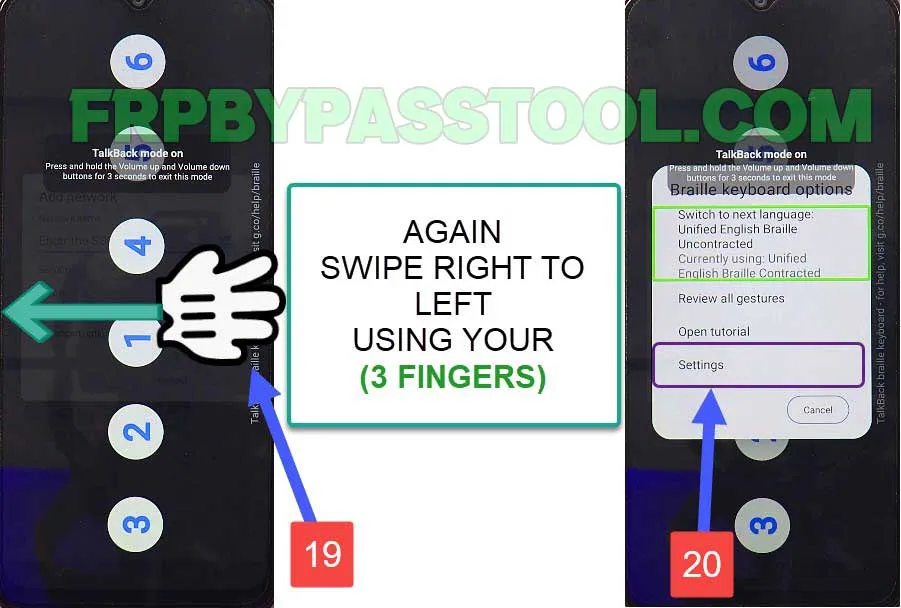
10. The Braille keyboard options will appear on your VIVO Y16 Android 12 FRP bypass screen. Now to “Finish Tutorial” double tap on this option.

11. Next, again Swipe (Right to Left) with your 3 fingers together, and this time double tap on the “Settings” option.
Turn off the TalkBack Settings
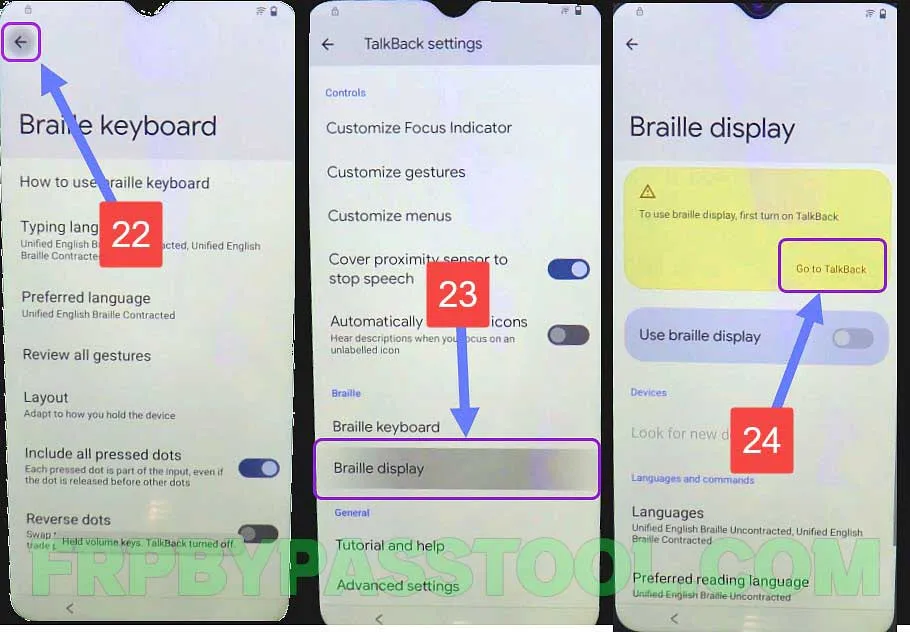
12. Now we need to push and hold both the volume buttons together to turn off the Talkback settings.
13. Now go back <, and then open Braille display, and click on Go to Talkback.
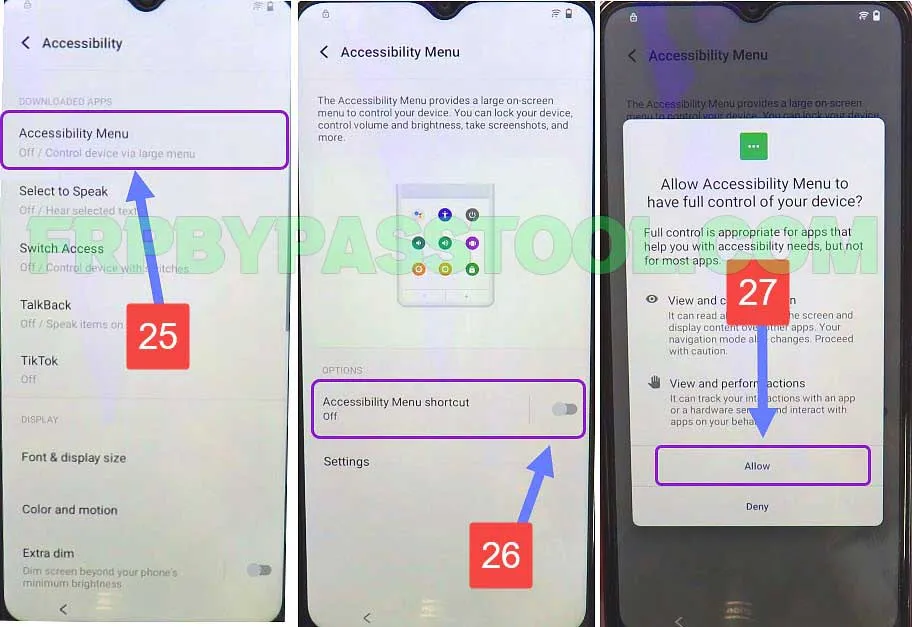
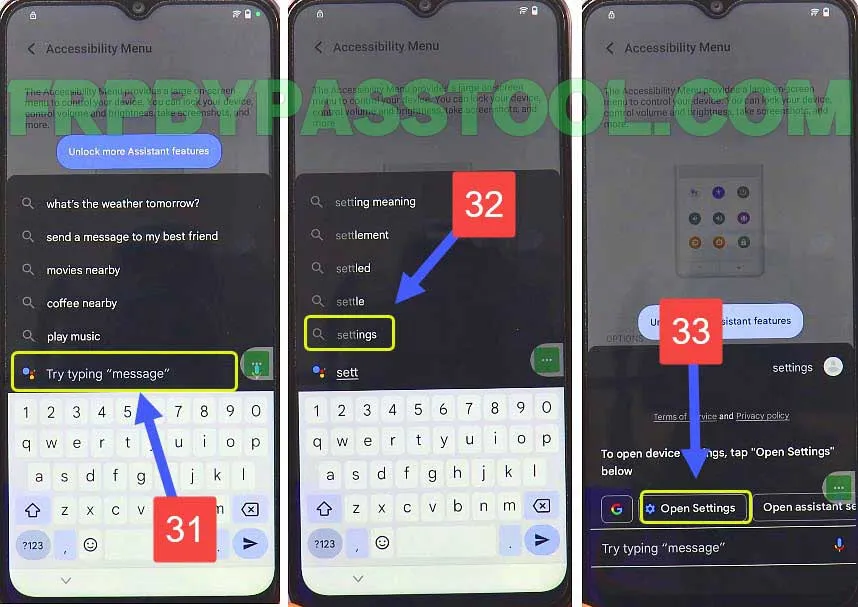
14. Next, tap on “Accessibility Menu” and then switch on the shortcut of this menu.
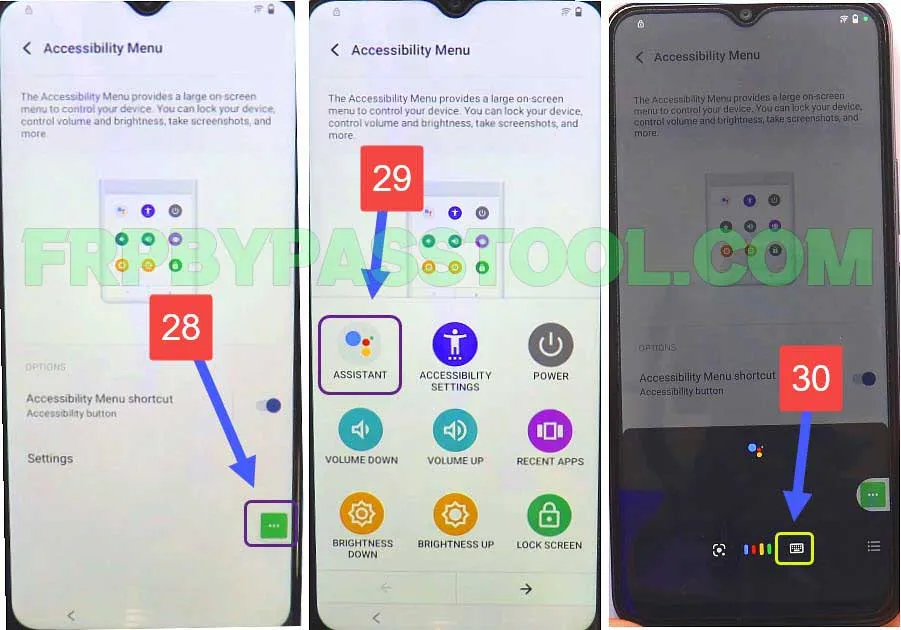
15. Then, tap on the shortcut icon and select “Assistant”. This will open the Google Assistant for you, now tap on the (Keyboard icon).
16. Type and search for Settings, and then select “Open Settings” from the results.
17. Next, go to system > then select Phone Clone > and then agree.

18. Select New Phone > then select Android, this will open the QR code scanner.
Select Android, if your 2nd phone is an Android phone, otherwise, select “iPhone” if you have an iPhone.
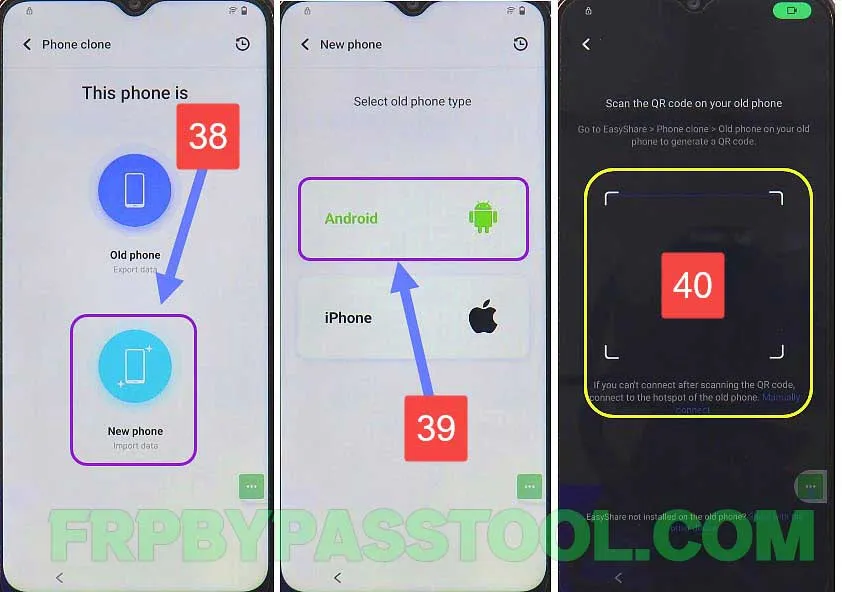
Next, it will open the “QR Code Scanner”, here we need to scan the QR Code of the 2nd Android Phone.
Simply, open the Clone Phone app on any 2nd smartphone.
Follow the Steps on your 2nd Android Phone:
1. Go to the Play Store and then install 2 applications.
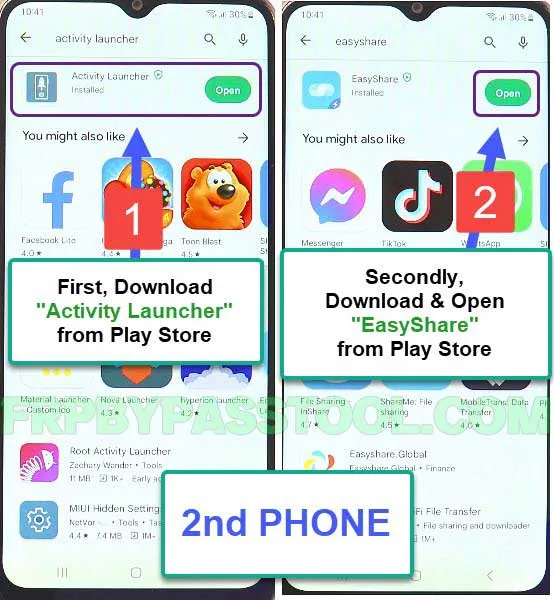
- Activity Launcher
- EasyShare
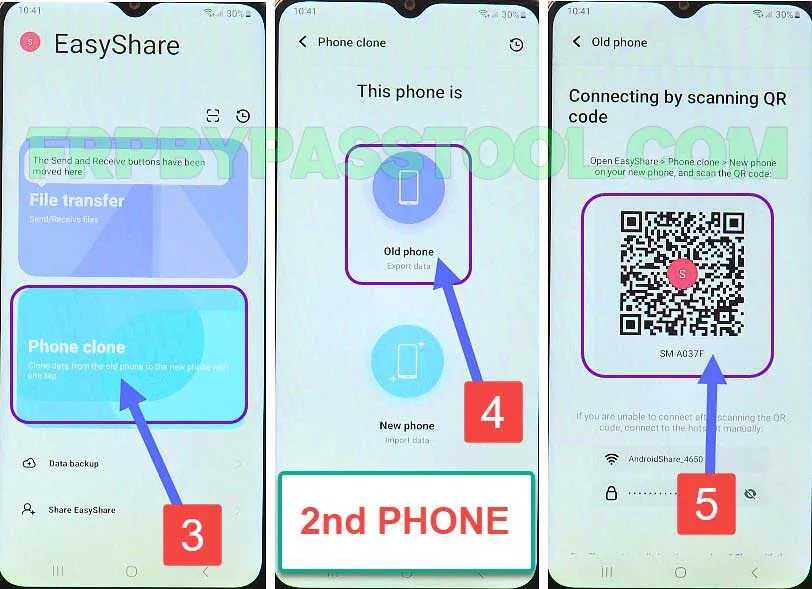
2. Open the EasyShare app, and then select “OLD PHONE” and this will give you a unique QR code.
Now, simply scan this QR code using the VIVO Y16 FRP Locked device.
3. Once you connect both phones, go to apps inside your 2nd phone, and then select the “Activity Launcher” app.
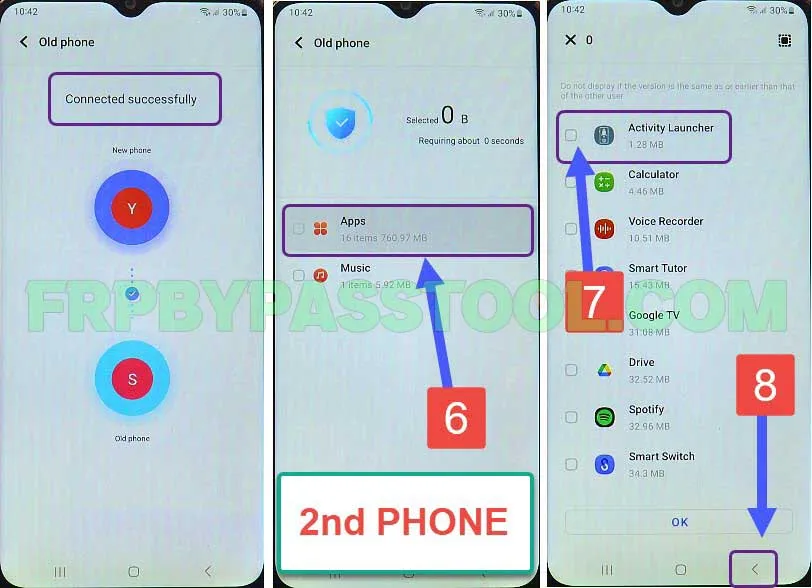
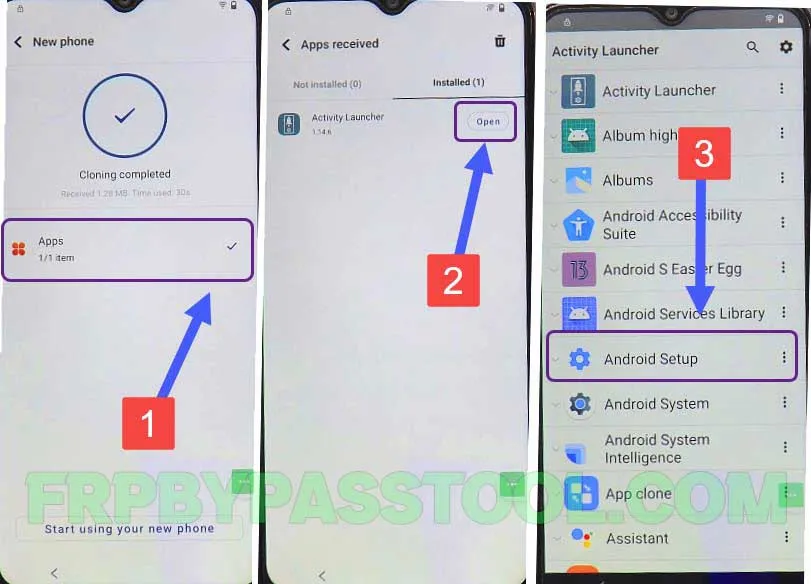
4. Then, go back and tap on “Start Phone Clone”. In a few seconds, this application will be transferred to the VIVO Y16 Android 13 FRP bypass device.

5. Now go to the VIVO Y16 phone, open Apps >, and open the Activity Launcher app.
Inside the app, go to (Android Setup).
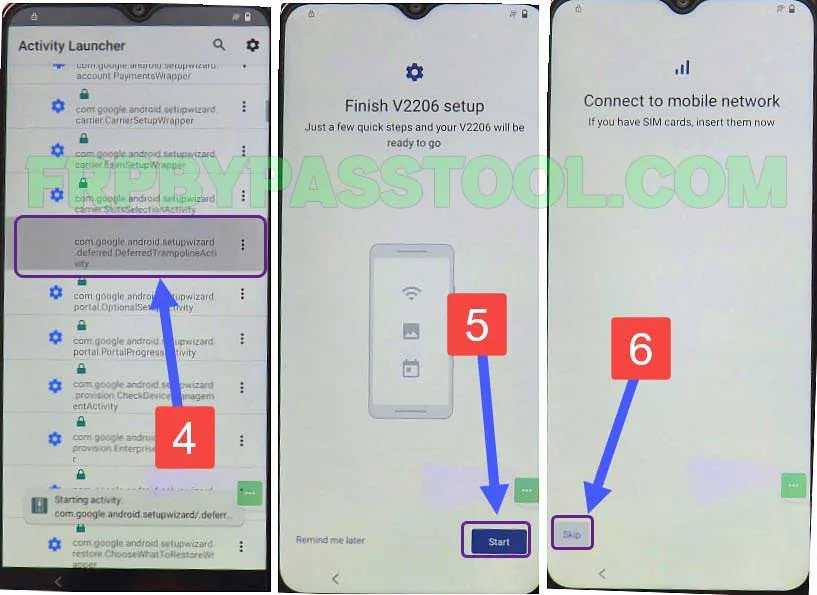
6. Now, open the (com.google.android.setupwizard.deffered.DefferedTrampolineActivity), and then click on the Start button.
Skip the Connect to mobile network screen.
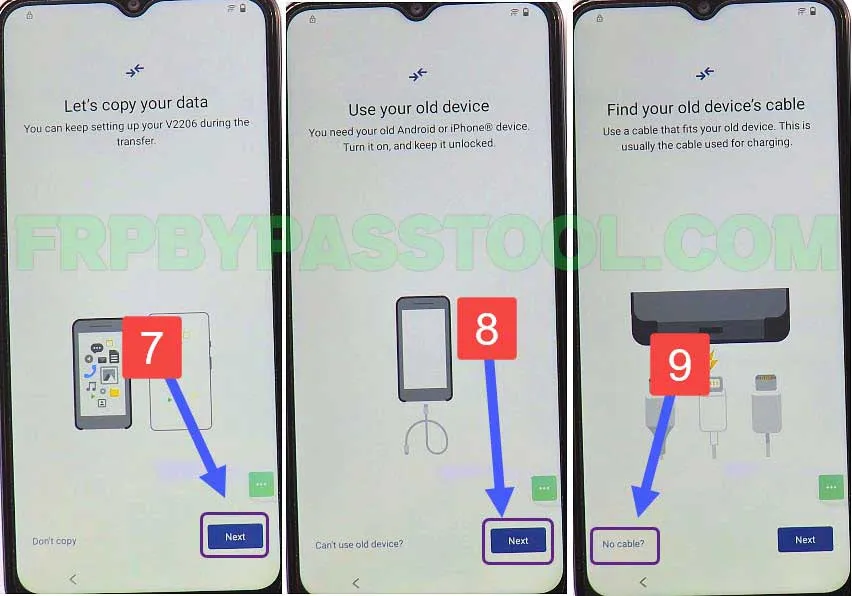
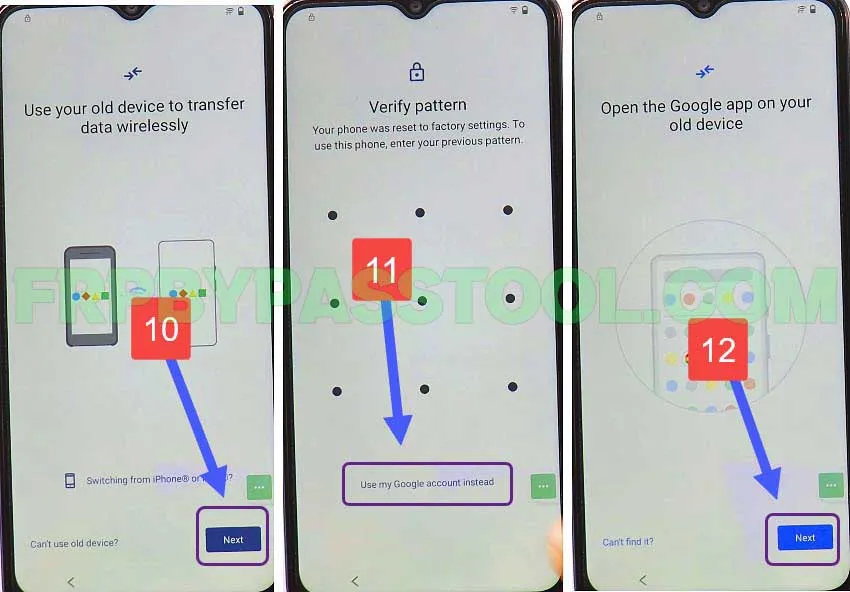
7. Push the next button on Let’s copy your data > and then again push next. When you see Find your old device’s cable screen, simply select the “No cable” option.
Bypass Google Account Verify Screen from VIVO Y16
8. After that, select Next > and then it will show the (Verify Pattern) screen, or tap on Use my Google account instead.
And the next screen will ask you to open the Google app on your old device.
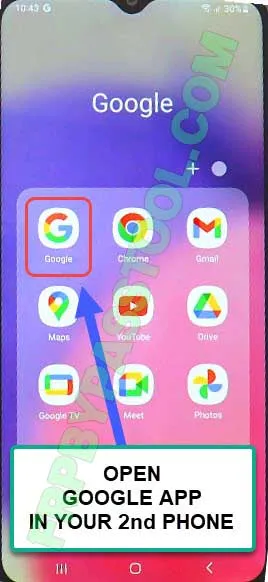
9. Now go back to your 2nd Android phone and then open the Google app.
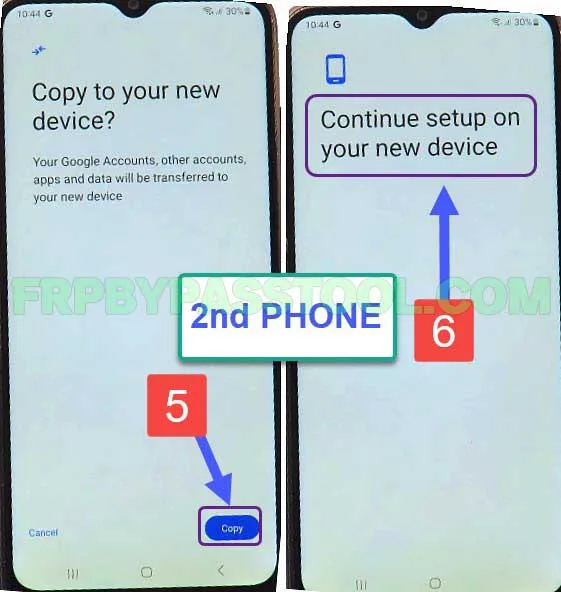
10. Once it appears, tap on the (Mic icon) say “Setup my device” and push the Next button.
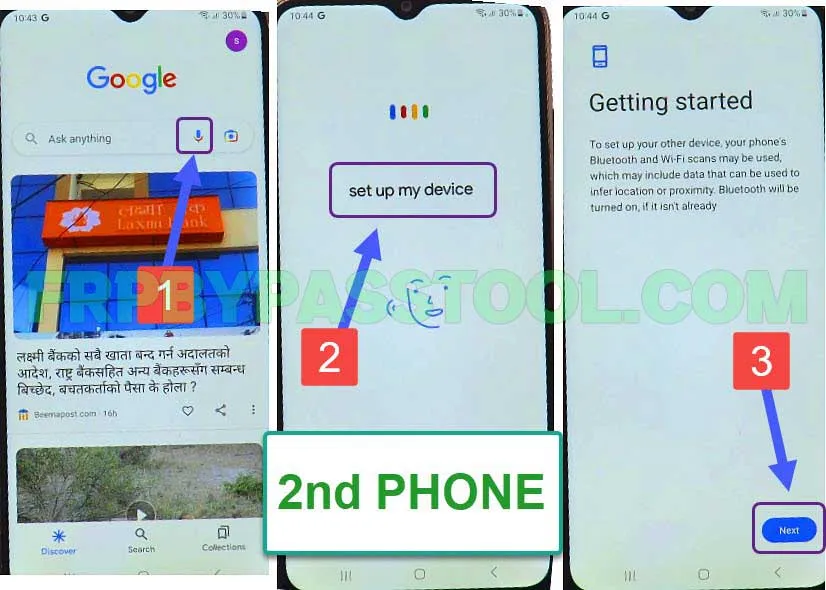
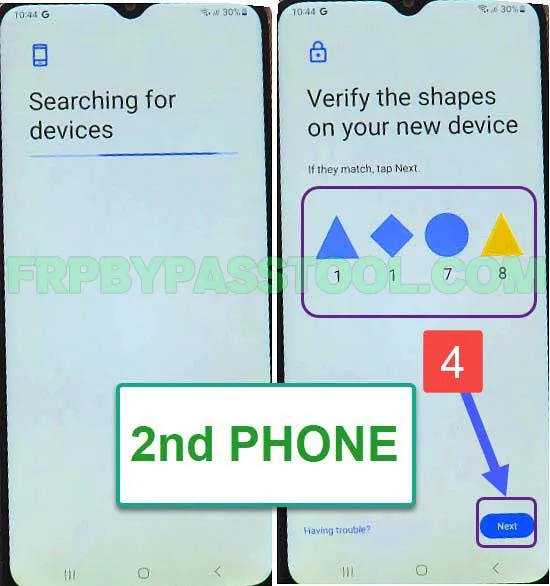
11. Now it will start searching for the VIVO Y16 FRP lock device.
Simply verify the shapes by typing the numbers on your VIVO y16 phone.
12. After that, tap on the copy button, and then it will start copying the Google account from your 2nd Android phone.
13. This is the Google account of your 2nd Android phone, simply enter the login password and it will copy the account to the Vivo y16 device.
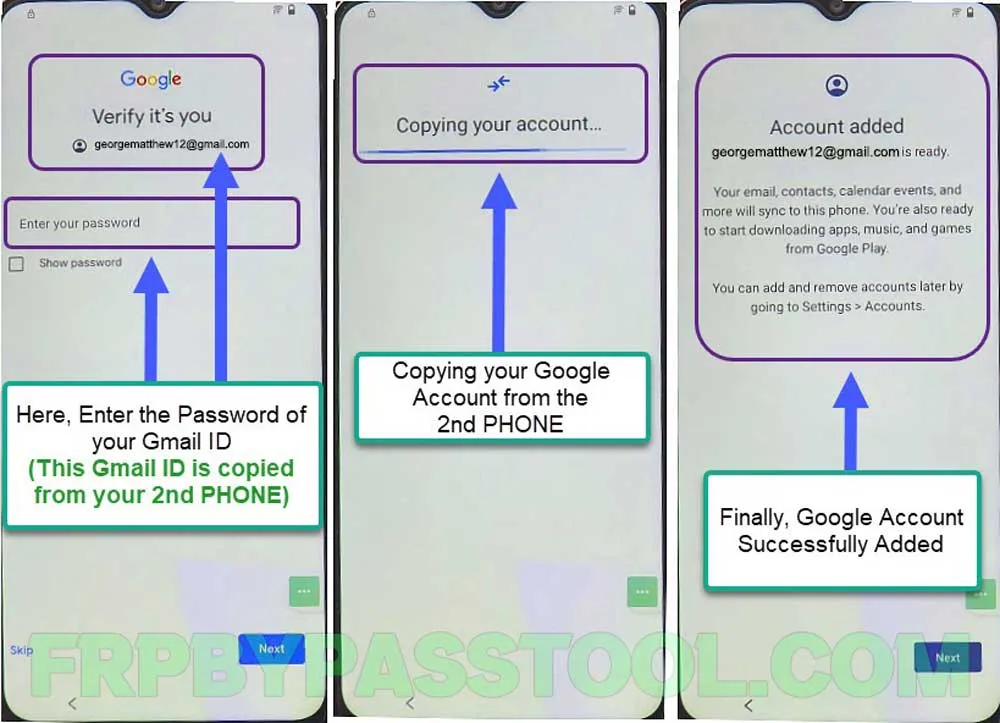
14. After that, you will see the Account Added screen on your FRP-locked device.
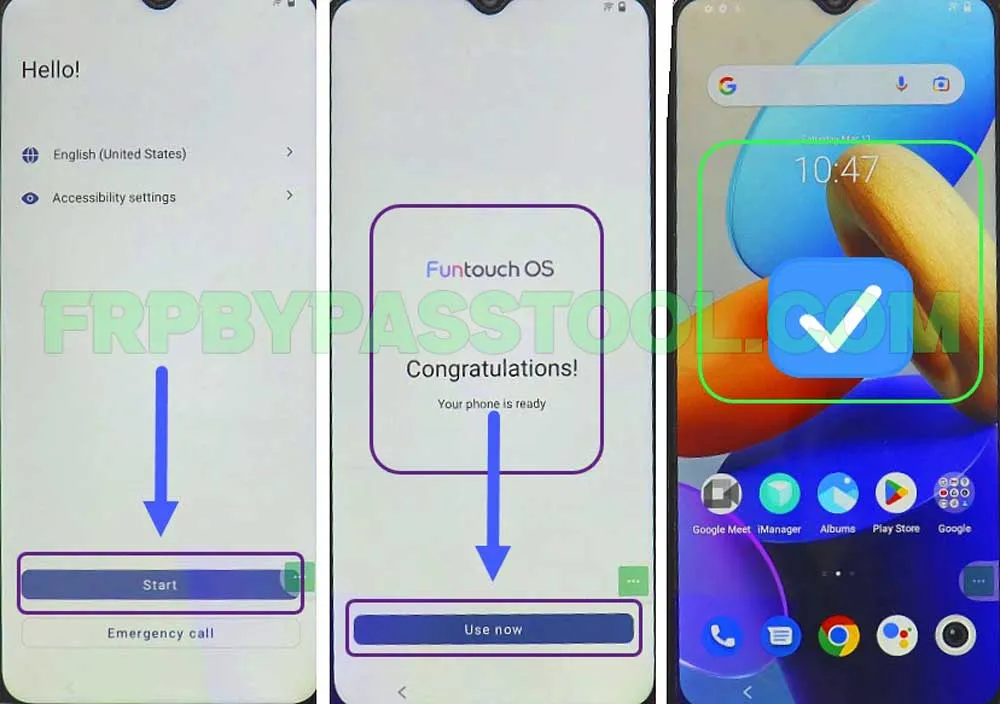
Then push the next button, and complete the rest of the initial setup without facing the Google account verification screen on the VIVO Y16 smartphone.
Conclusion
VIVO Y16 Android 12, 13 device is popular amongst the android users. Therefore, we created this FRP unlock guide for this smartphone model. However, if you still feel any help, feel free to comment down below this post.