The FRP Bypass Android 13 guide is simply the best when it comes to unlocking the FRP lock. Nowadays, a lot of Android users face Google account verification issues. This verification lock appears after a device is reset to its factory settings.
Once an Android device goes through a process of Hard Reset or Factory Reset, the FRP lock will eventually start to protect the device. Now, we have been posting a lot of free guides for Android 13, 12, and 11.
Jump to
FRP Bypass Android 13
However, this guide is fully dedicated to bypassing the FRP lock from the Android 13 version. It is difficult to create a step-by-step guide for the latest version of Android. As it comes with more strong security patches, that makes it difficult to unlock.
FRP Bypass Android 13 is going to be the latest method to remove Google verification and FRP lock from Android devices. It works for all smartphones and tablets, the method is simple and easy to understand.
What’s more, the method is simple and to the point, unlike other YouTube tutorials, the chances of successfully bypassing FRP lock from Android version 13 are quite high.
Fortunately, this method works for almost all Android brands, like, Samsung Galaxy, Huawei, OPPO, VIVO, Xiaomi, Nokia, POCO, Tecno, LG, Realme, and more. Almost all the brand’s smartphones can be unlocked using this method. So if you are facing the Google account verification lock in your device which has the latest Android version 14. Then, you should probably going to love this journey of unlocking it, with the help of this post.
VIVO FRP Bypass Android 13 – Complete Guide
If you are experiencing this Google lock on your VIVO Android 13 phone, luckily, we have a solution for you. This guide is not only compatible with the most recent Android Security Patch but also unique.
At the same time, removing the Google account verification lock from VIVO Android 13 devices is tough, but not impossible. We are going to share our straightforward strategy with you today and will try to explain each step precisely. So that you can easily understand the complete process and feel confident while applying this to unlock your phone.
Nevertheless, there is no need to buy credits or subscriptions to paid FRP tools to unlock your phone anymore. This VIVO Android 13 FRP bypass guide provides an all-in-one solution. To make sure that using this method, you will be able to easily bypass Google lock from all the VIVO Android versions.
To be honest, there aren’t many free guides that eventually help users unlock FRP from the Android 13 version. But, this method works for almost all the versions like 13, 12, 11, and more.
On the other hand, if you are an old Vivo user and you have not upgraded your device to the latest Android versions. Or maybe you enjoy using the device with Android 8, 7, or even 6. Or maybe your device does not receive updates to upgrade it to the newer versions. Still, this guide will help you easily remove the FRP lock from older Android versions.
VIVO FRP Bypass Android 13 – Universal Guide
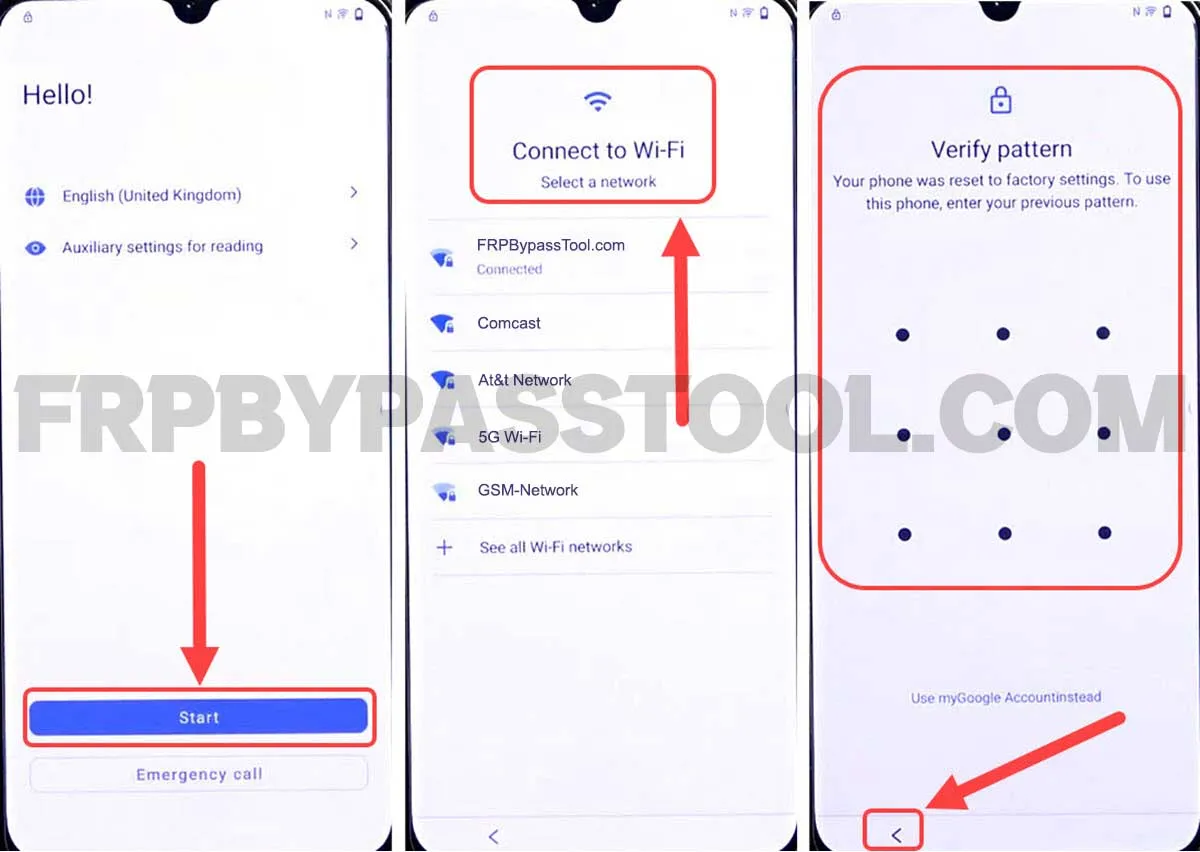
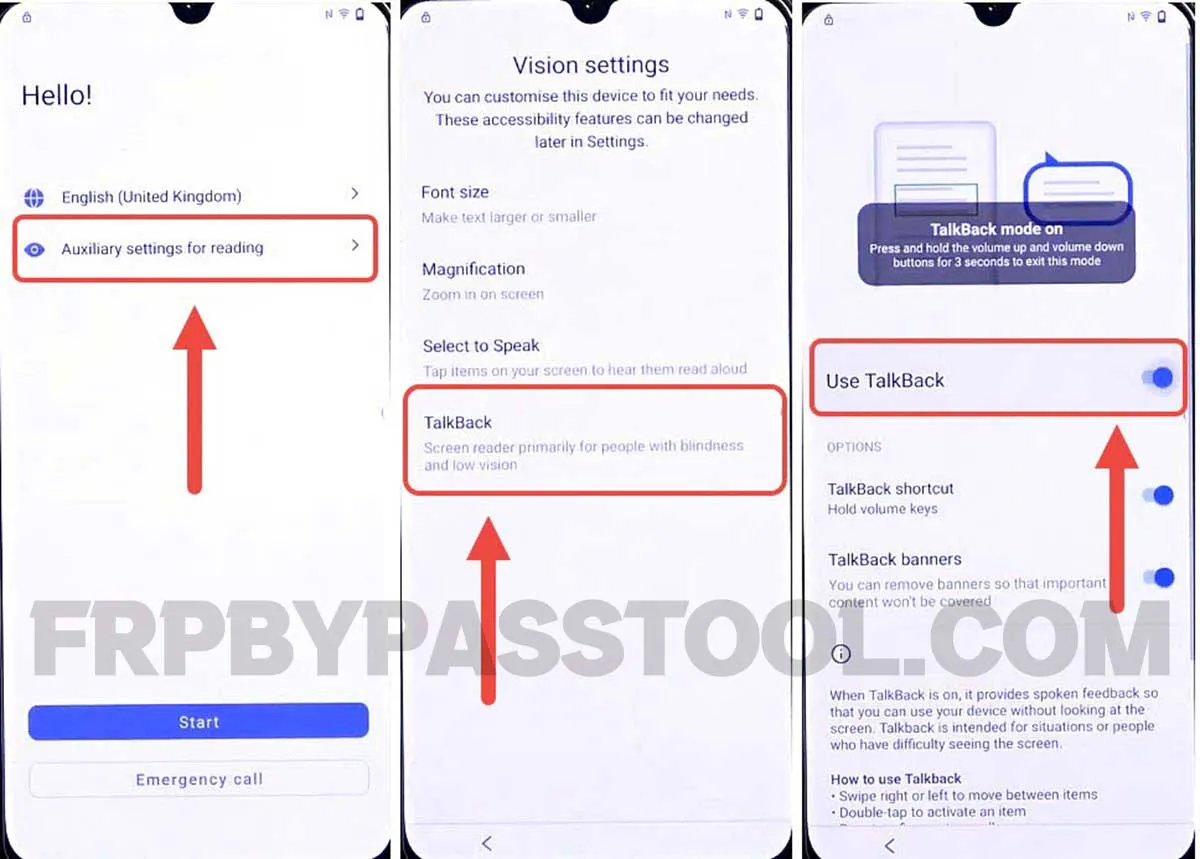
1. Start by connecting to a Wi-Fi network and when you face Verify Pattern or Google verify your account. Go back to the welcome page.
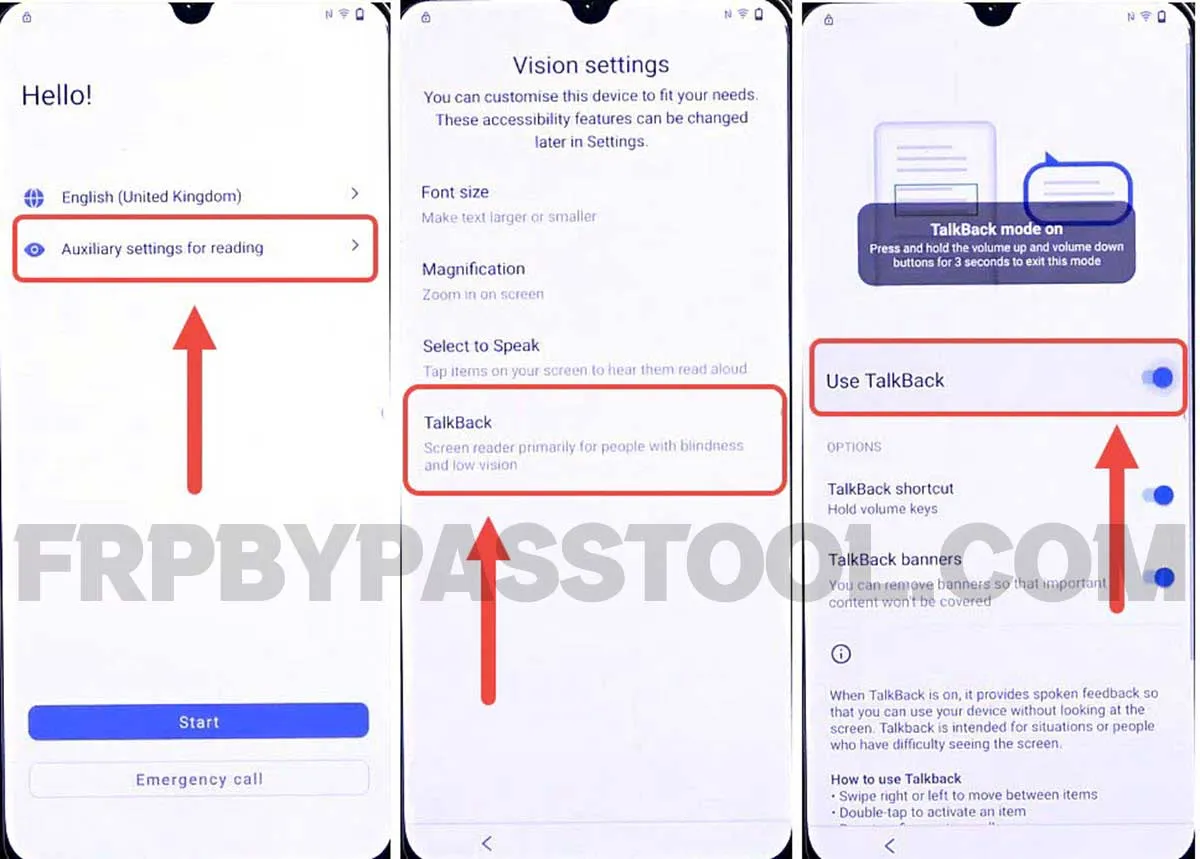
2. Now, tap on “Reading settings”, then select “TalkBack” from the given options.
After that, enable the “Use TalkBack” toggle.
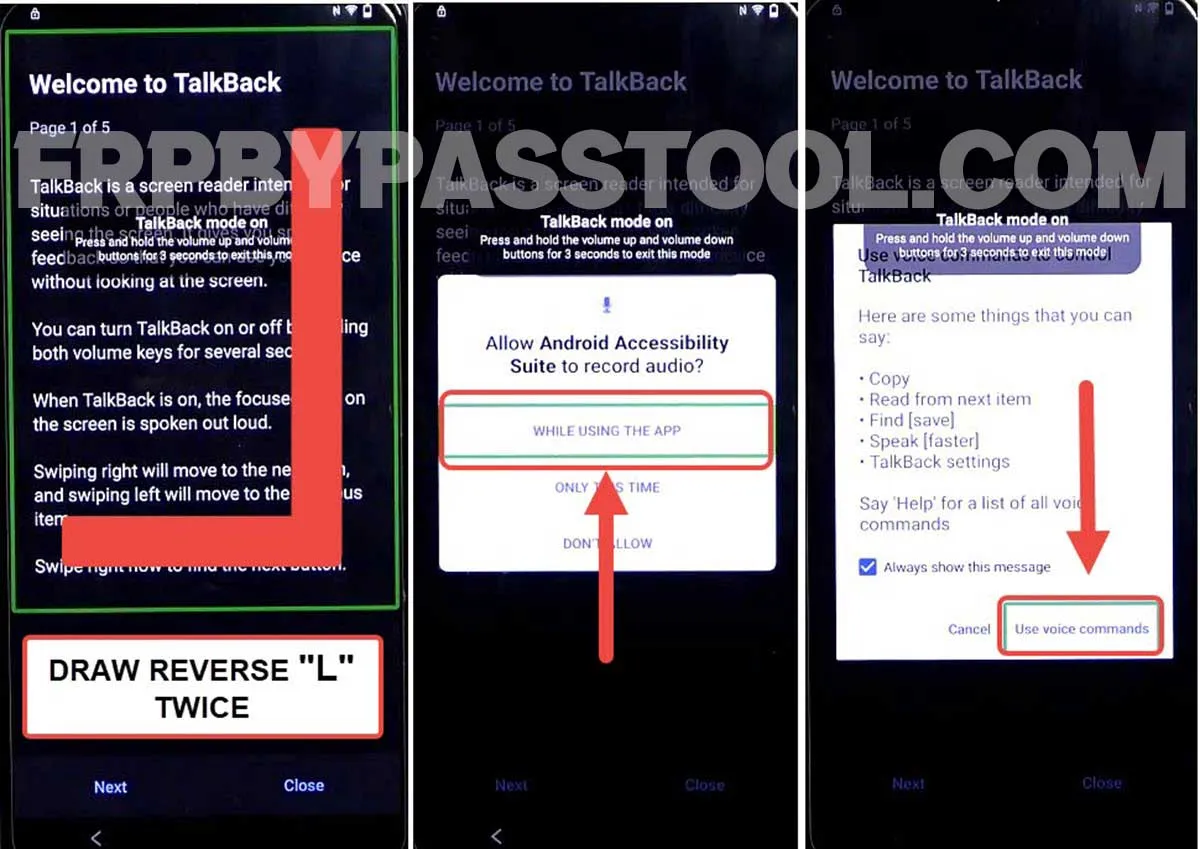
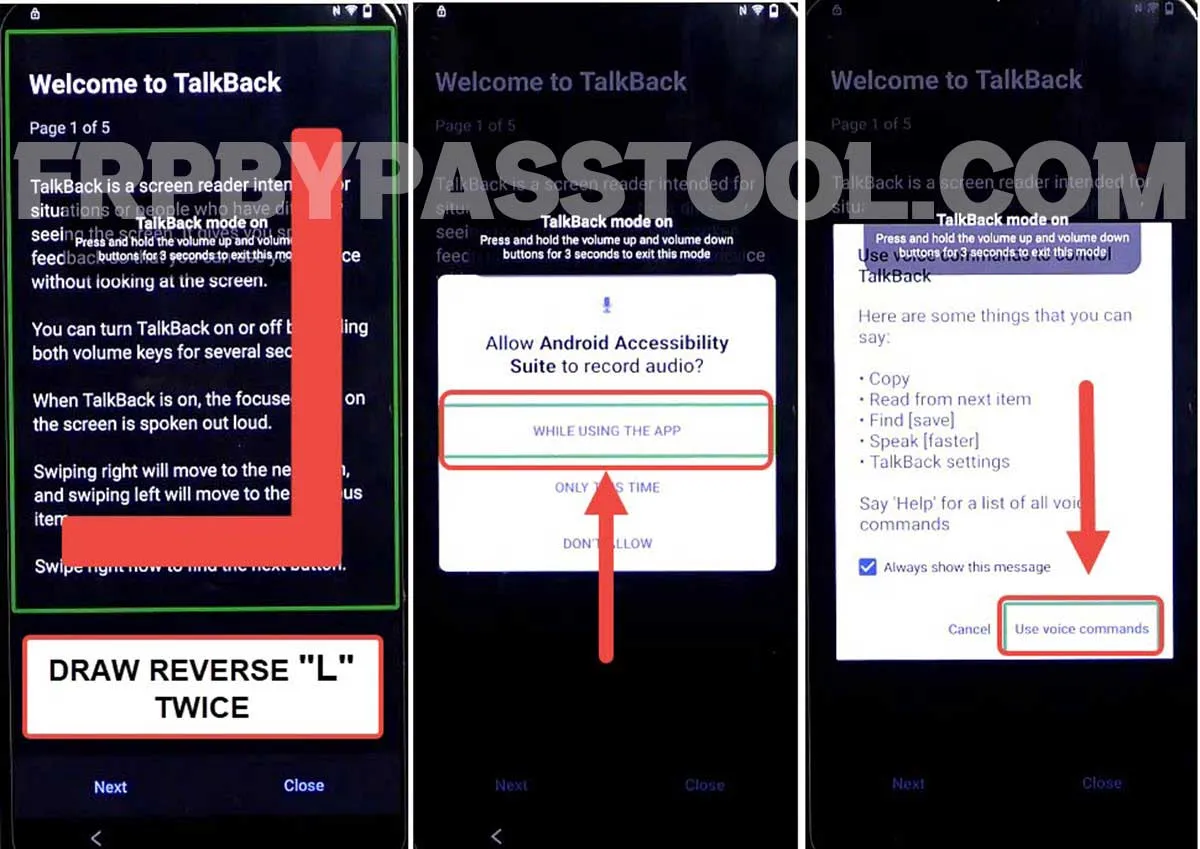
3. Once you do that, it will show a “Welcome to TalkBack” screen. Draw a big reverse “L” twice on the screen.
Then, it will show a popup message with “Allow Android Accessibility”, double tap on the “While using the app” option.
Next, double tap on the “Use voice commands”.
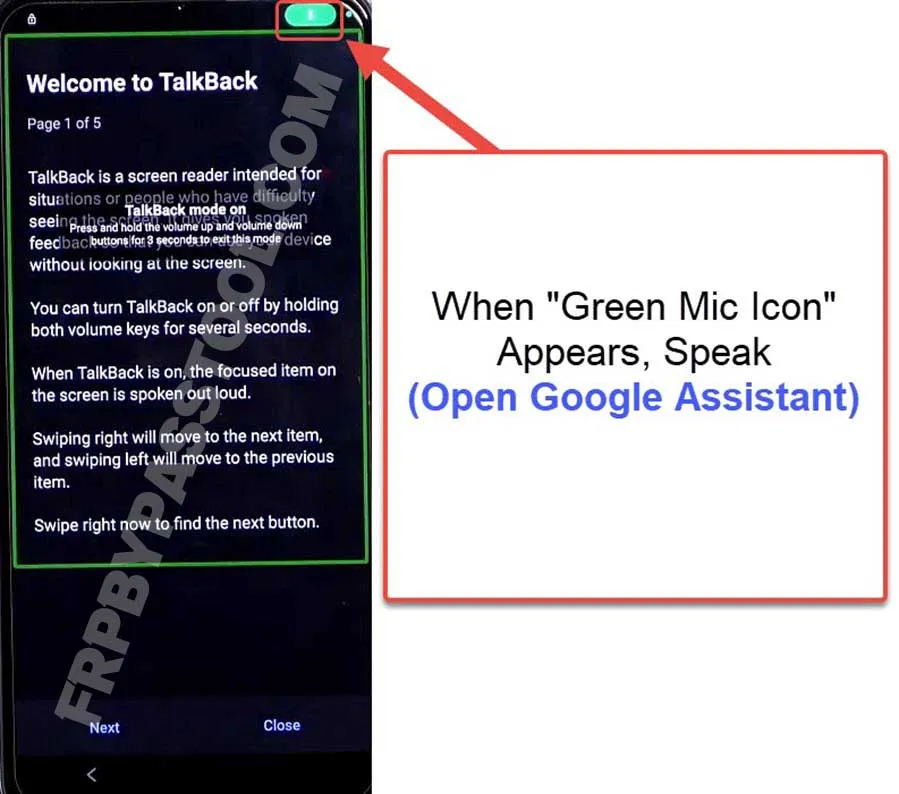
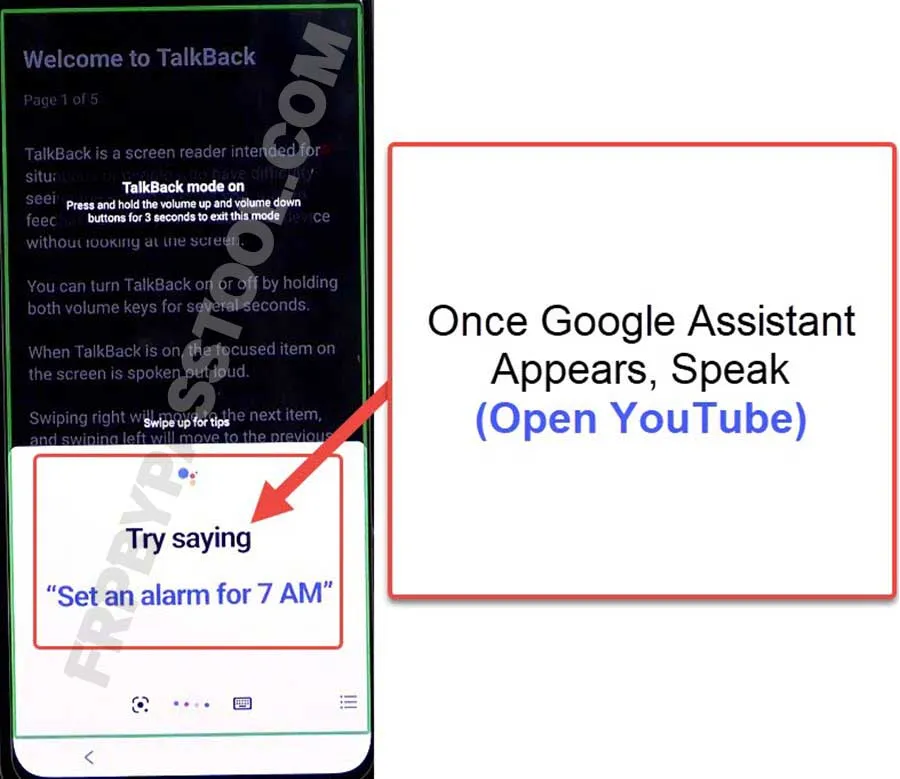
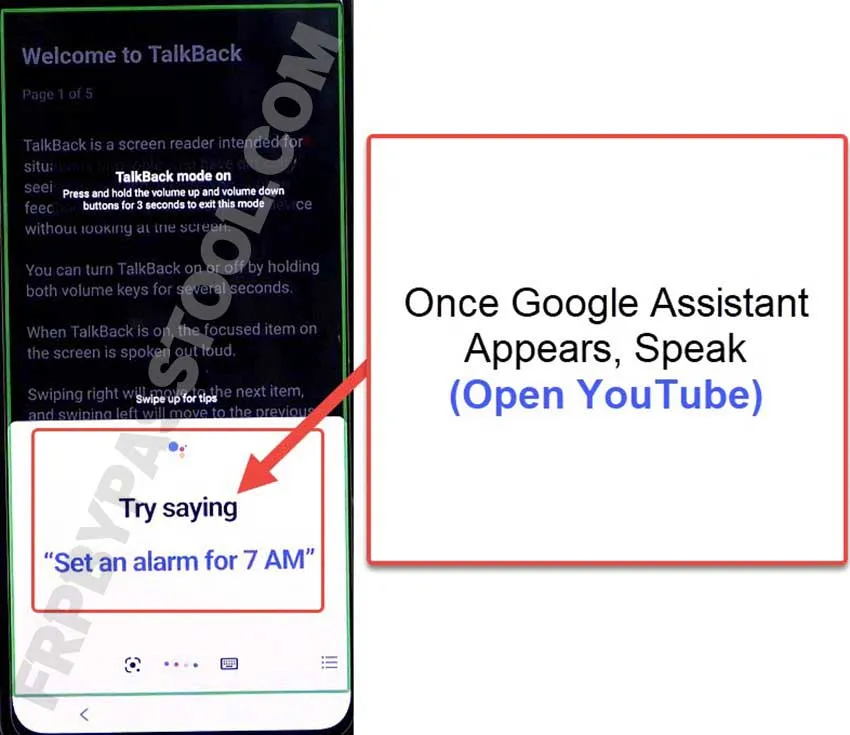
4. Just after selecting “Voice Commands”, the voice commands will activate and you should speak “Open Google Assistant”. Doing this will open the Google Assistant in your VIVO FRP-locked Android device.
5. Once the Google Assistant appears on the screen, say “Open YouTube”.
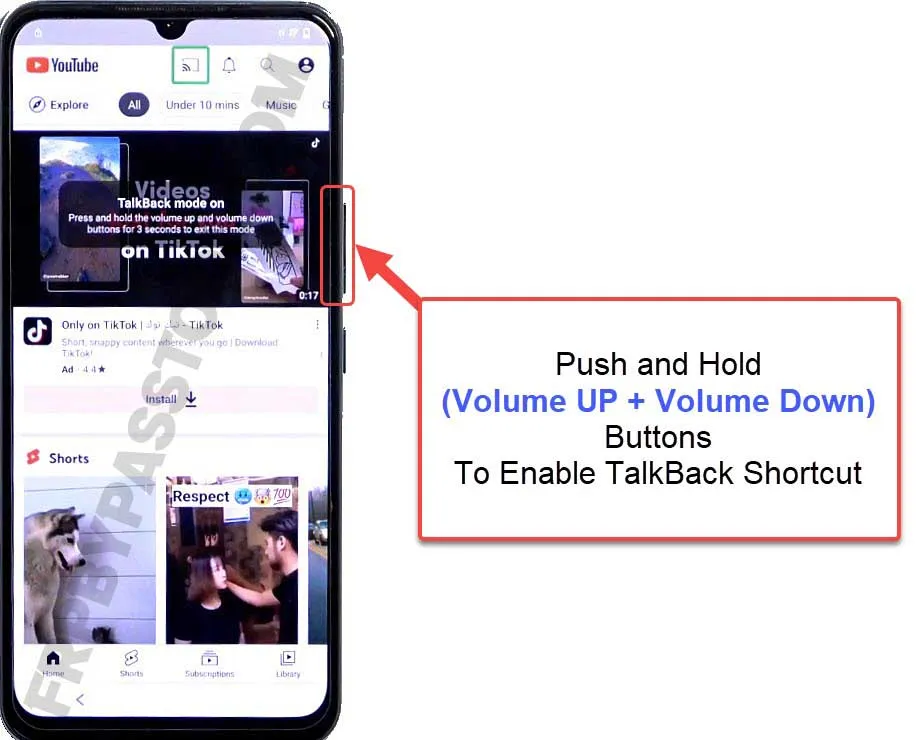
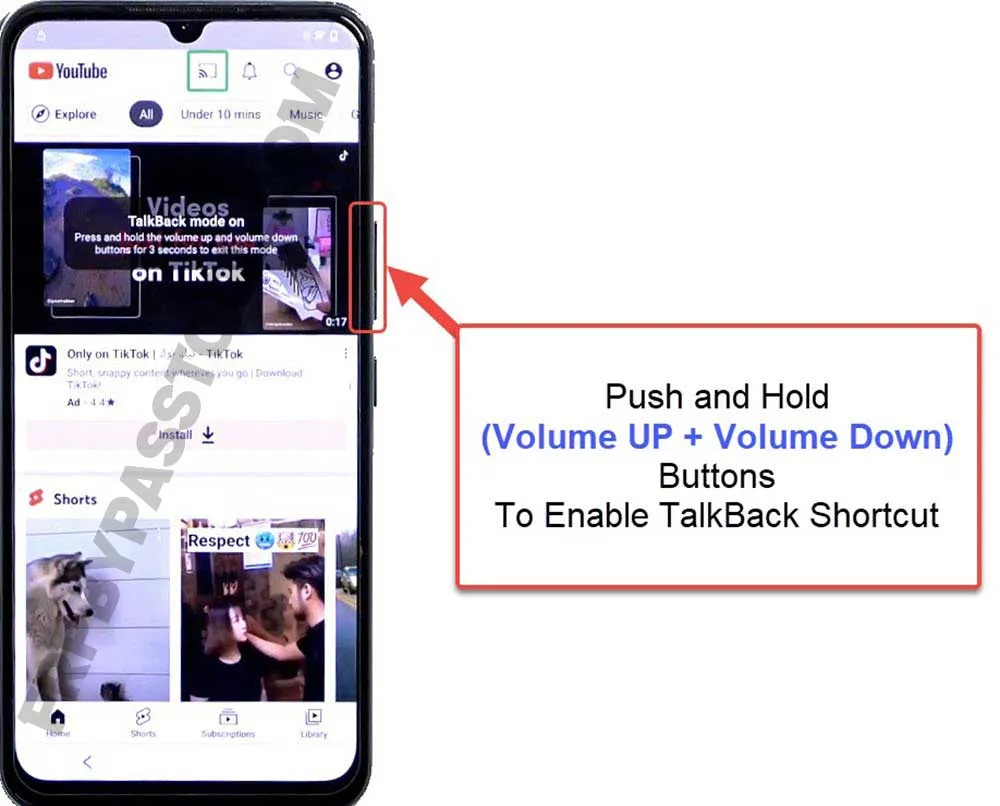
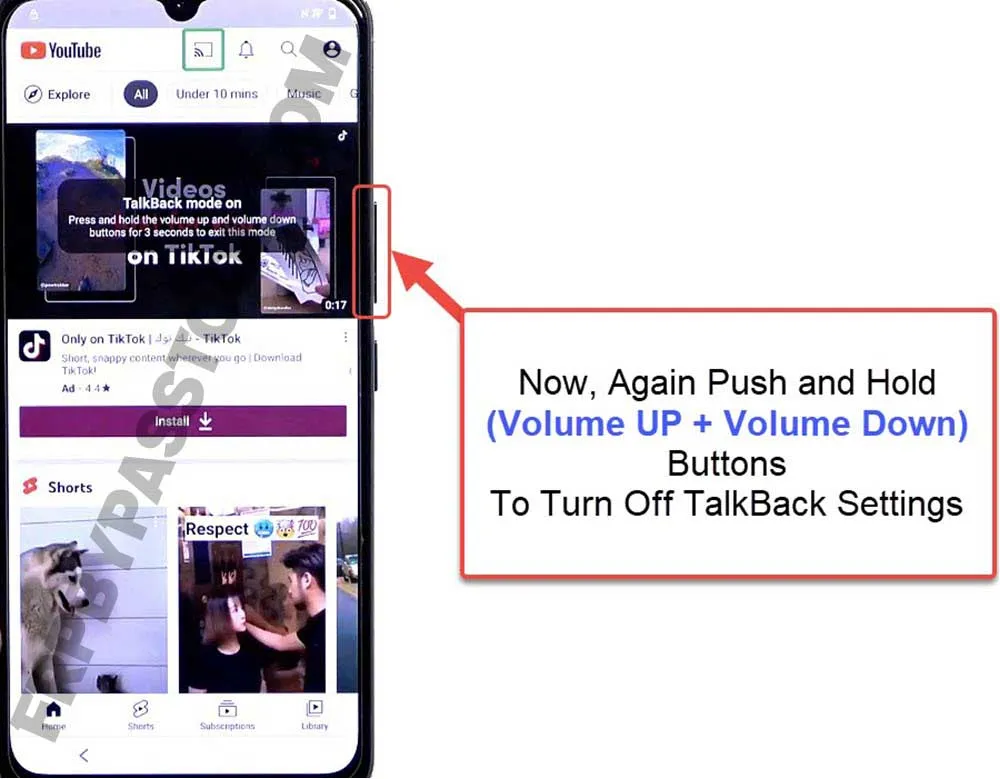
6. Next, this will open the YouTube application. Before proceeding further, we have to turn off the TalkBack Settings.
To do that, simply push and hold (Volume UP + Volume Down) both the volume buttons together.
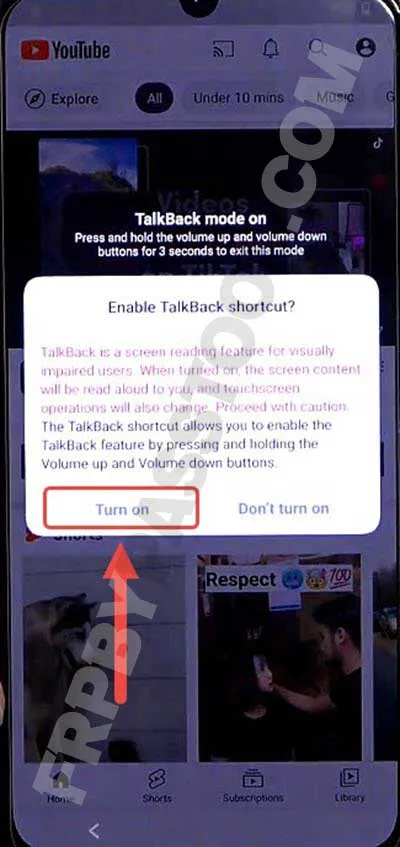
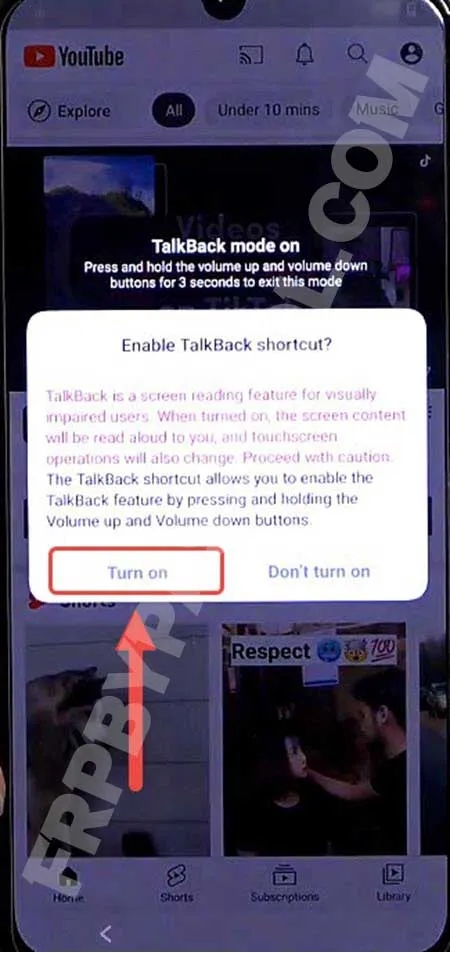
7. Keep holding until you see the “Enable TalkBack Shortcut?” popup window. Double tap on the “Turn On” option.
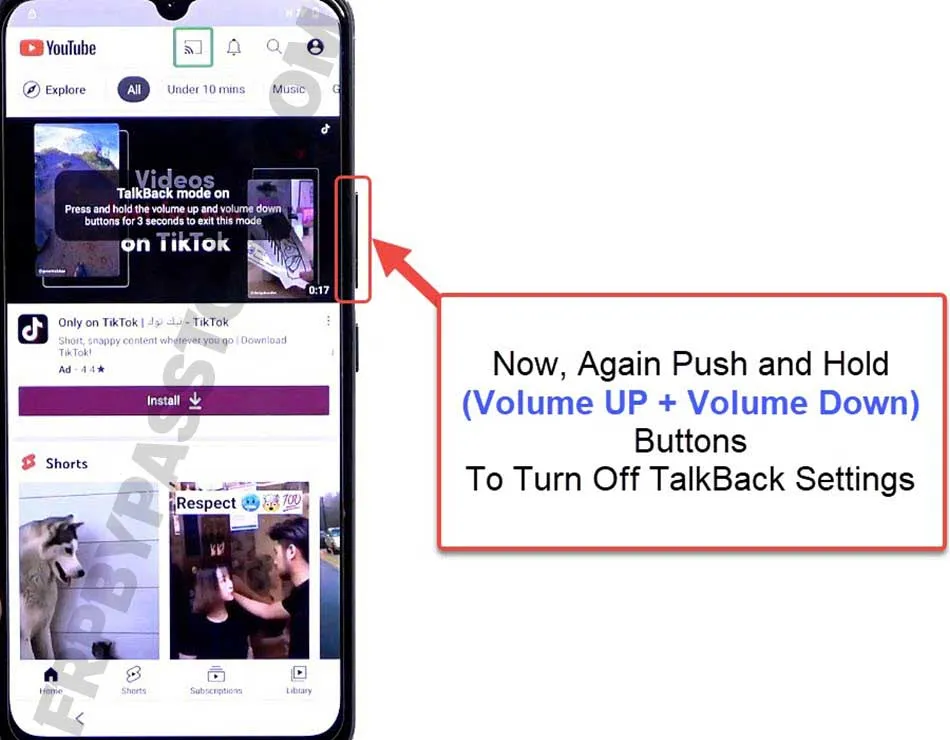
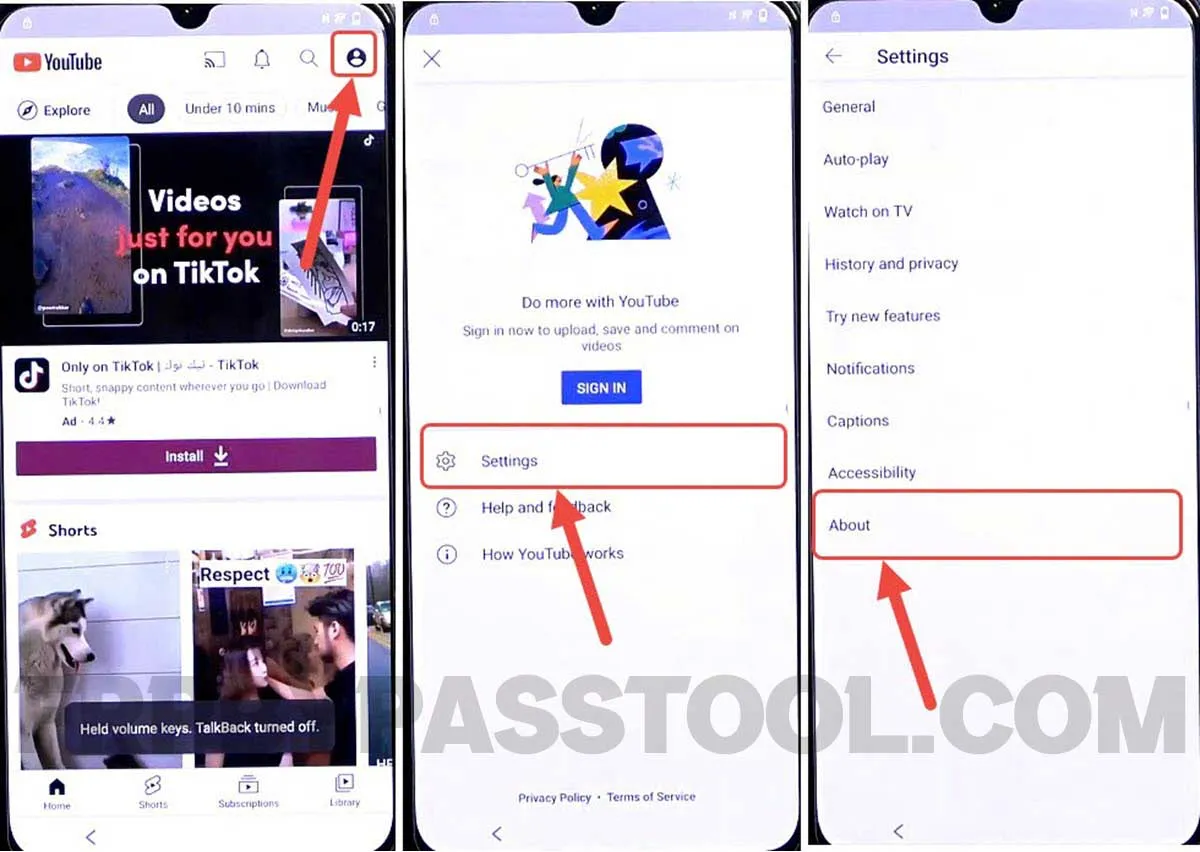
8. After that, again push and hold both the volume buttons to Turn off TalkBack settings.
9. Next, tap on the “Account Icon” in the top left corner, and then select Settings.
Inside Settings, tap on the “About” button.
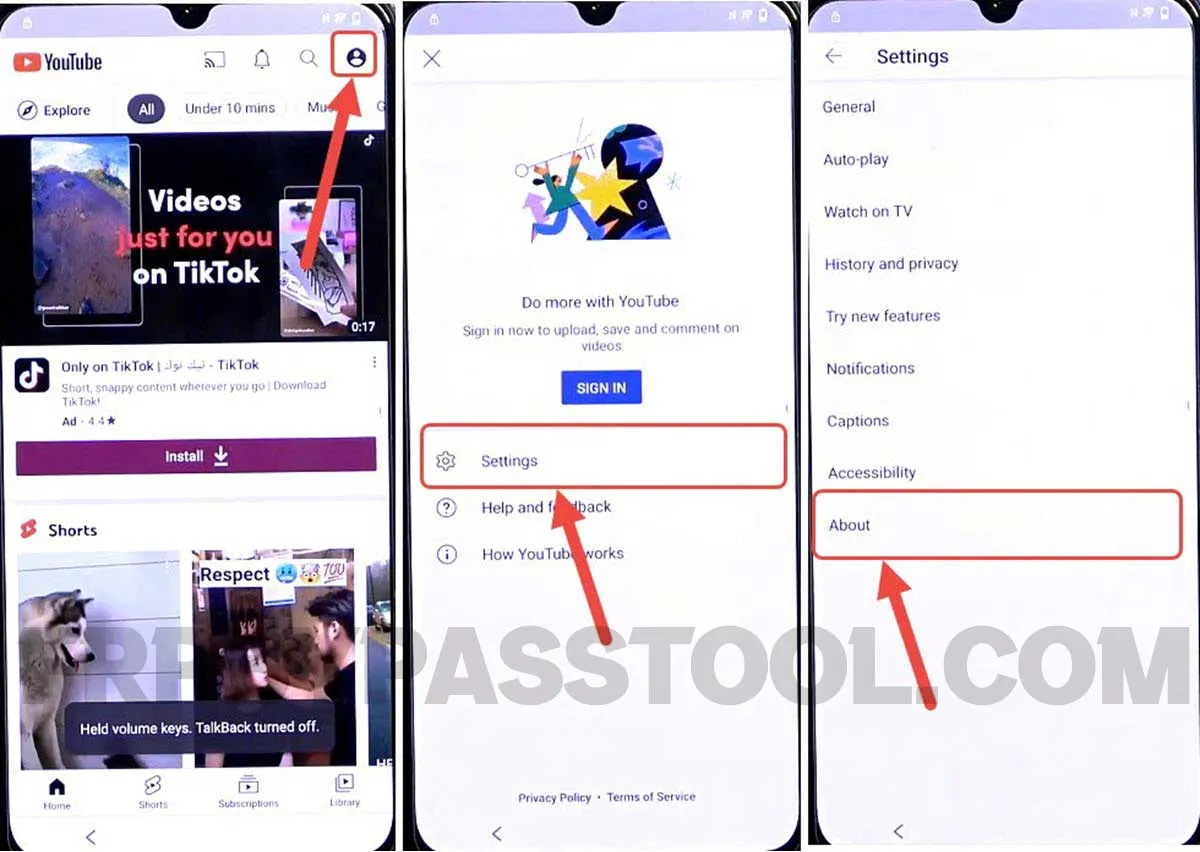
10. Next, select “Google Privacy Policy” and this will open up the Google Chrome browser.
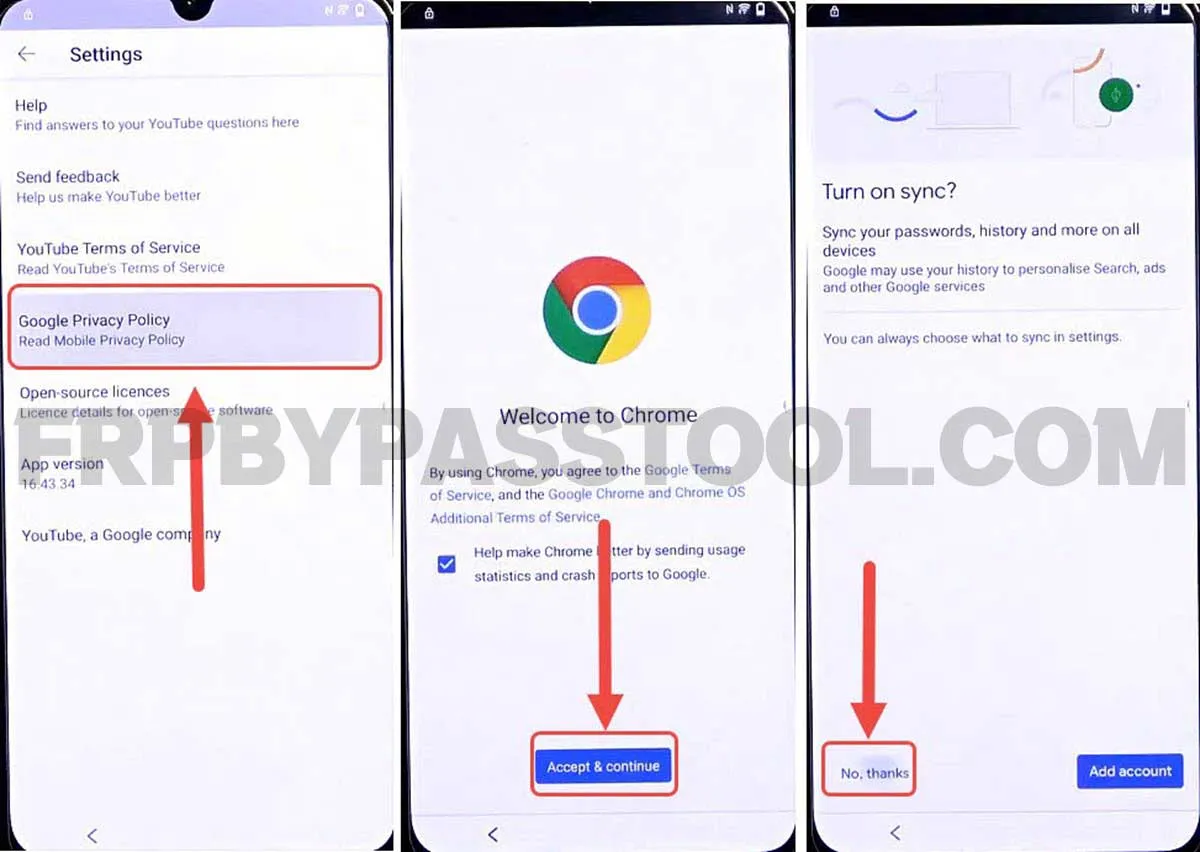
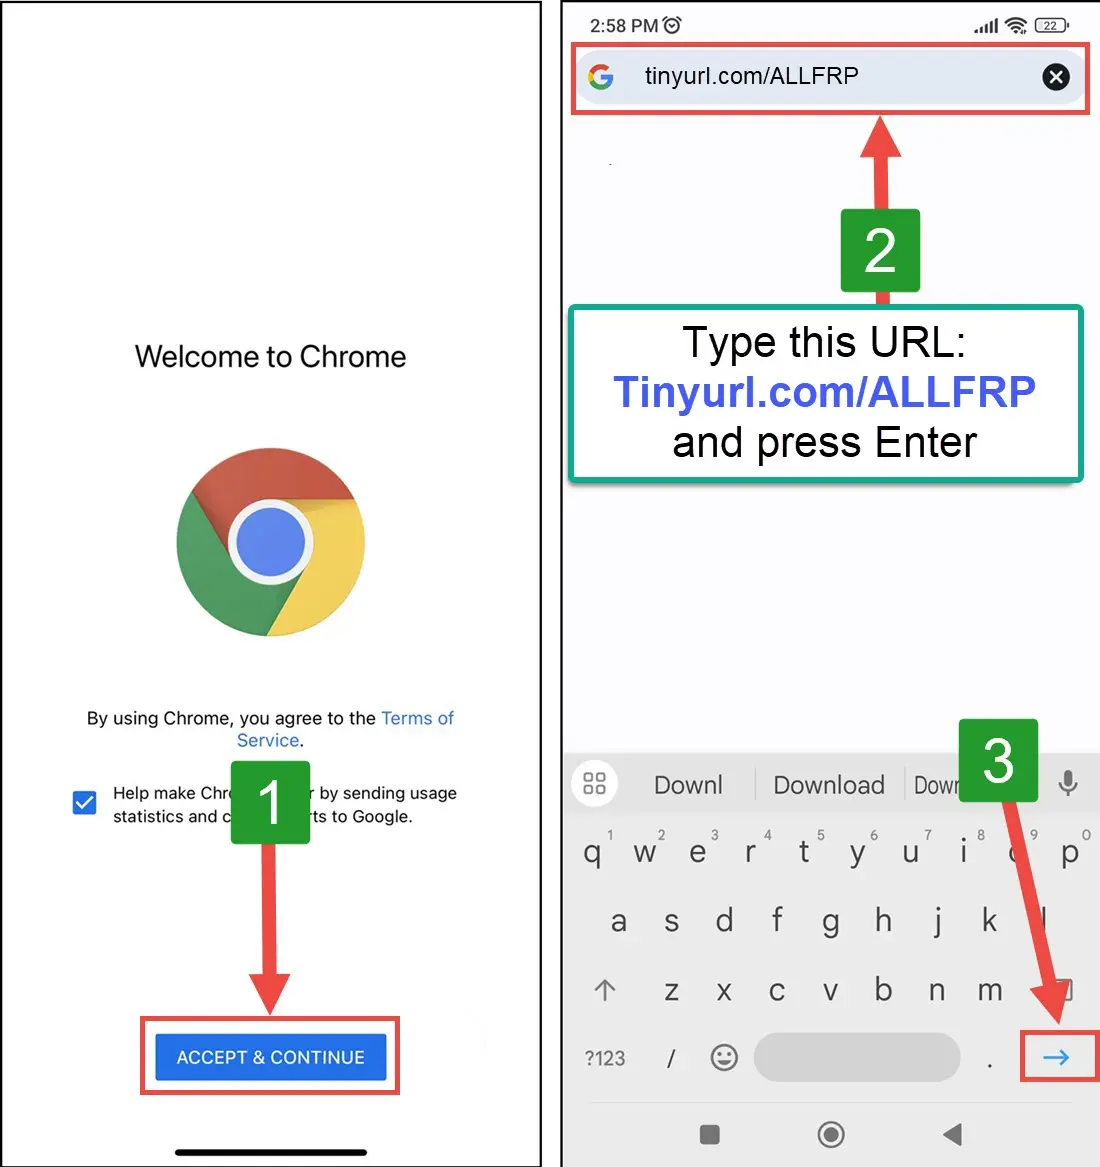
IMPORTANT STEPS
11. Once you do that, type this URL: tinyurl.com/ALLFRP into the URL bar and press enter.
If upper link does not work for you, then you can use the mirror link to open the page.
Mirror Link: tinyurl.com/allfrpfiles
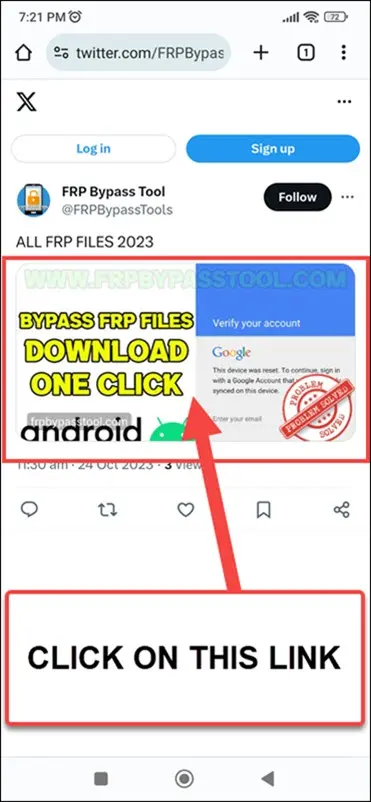
12. After that, tap on the “Bypass FRP Files” link shared on our twitter page.
13. Once you open the website, swipe up and click on the “Open Settings” application.
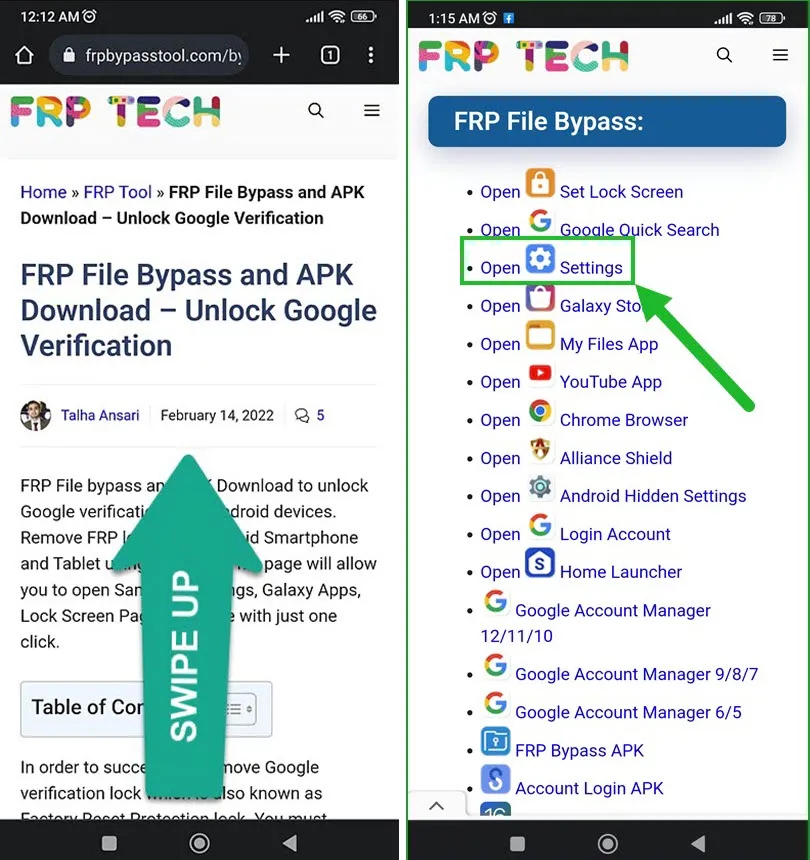
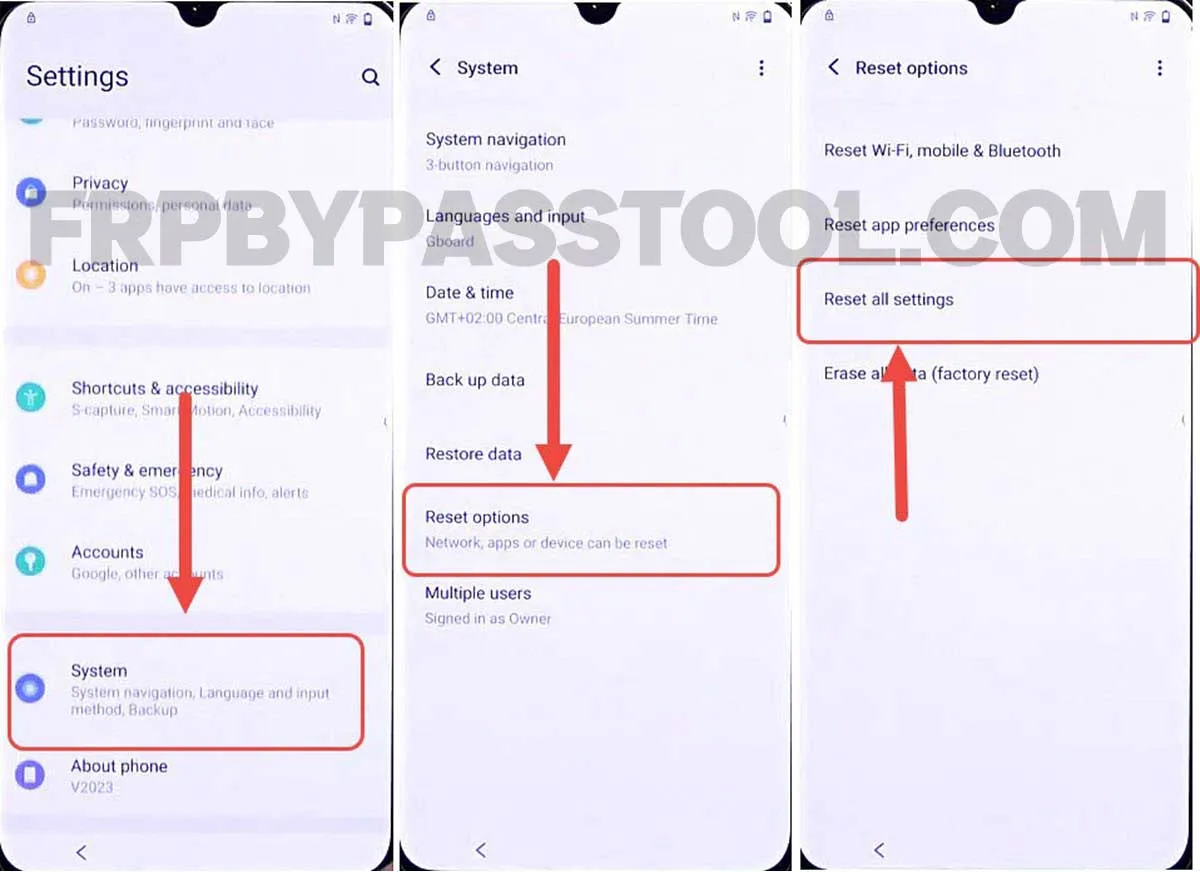
14. This redirects you to the Settings of your VIVO FRP bypass Without a PC device.
Go to the System, then select “Reset Options” and then tap on “Reset all Settings”.
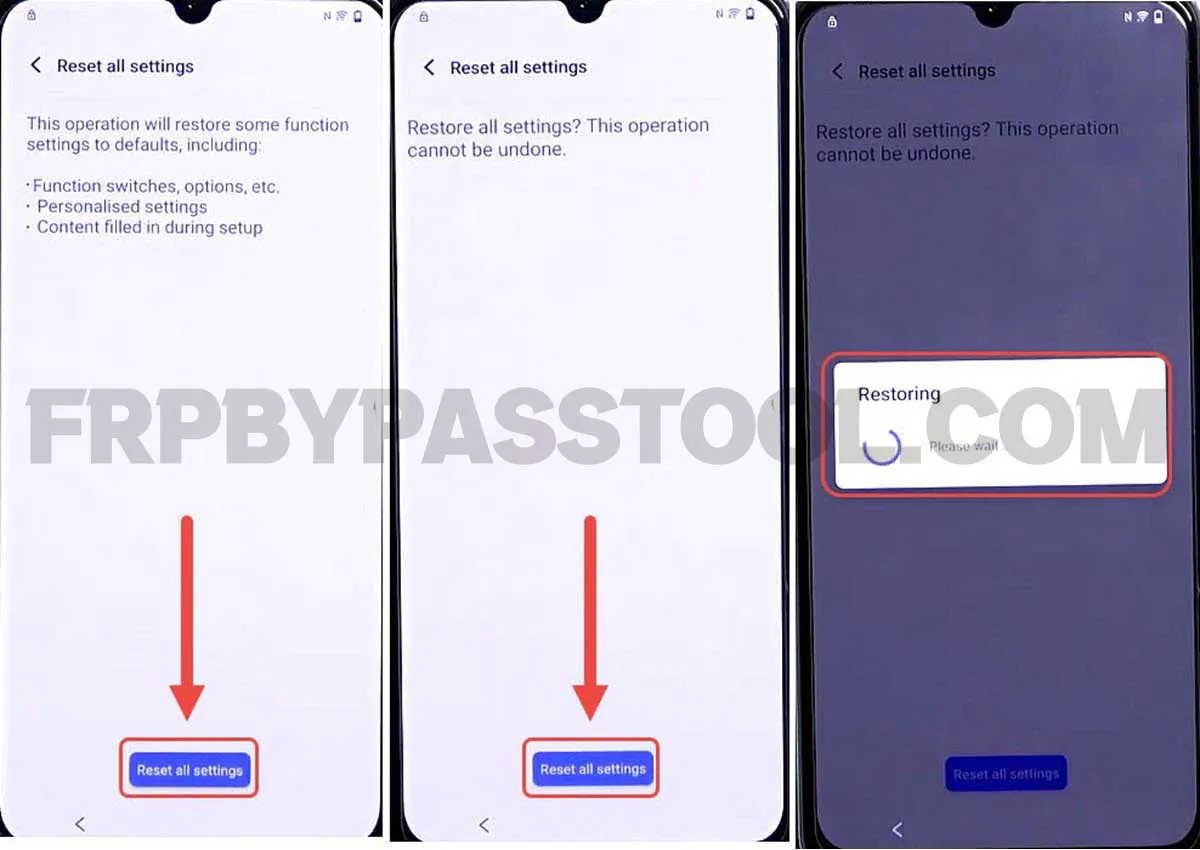
15. Next, tap on “Reset all settings”, again click on “Reset all Settings” and then finally it will start restoring the device.
16. Once the device boots back up, we need to follow the same steps to open the Chrome browser as we opened before.
To do that simply follow the below steps.
Now again, start by connecting to a Wi-Fi network and when you face Verify Pattern or Google verify your account. Go back to the welcome page.
17. Now, tap on “Reading settings”, then select “TalkBack” from the given options.
After that, enable the “Use TalkBack” toggle.
18. Once you do that, it will show a “Welcome to TalkBack” screen. Draw a big reverse “L” twice on the screen.
Then, it will show a popup message with “Allow Android Accessibility”, double tap on the “While using the app” option.
Next, double tap on the “Use voice commands”.
19. Just after selecting “Voice Commands”, the voice commands will activate and you should speak “Open Google Assistant”. Doing this will open the Google Assistant in your VIVO FRP-locked Android device.

20. Once the Google Assistant appears on the screen, say “Open YouTube”.
21. Next, this will open the YouTube application. Before proceeding further, we have to turn off the TalkBack Settings.
To do that, simply push and hold (Volume UP + Volume Down) both the volume buttons together.
22. Keep holding until you see the “Enable TalkBack Shortcut?” popup window. Double tap on the “Turn On” option.
23. After that, push and hold both the volume buttons to Turn off TalkBack settings.
24. Next, tap on the “Account Icon” in the top left corner, and then select Settings.
Inside Settings, tap on the “About” button.
25. Next, select “Google Privacy Policy” and this will open up the Google Chrome browser.
Open the All FRP Files Page
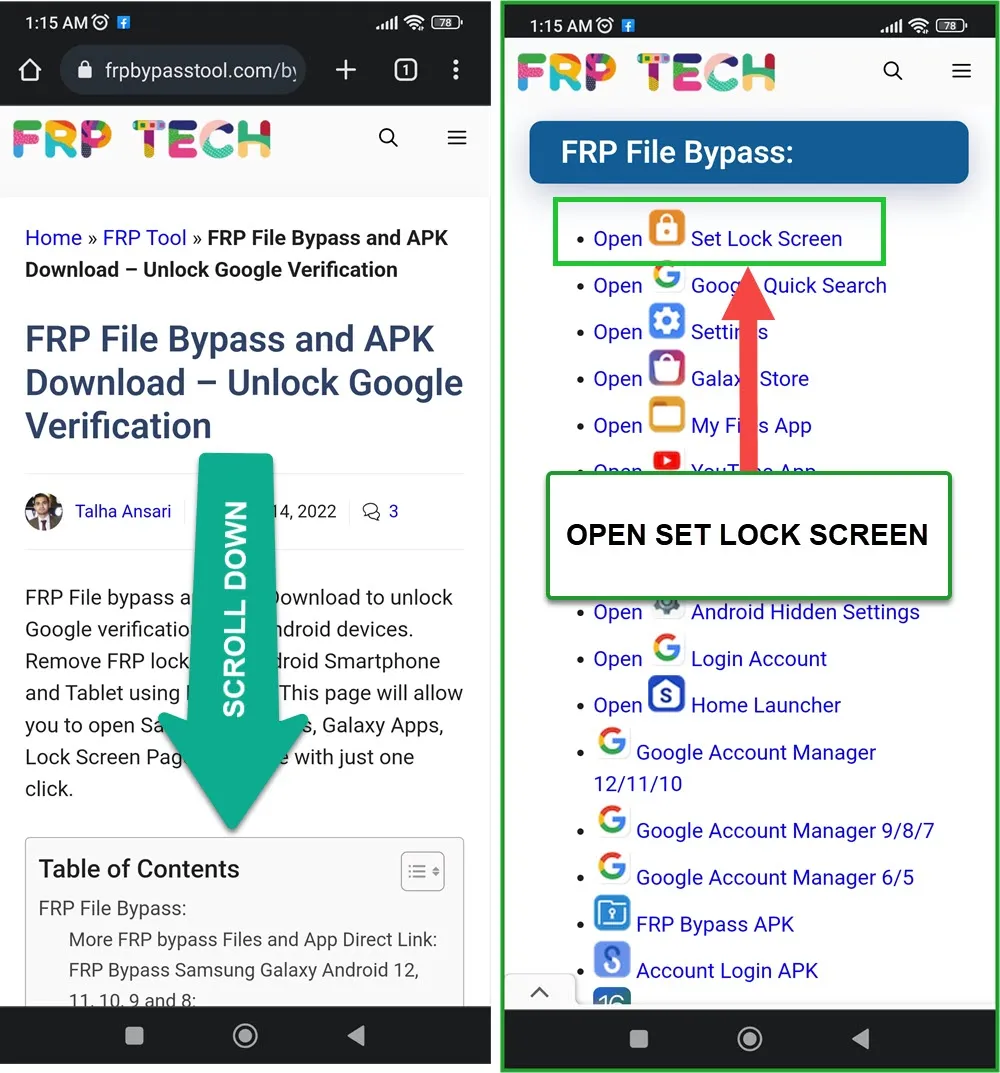
26. Once you do that, type this URL: tinyurl.com/ALLFRP into the URL bar and press enter.
Mirror Link: tinyurl.com/allfrpfiles
17. After that, tap on the “Bypass FRP Files” link shared on our twitter page.
28. Once the website loads up, swipe up and tap on the “Open Set Lock Screen” application.
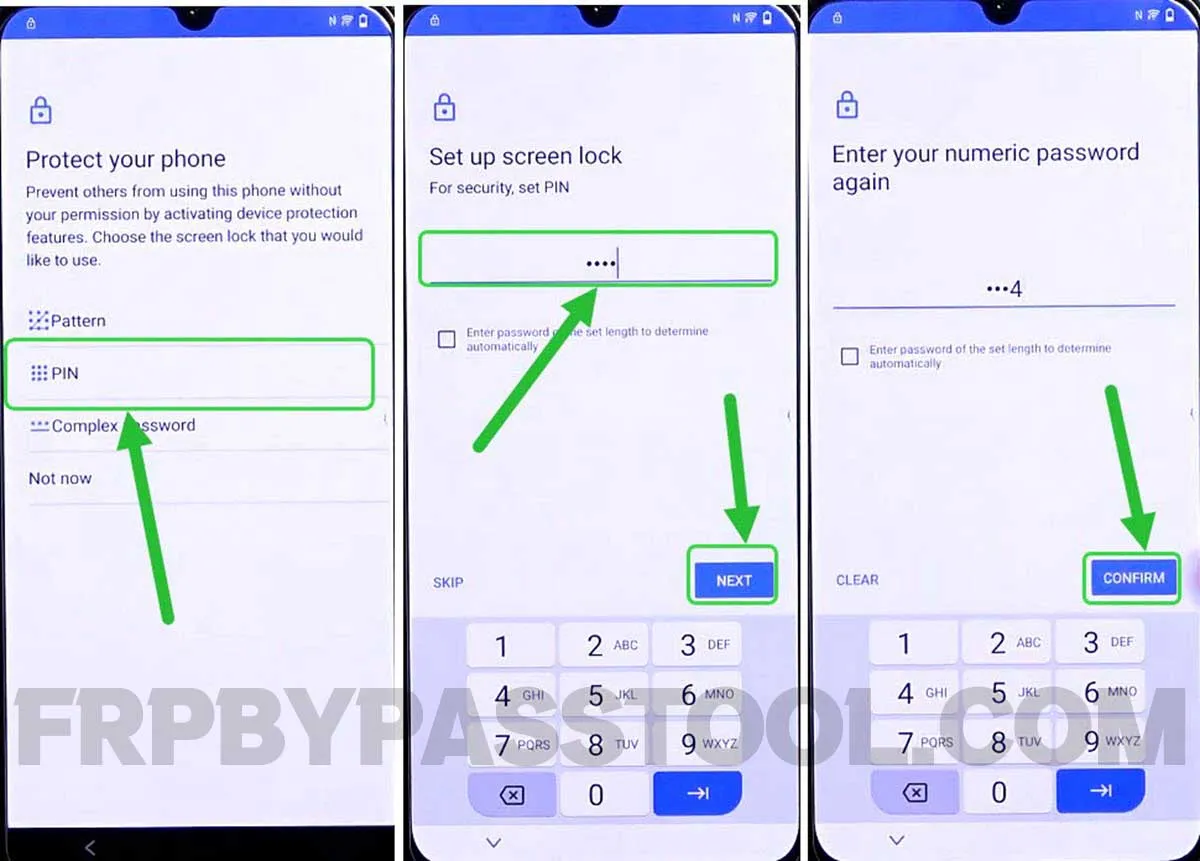
29. This redirects you to the “Protect your phone” page and from here you can easily set up a screen lock.
Before I was using a Pattern Lock in this device, now I am going to select “PIN” as a screen lock.
If you were also using the Pattern lock then, I would suggest you use “PIN” this time.
Simply, I put “1234” as my PIN lock, put any PIN lock, and then select “Confirm”.
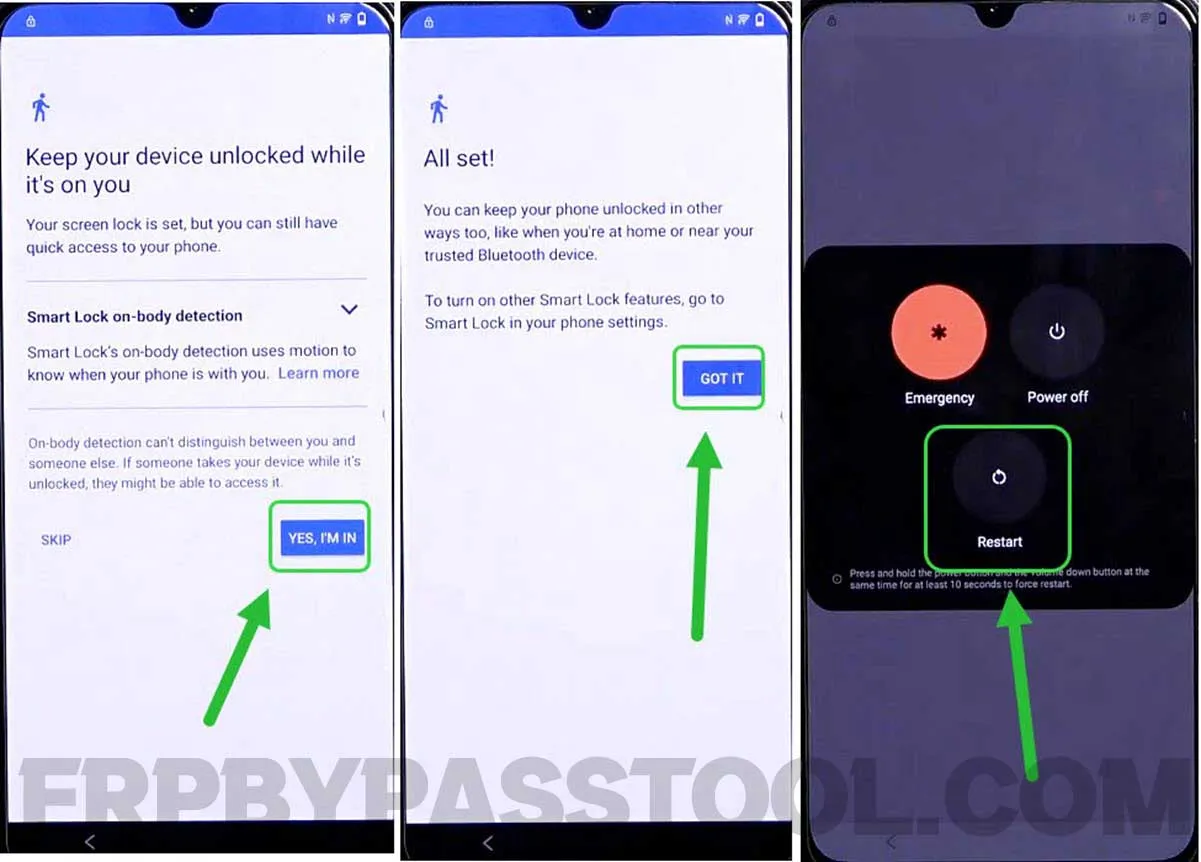
30. Next, tap on the “Yes, I’M IN” button, and then click “GOT IT”.
After that, push the power button and Restart your VIVO FRP-locked device.
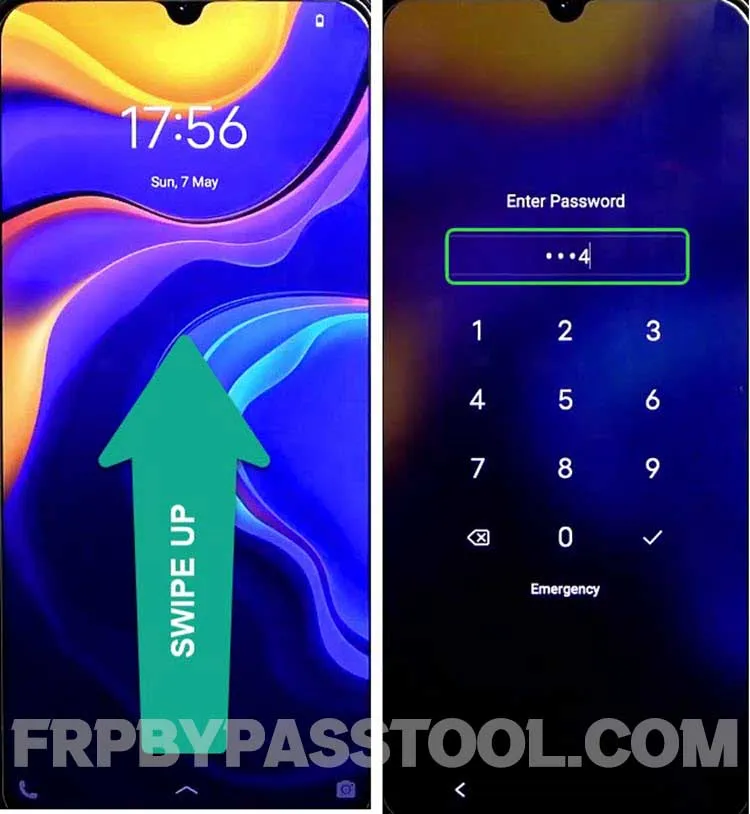
31. Now, after the device boots back up, swipe up and enter the PIN lock that you set before.
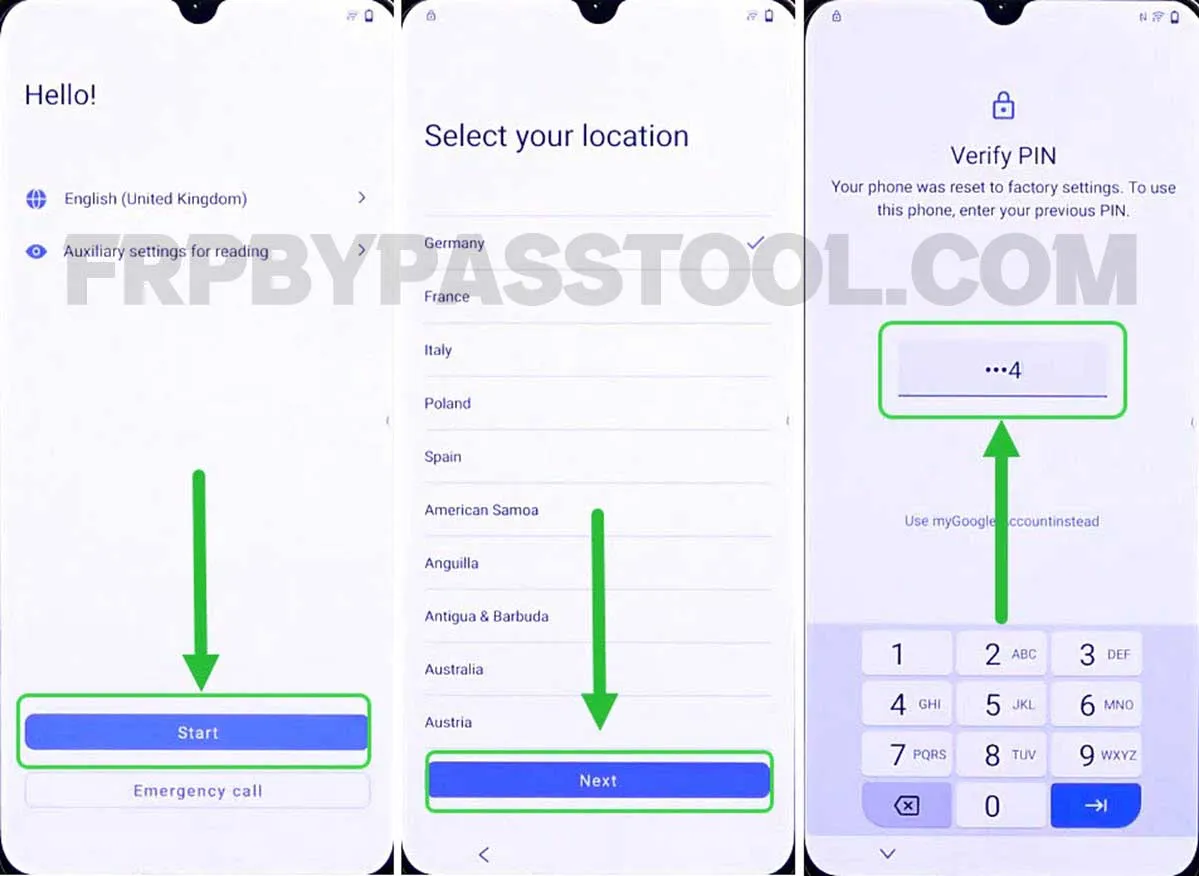
32. Next, it will redirect you to the initial setup of the VIVO device.
Complete the initial setup, Once you face “Verify PIN” simply enter the same PIN lock that you set before in step “29”.
33. After that, the Google verification lock page appears, simply tap on the SKIP button to skip the Google verification screen.
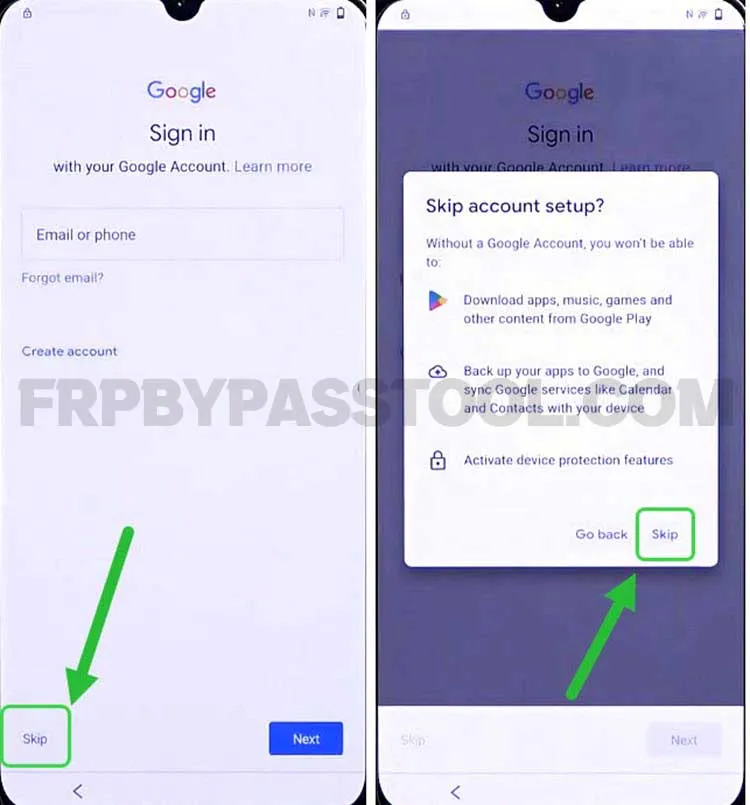
34. Next, complete the remaining initial setup steps without facing any Google account verification page.

Conclusion
I hope this guide helps you to easily unlock your Vivo smartphone. If in case you are facing any problem while applying this guide, feel free to comment below.