VIVO FRP Bypass Android 13 without PC method is finally available on our website. This is the most demanding method as people are looking for a working method for Android version 13. This is a universal method, it will work for Android 13, 12, 11, and 10. In fact, it can work for old Android versions like, Android 9, 8, 7, and even version 6.
However, if you are facing the “Google Account Verification” screen after resetting your VIVO Android 13 device. Then, you have to enter the correct details of the Google Account which was synced into your device. These details include the Gmail ID and Password, and you should enter both of these correctly.
In case, you don’t remember these details and you are now stuck with the Google Account Lock. Well, we have a solution for you. As we have been working to provide free FRP unlock guides for many Android devices. Today, we are going to show the latest method to bypass FRP lock from VIVO Android 13 smartphone.
Jump to
- 1 VIVO Android 13 FRP Bypass without PC 2024 – Overview
- 1.1 VIVO Android 13 FRP Bypass Activity Launcher – Details
- 1.2 VIVO Android 13 FRP Bypass 2024 Latest Security Unlock Method:
- 1.3 Activate Talkback in VIVO Android 13 FRP Bypass Smartphone
- 1.4 IMPORTANT STEPS:
- 1.5 Follow these steps on your 2nd Phone:
- 1.6 Follow these steps in the Vivo FRP lock device:
- 1.7 Follow these steps on your 2nd Phone:
- 1.8 VIVO FRP bypass Android 13 Without PC – Last Steps
- 1.9 Conclusion:
VIVO Android 13 FRP Bypass without PC 2024 – Overview
Generally, this is one of my favorite methods to bypass Google Lock from VIVO Android devices. As it does not require to use a Computer/PC to unlock the device.
Although, we have a variety of VIVO FRP Tools available on our website for free. But, this method is different as in this method you don’t need to use a Computer or PC, as it will work without a PC.
This time, we are going to use an application that will be transferred to the FRP-locked VIVO device from a 2nd device.
For this method, you need to have 1 more Android/iPhone device. As we are going to use a Clone Phone feature to remove Google Lock from our VIVO Android 13 device.
VIVO Android 13 FRP Bypass Activity Launcher – Details

Currently, the only easy-to-follow working method for the latest Android security patch is the “VIVO FRP Activity Launcher” method. This application can give us access to the Android Setup of our VIVO FRP-locked phone. After that, we can easily get into the settings and will be able to copy the Google Account from our 2nd phone to the VIVO FRP lock device.
Remember, we are going to copy the Google Account from a (2nd Smartphone) to the FRP Locked phone. So you should know the Password of your 2nd Smartphone (Which is not locked by FRP).
Make sure to get your 2nd phone or someone who does know about the Password of their Google Account. As we are going to copy that Google Account into our VIVO FRP Locked device.
With the help of the Vivo Activity Launcher application, we can not only bypass FRP lock but we will be able to add a new Google account. After copying the account, you can change this account to your own by going into the settings of your phone.
What’s more, just follow the below step-by-step guide to bypass FRP lock from your VIVO smartphone. Don’t forget, this method works for all Android versions, including Android 13, 12, 11, and 10. But, if you are using an old VIVO device with Android 9, 8, 7, or 6, you can still apply this method.
- New Method (2024): VIVO FRP Bypass Without PC Android 13, 12, 11 – Bypass Google Verification
VIVO Android 13 FRP Bypass 2024 Latest Security Unlock Method:
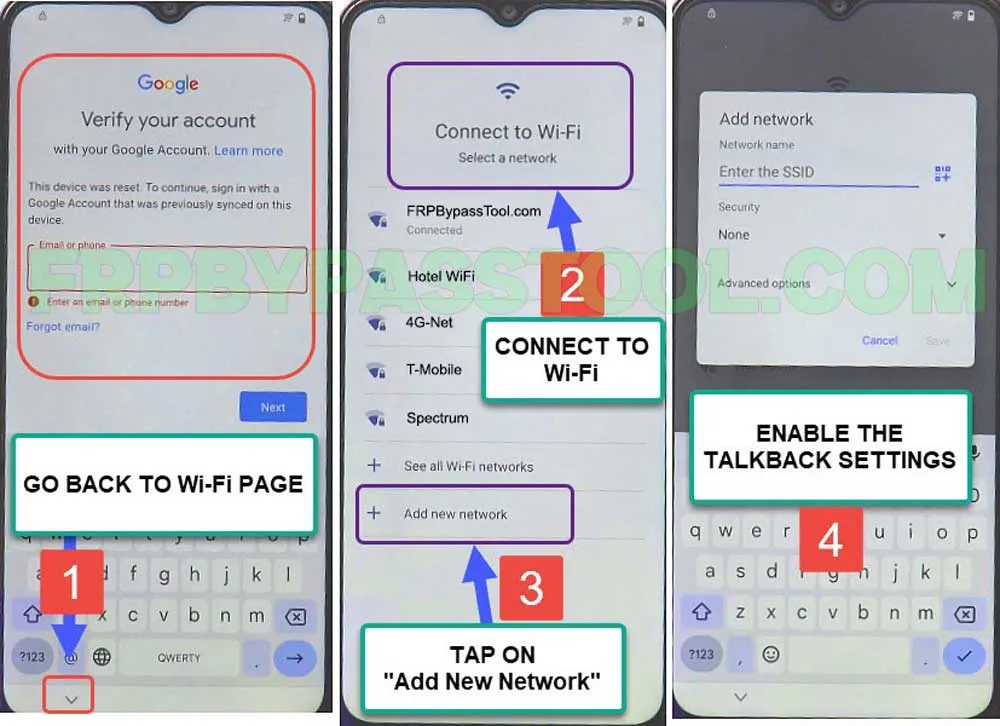
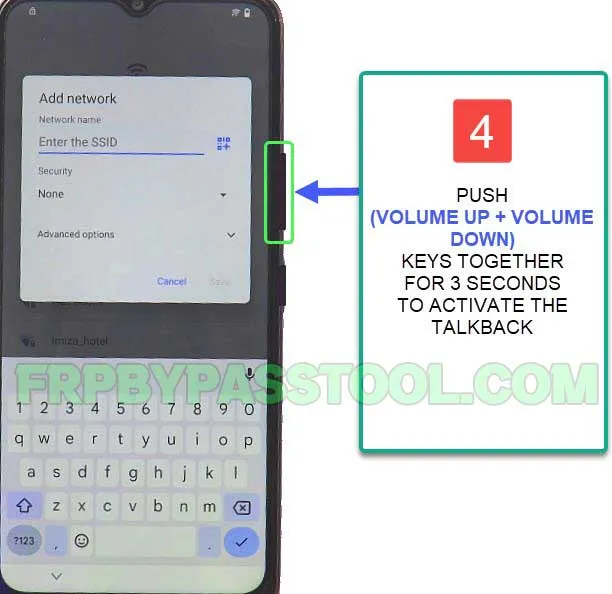
1. Connect to a Wi-Fi network, and then tap on “Add New Network”.
- Now follow the next steps to enable the Talkback settings in Android 13.
2. Push (Volume UP + Volume Down) keys together for at least 3-4 seconds.
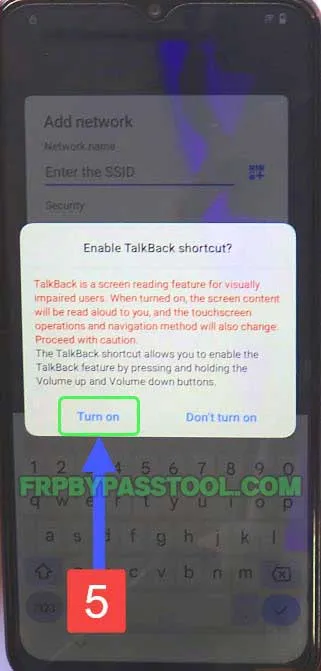
3. When you see the “Enable Talkback shortcut” popup window, tap on the “Turn on” option.
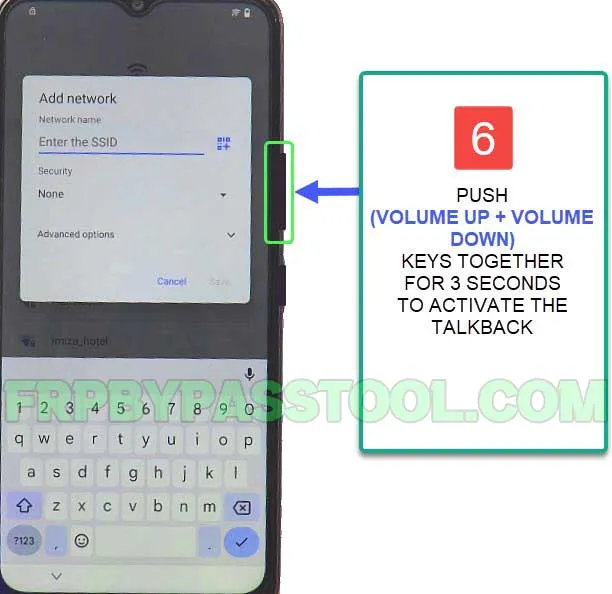
4. After that, again push and hold both the Volume keys to activate the Talkback feature.
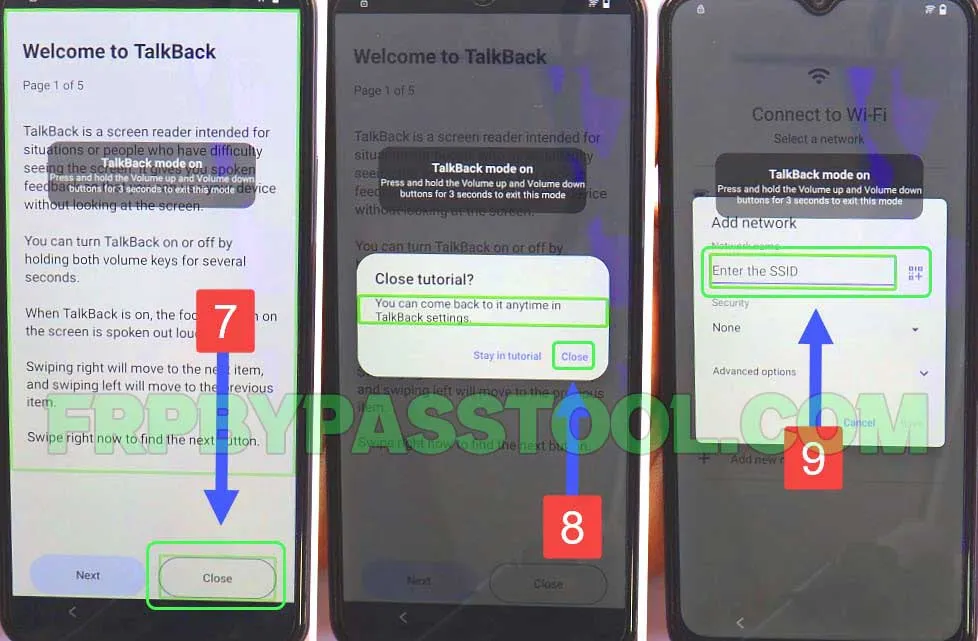
5. Remember, when Talkback is enabled, you have to “Double Tap” to select the options.
- Double tap on the “Close” button, then again double to close the tutorial of Talkback.
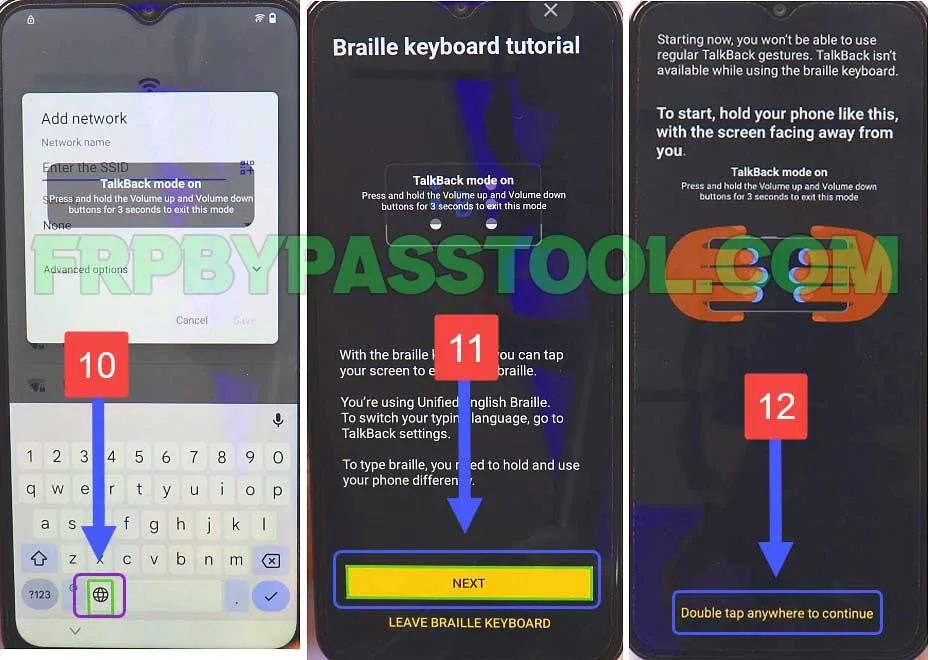
- After that, double tap on “Enter the SSID of new network”.
6. This will open the Keyboard, double tap on the “World icon” and this will open “Braille Keyboard Tutorial”.
- Double-tap on the “Next” button and then double-tap anywhere on the screen.
Activate Talkback in VIVO Android 13 FRP Bypass Smartphone
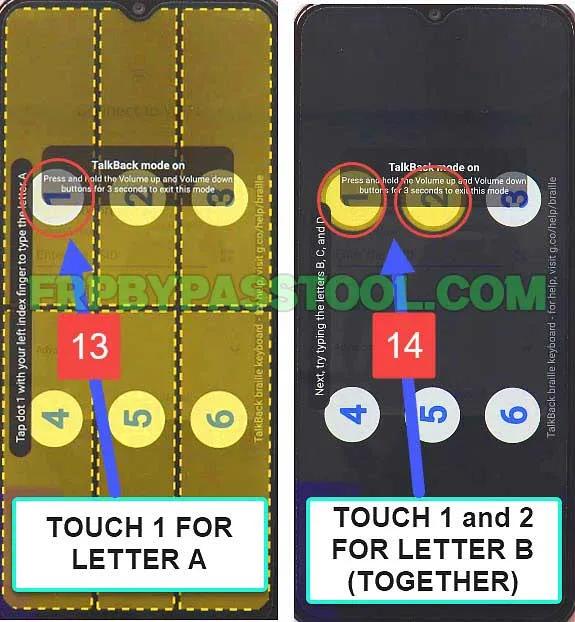
7. Now, follow these steps carefully. We need to write “A, B, C, and D” but with the combinations of numbers.
- Number 1 is for Letter A
- Number 1 and 2 is for Letter B
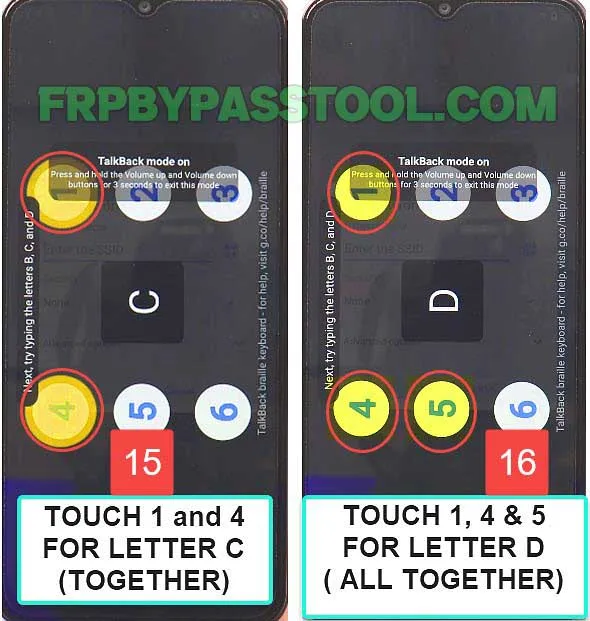
- Number 1 and 4 is for Letter C
- Number 1, 4, and 5 is for Letter D
Firstly, Touch number 1 for the letter A.
Secondly, Touch the number (1 and 2 together) for the letter B.
8. After that, touch the number (1 and 4 together) for the letter C.
- Finally, touch the number (1, 4, and 5 together) for the letter D.
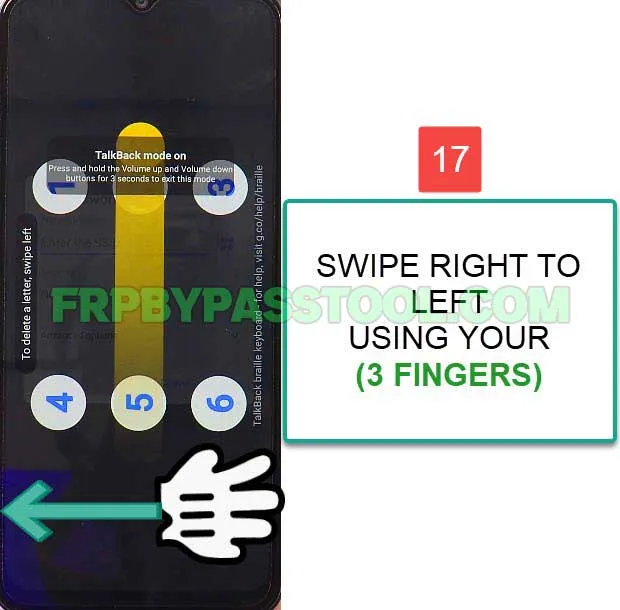
9. Now you need to swipe from (Right to Left) of your screen using your (3 Fingers). This will bring the Braille keyboard options.
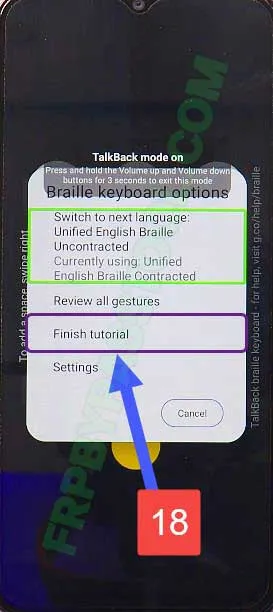
10. The Braille keyboard options will appear on your Vivo Android 13 FRP bypass screen. Double-tap on the “Finish Tutorial” option.
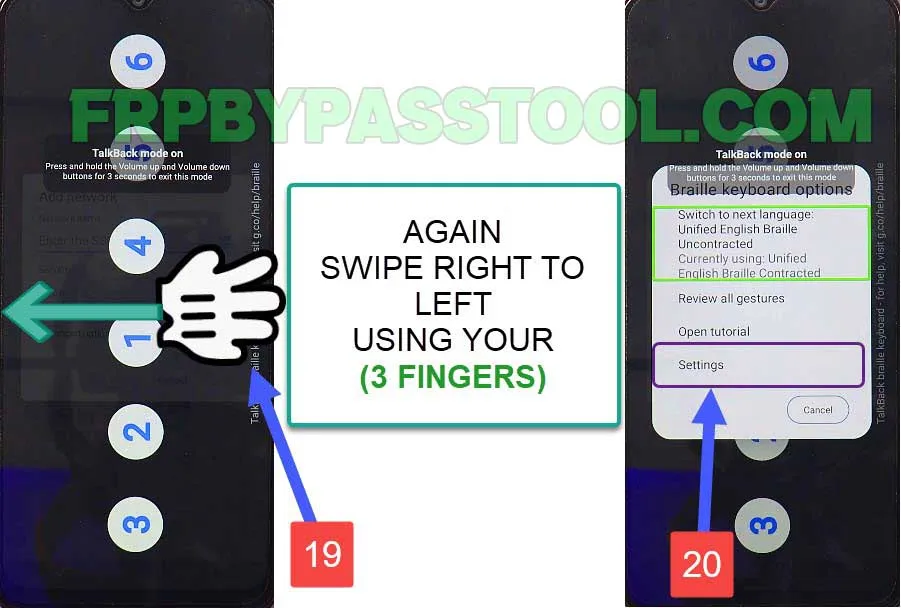
11. After that, again Swipe (Right to Left) with your 3 fingers together, and this time double tap on “Settings”.
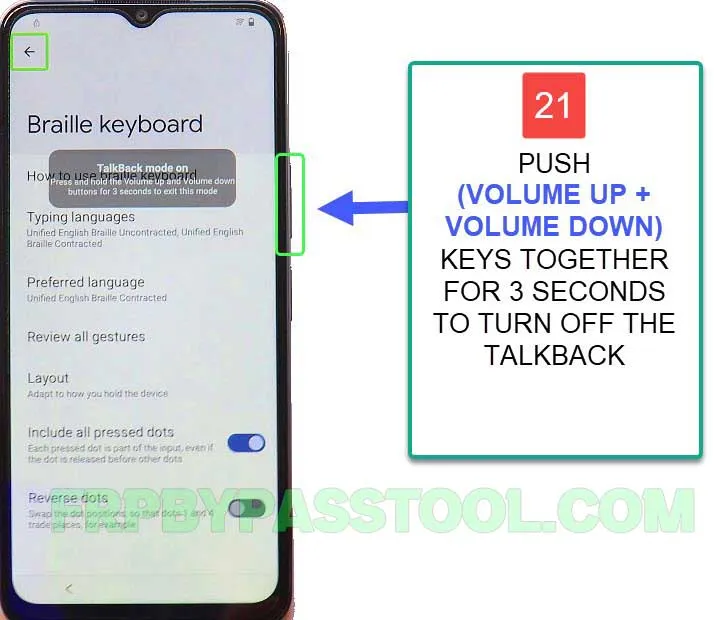
12. Once you get into the settings of “Braille Keyboard”. We need to turn off the Talkback feature.
- Simply, push and hold (Volume UP + Volume Down) keys together to turn off the Talkback feature.
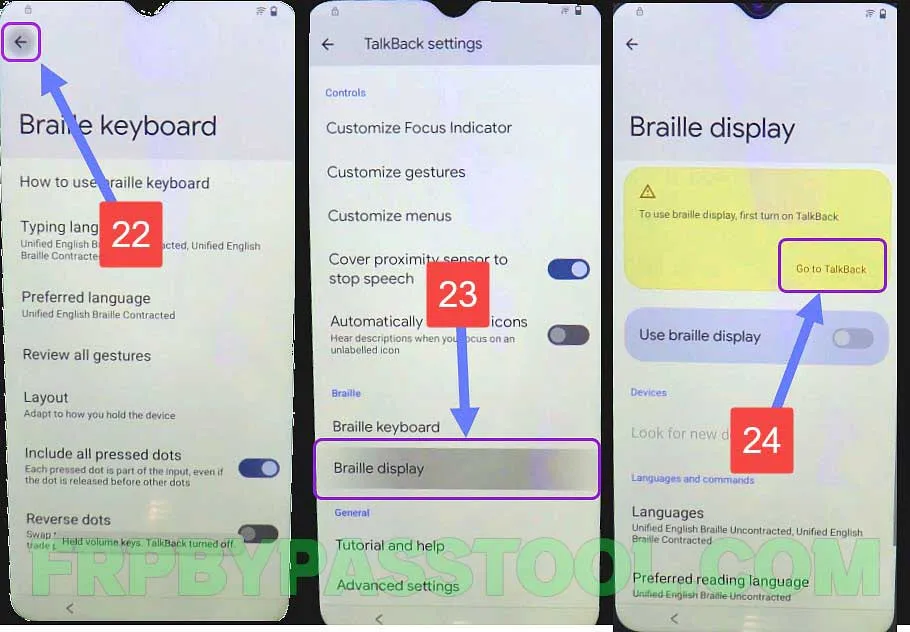
13. Now, tap on the “<” back button, and inside the “Talkback settings” swipe up and open the “Braille Display” option.
- Inside it, tap on “Go to Talkback”.
14. Doing so, will open the “Accessibility” section of your Vivo Android 13 FRP bypass without a PC device.
- Quickly enable the Accessibility Menu Shortcut.
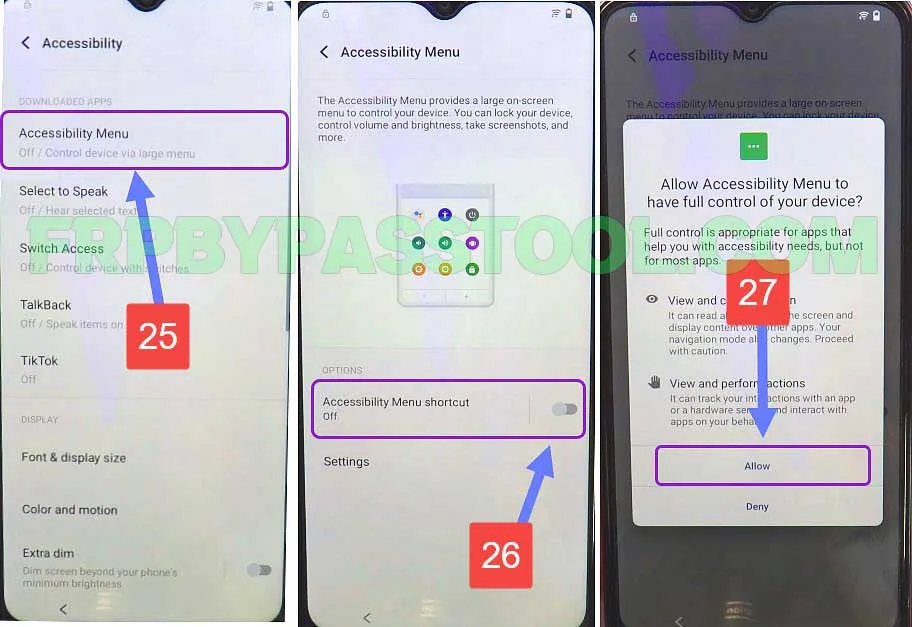
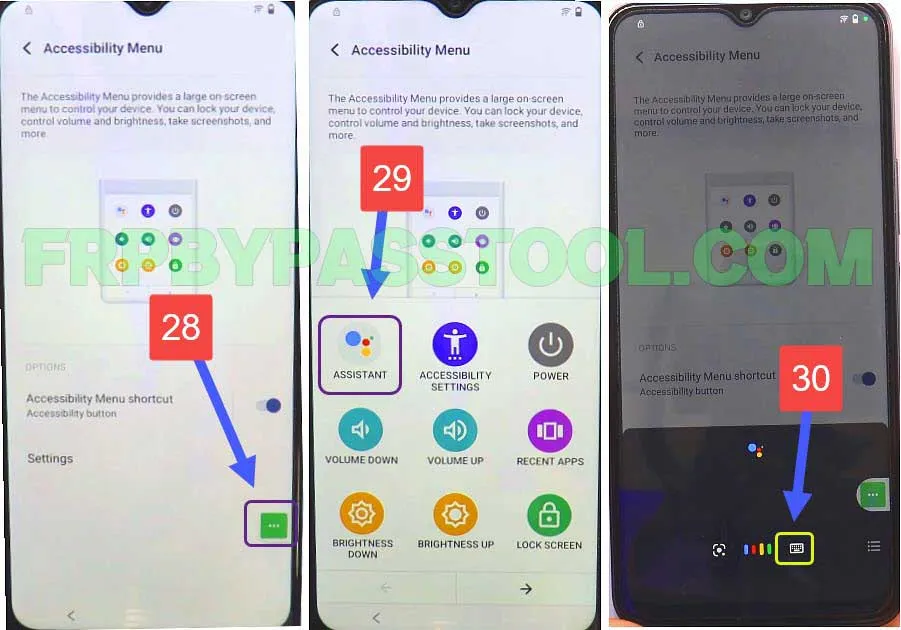
15. Once enabled, tap on the “Accessibility Menu Shortcut” and then select “Assistant”.
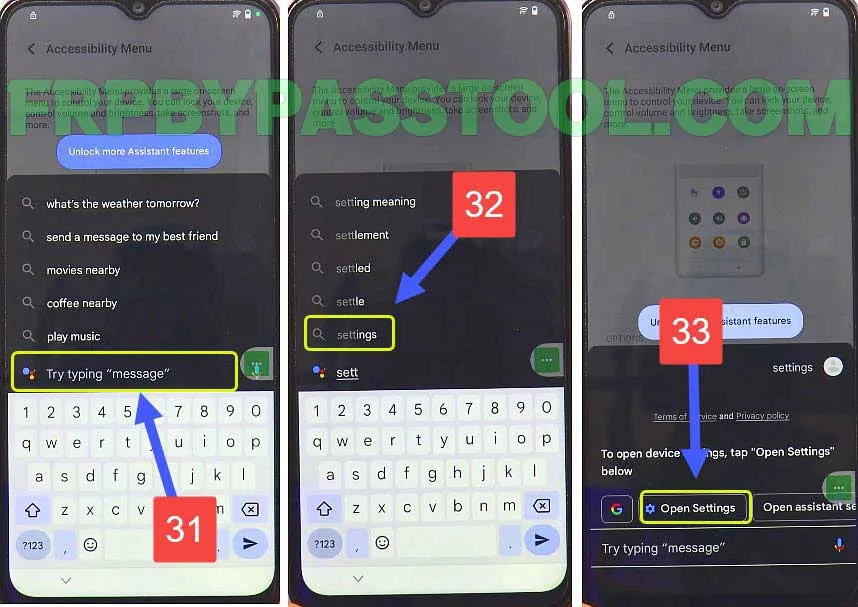
- Once you see Google Assistant on your screen, tap on the “Keyboard icon”.
16. Inside the search bar, type and search for Settings and then select “Open Settings”.
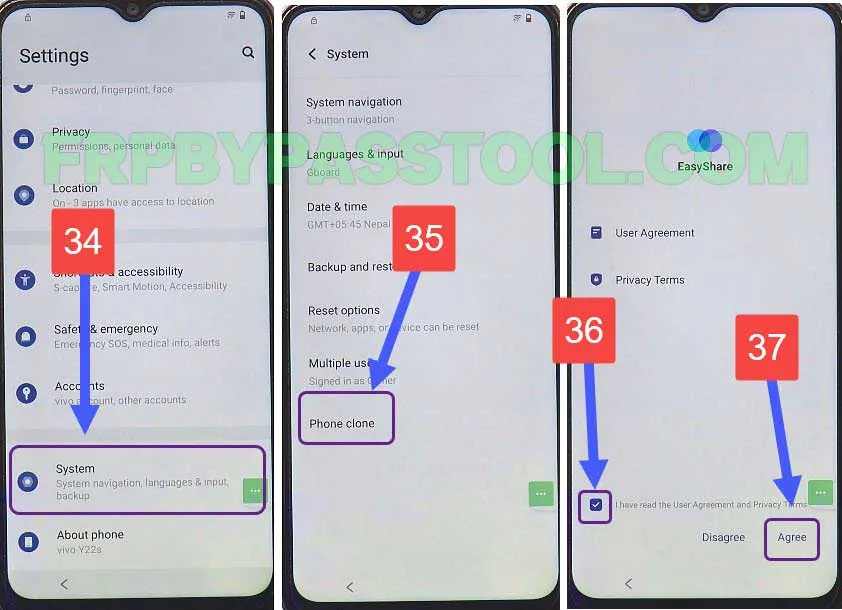
17. After that, swipe up and open the “System” then tap on “Phone Clone” and agree to the privacy terms.
IMPORTANT STEPS:
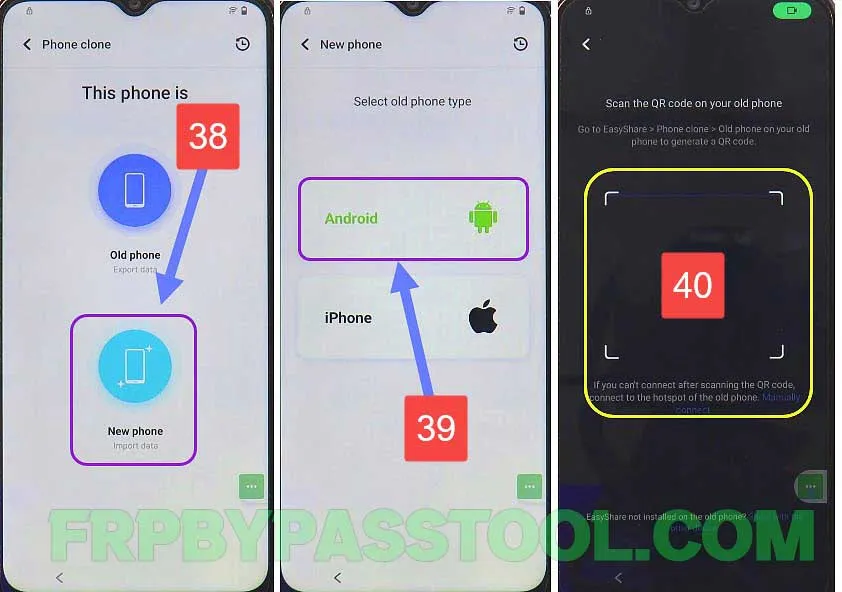
18. Click on “New Phone” and then select the “Phone type” of your 2nd phone.
- If your 2nd phone is an Android phone then select Android, otherwise select “iPhone” if you have an iPhone.
- After that, it will open the “QR Code Scanner”, here we need to scan the QR Code of our 2nd Phone.
- Now, we need to open the Clone Phone app on any smartphone which is not locked by FRP.
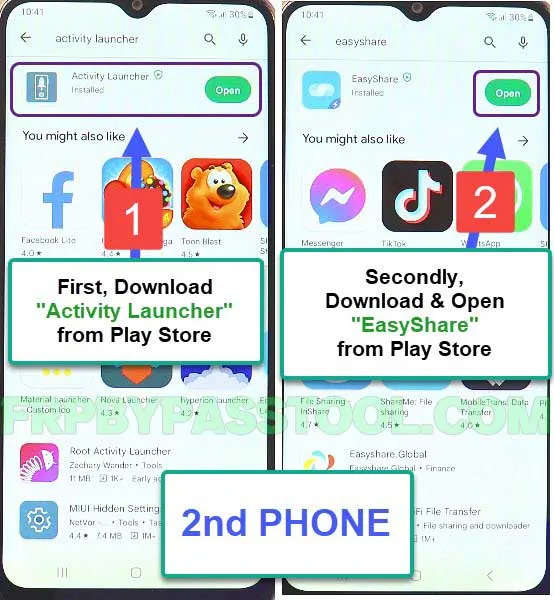
Follow these steps on your 2nd Phone:
1. First, install the “Activity Launcher” application on your 2nd phone. Then, install and open the “EasyShare” application. Both these applications are available for free in Google Play Store.
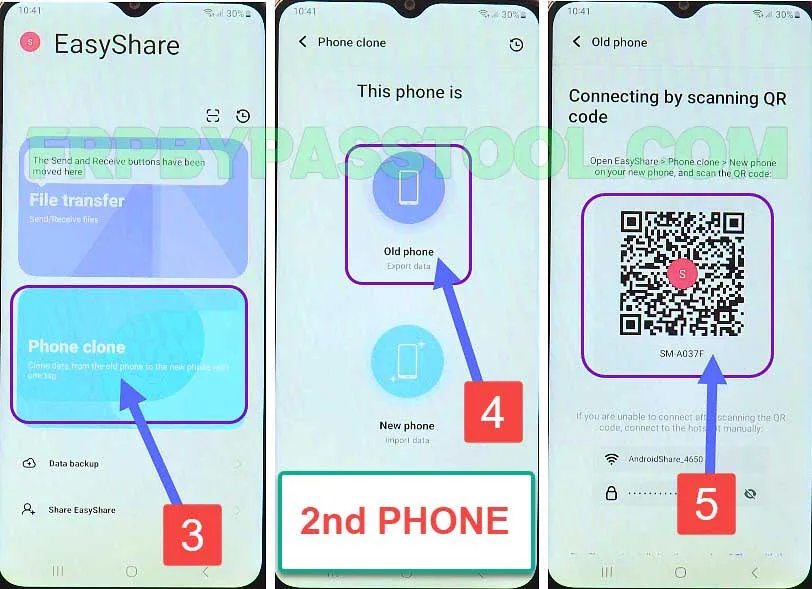
2. Once you open the “EasyShare” application, select the “Phone Clone” option. And then select “Old Phone” as we are going to connect our Vivo FRP locked phone.
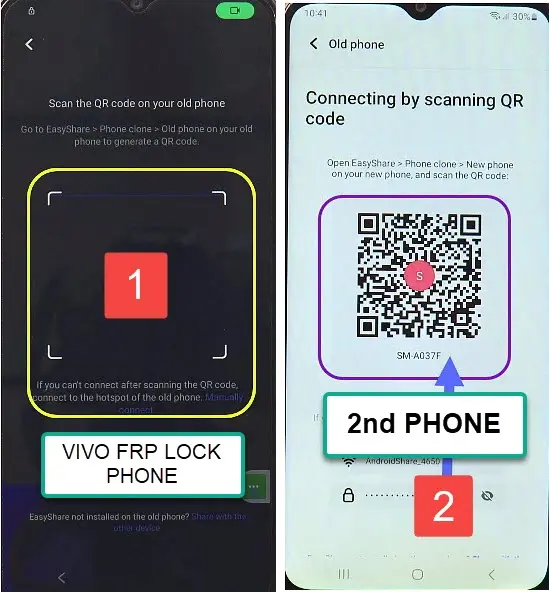
- Now, this will give you a “QR Code” to scan with your VIVO FRP lock device.
(Move back to your VIVO FRP Locked device and Scan this QR-Code, then follow the next steps on your 2nd phone.)
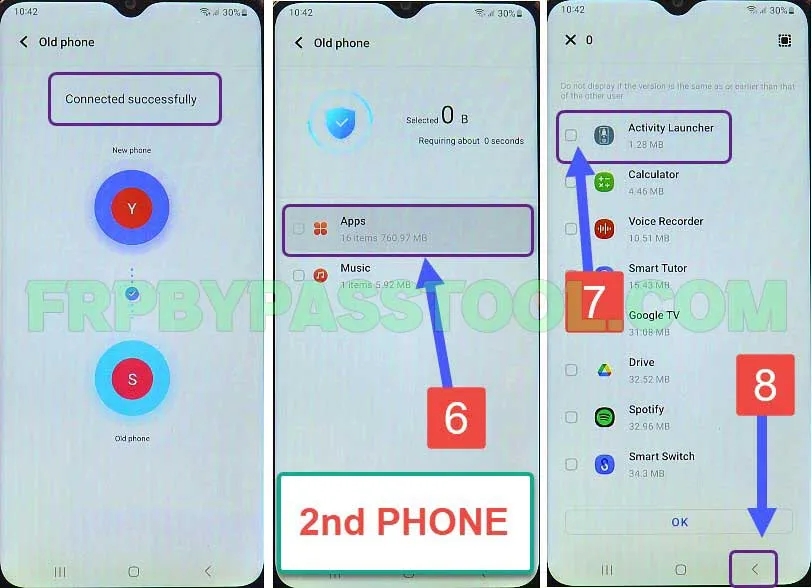
3. Once you connected successfully with your VIVO FRP-locked smartphone, then open the “Apps” folder.
- Here, you will see the “Activity Launcher” application, you need to only select this 1 application and then go back.
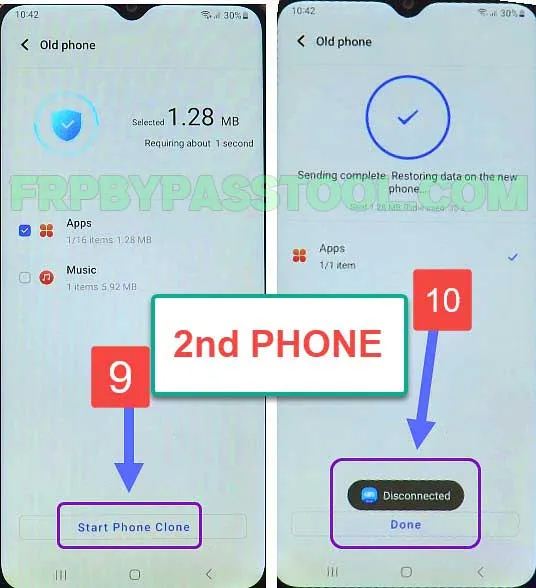
4. After that, tap on the “Start Phone Clone” button to send the “VIVO Activity Launcher” application to your VIVO Android 13 device.
- Your 2nd phone will automatically disconnect after sending the app, tap on “Done” and move back to your VIVO FRP Lock device.
Follow these steps in the Vivo FRP lock device:
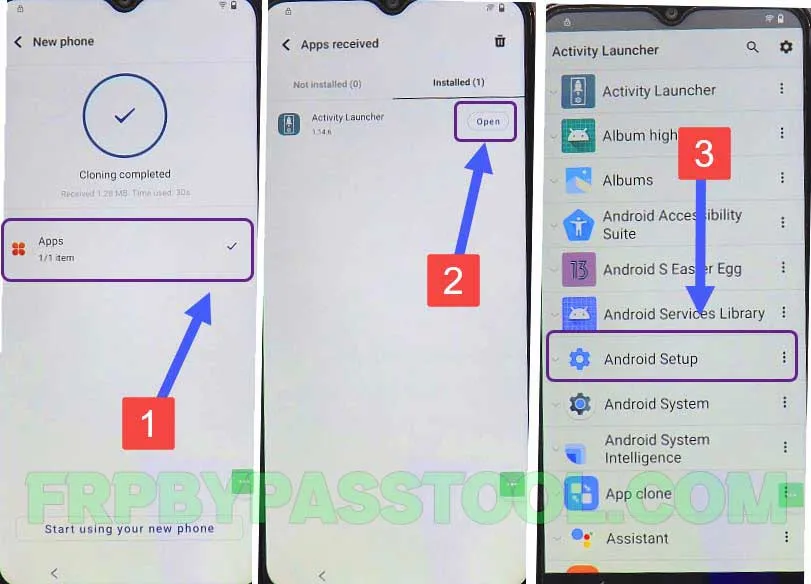
1. It will show the “Cloning Completed” screen, and below it, you will find the Apps folder.
- Go inside this folder, and then open the “Activity Launcher” app.
- After that, open the “Android Setup” application.
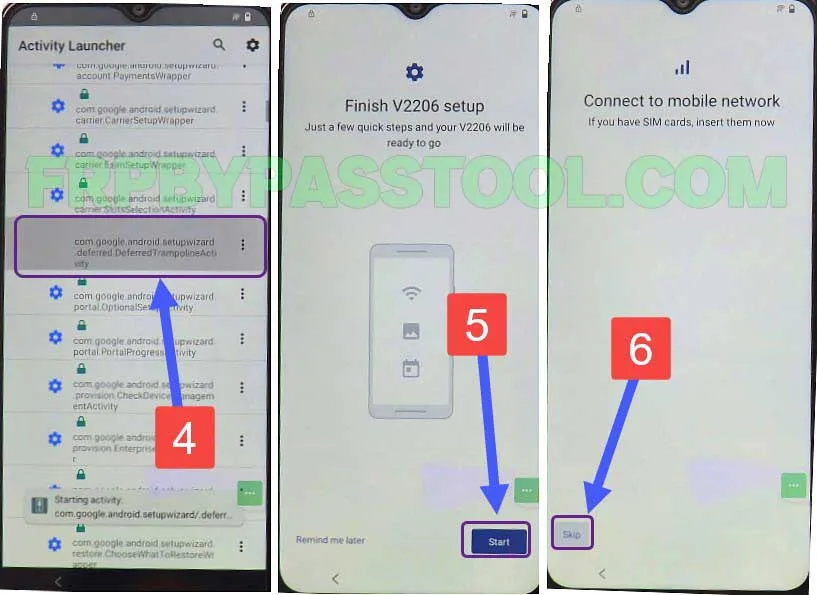
2. And then, find and open “com.google.android. setup wizard” with (.deffered.Deffered Trampoline Activity).
- Tap on the “Start” button, and then Skip connecting to the mobile network.
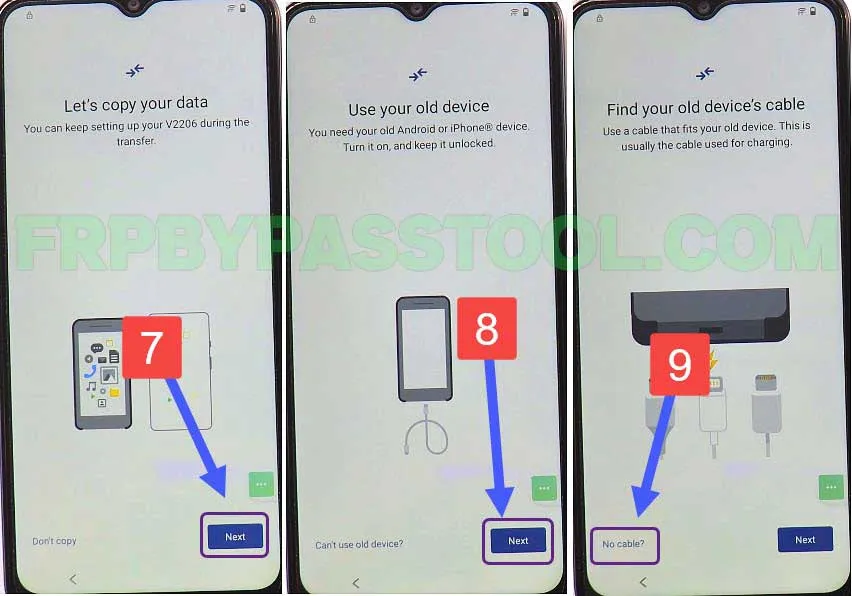
3. Now, tap on the “Next” button on the “Let’s copy your data” screen and then again tap “Next”.
- Here, it will ask you to find your old device’s cable, tap on the “No Cable” option.
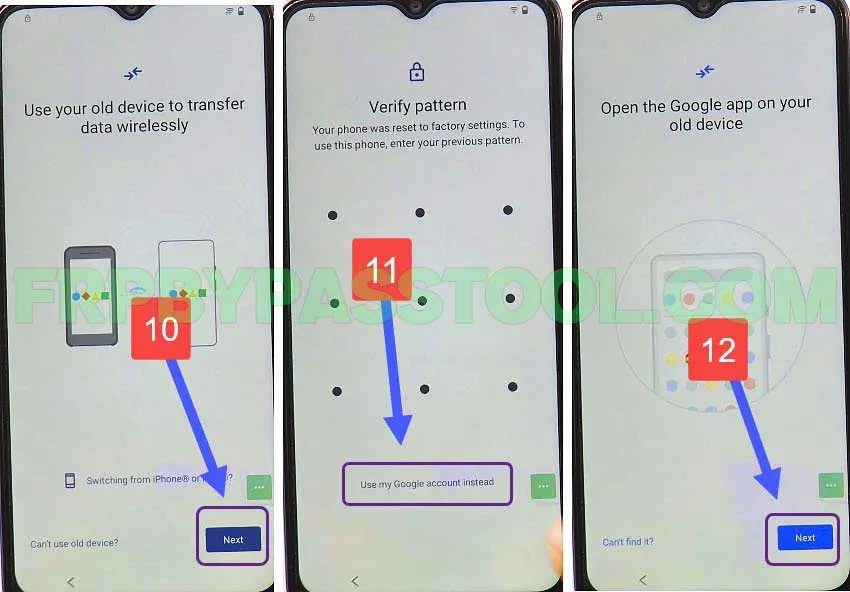
4. Now, it will show you to transfer data from your “2nd Phone” to the Vivo FRP lock device wirelessly.
- Tap on Next >> and then tap the “Use my Google Account” option.
- Now, it will tell you to open the “Google App” on your “2nd Phone”, tap next, and go back to your 2nd phone.
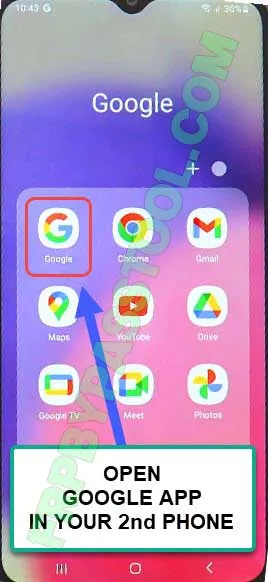
Follow these steps on your 2nd Phone:
1. Open the “Google App”, it is a pre-installed app and you can easily find it on any Android phone.
2. Then, tap on “Microphone Icon”, and then speak “Set up my device” and then tap the “Next” button.
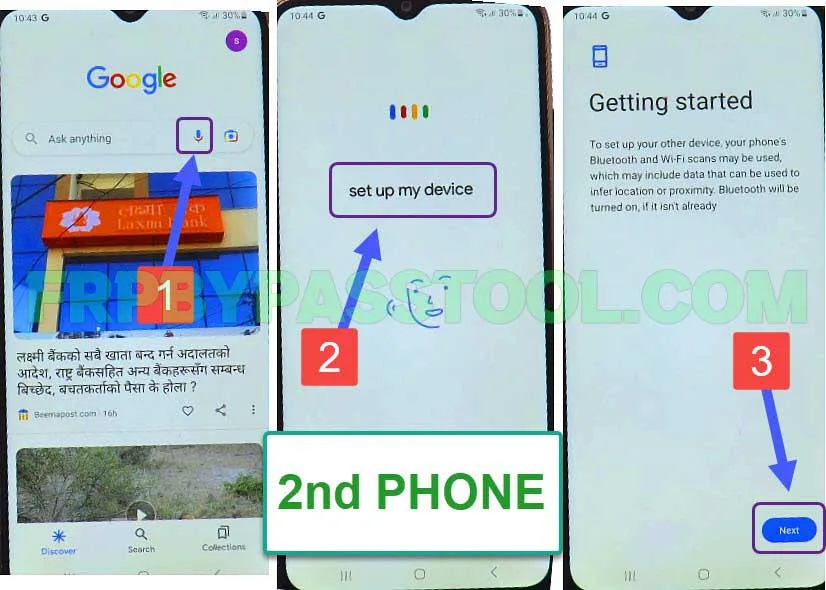
3. Finally, it will start connecting with your “Vivo FRP Bypass Android 13” device.
- Once you see “Verify the shapes on your new device”, simply check the same shapes on your Vivo FRP lock device and then hit “Next”.

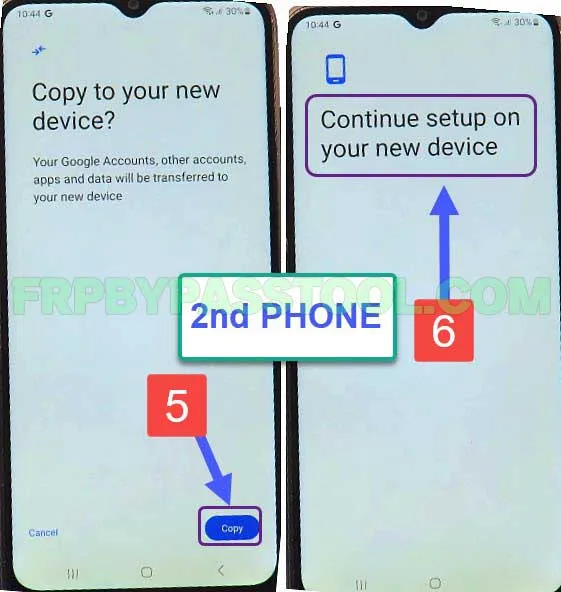
4. Currently, we are going to copy the “Google Account” from our 2nd phone to the Vivo FRP locked phone.
- Simply, tap on Copy >> and then it will show you the message “Continue setup on your new device”.
- That means the work of 2nd phone is completed here. Go back to your Vivo Android 13 FRP lock device and follow the next steps.
VIVO FRP bypass Android 13 Without PC – Last Steps
1. Finally, as you can see the Gmail ID and Google account is ready to connect with your Vivo smartphone.
- The Gmail ID is also appearing just below the “Verify it’s you” message.
- Now, simply enter the Password of your this Google account and it will be added to your device.
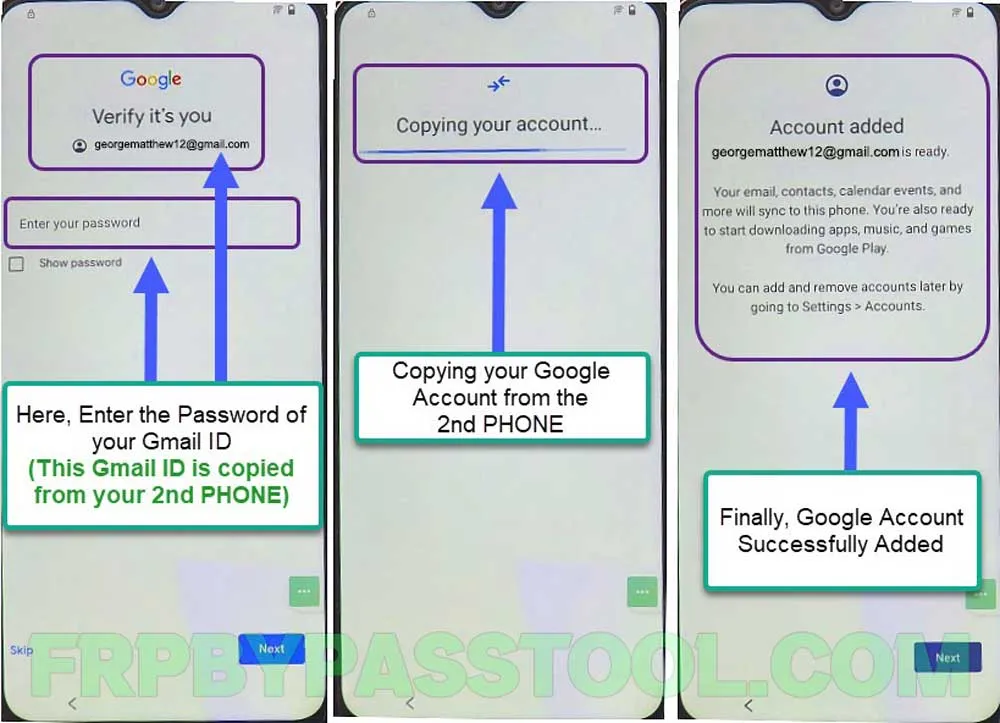
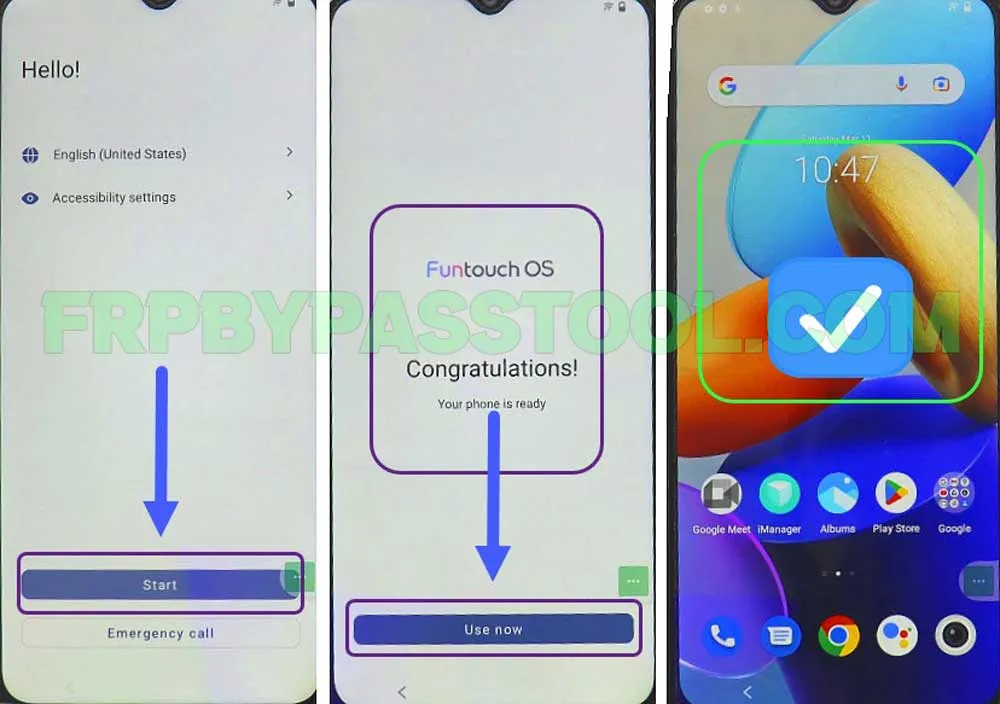
2. Once you see the “Account Added” screen, simply move back to the “Initial Setup Wizard” of your VIVO device.
- Complete the initial setup without facing Google account verification or Factory Reset Protection lock.
Conclusion:
Hopefully, this method helps you remove and bypass Google Lock from your VIVO Android 13 smartphone. If you still need any help or you are facing any errors during the procedure, feel free to comment below. Additionally, you can also contact me directly on our official Facebook page.