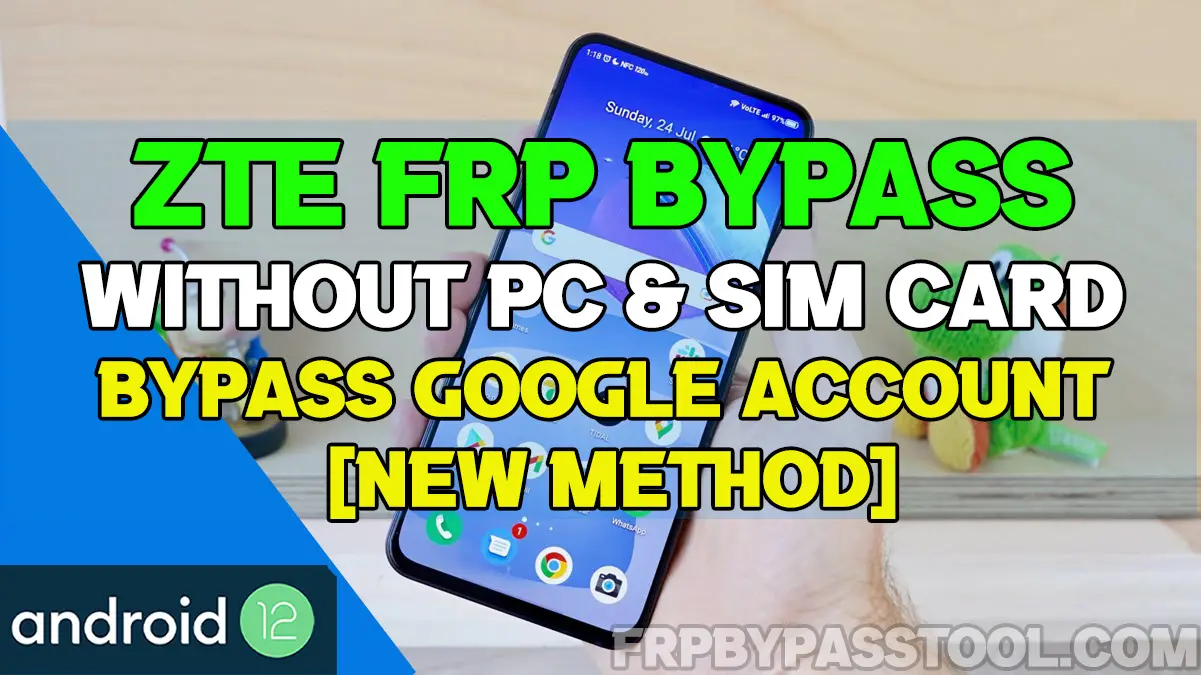
ZTE FRP bypass without PC Android 12 guide is no more than a blessing in 2023. If you are stuck at the “Google verify your account” screen and you don’t remember the Google account details. Then this guide is for you.
Jump to
ZTE FRP Bypass Without PC Android 12 – Google Account Verification
Google account verification is also known as FRP lock which stands for Factory Reset Protection. This is a safety feature that is provided by Android developers to all the smartphones using Android Operating System.
Although it is an important security feature it sometimes makes trouble for many Android Smartphone owners. Many of the users do not remember the Gmail ID or Password of their Google account that is synced to their device.
Therefore, this security feature is becoming a problem for the authentic Android device user. It is no doubt a useful feature that protects the important data of our device. But, what if you forget your own Google account details and stuck to the “Google account verification” screen?
How to bypass Google account verification from a ZTE Android device?
Well, the answer is quite simple, we have to bypass Google account verification to get complete access to our phone. To do that, we are going to show a complete step-by-step guide that includes all the steps to easily bypass FRP lock from the ZTE Android 12 device.
In general, it is not a reliable situation to forget your Google account. It is always better to write it down somewhere so that you don’t have to face this situation. Submitting the right details of the synced Google account is the best option to go with. But, if you don’t remember either the Gmail ID or Password of your account, then follow this guide.
ZTE Android 12 smartphone is using the latest security patch from Android. With that in mind, we have to apply a guide that can bypass FRP lock even with the latest Android security patch. As this guide is free to use, you don’t have to buy credits or a paid ZTEP FRP tool to unlock it.
At the same time, multiple ZTE FRP Tools are available online that can bypass Google account lock. But, to use their services, you have to buy the FRP tool or credits.
Fortunately, that’s not the case with this Free ZTE FRP bypass guide. Follow each step carefully and you will be able to successfully bypass FRP lock from your ZTE Android 12 device.
ZTE FRP Bypass Without PC Android 12 – Complete Guide
With the help of this guide, it becomes quite easy to bypass FRP lock from a ZTE phone without using a PC or Computer. Yet, the difficulty level of using this guide to unlock your ZTE device without taking the help of anyone is quite low. That means anyone can use this guide even if they don’t have much knowledge about unlocking or bypassing.
1. Tap on the “Start” button and then connect to a Wi-Fi network.
Once the “Verify your account” screen shows up, go back to the Wi-Fi network page.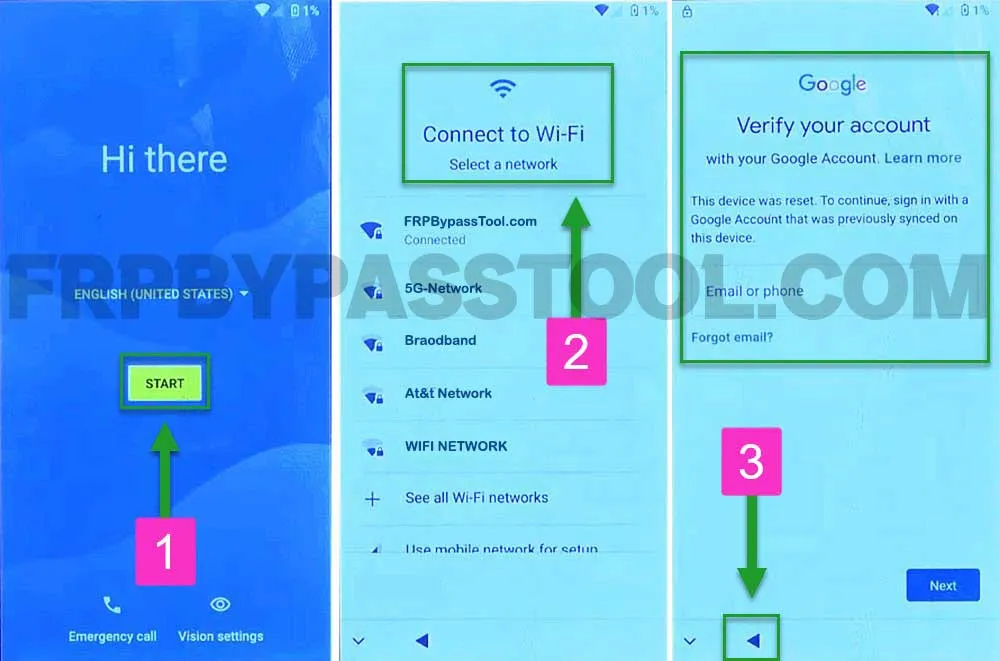
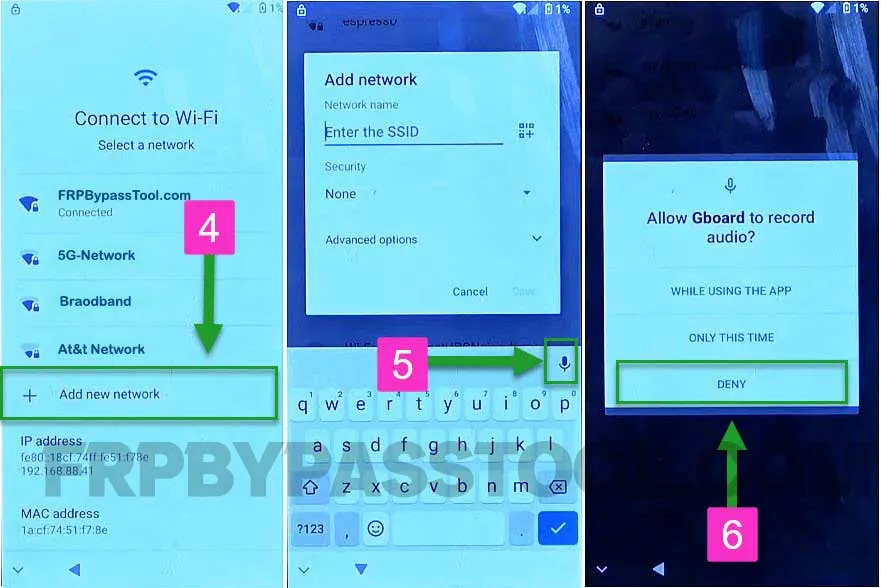
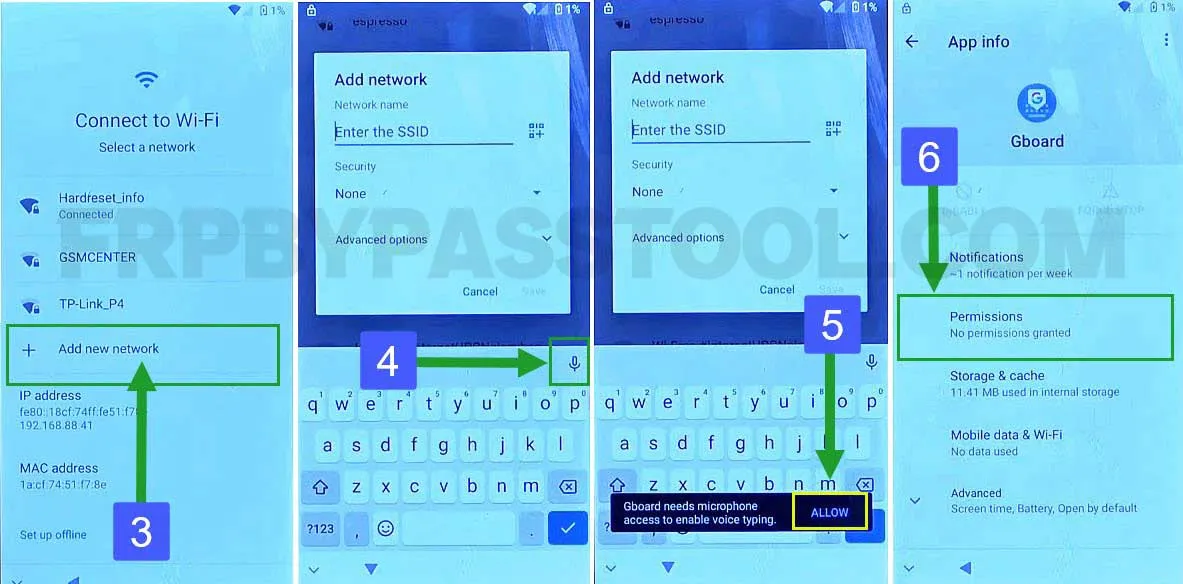
2. Next, tap on the “Add new network” and then click on the “Mic icon” from the Keyboard.
It will ask to allow the Gboard to record audio, tap on “DENY”.
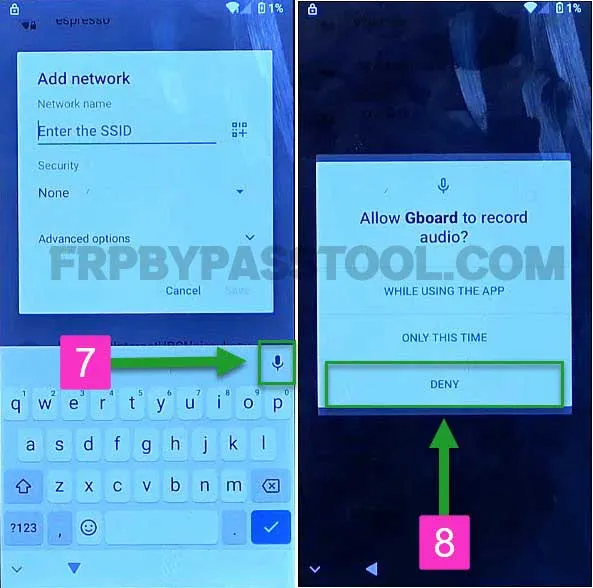
3. Again, repeat the steps by clicking on the Mic icon and then selecting the “DENY” button.
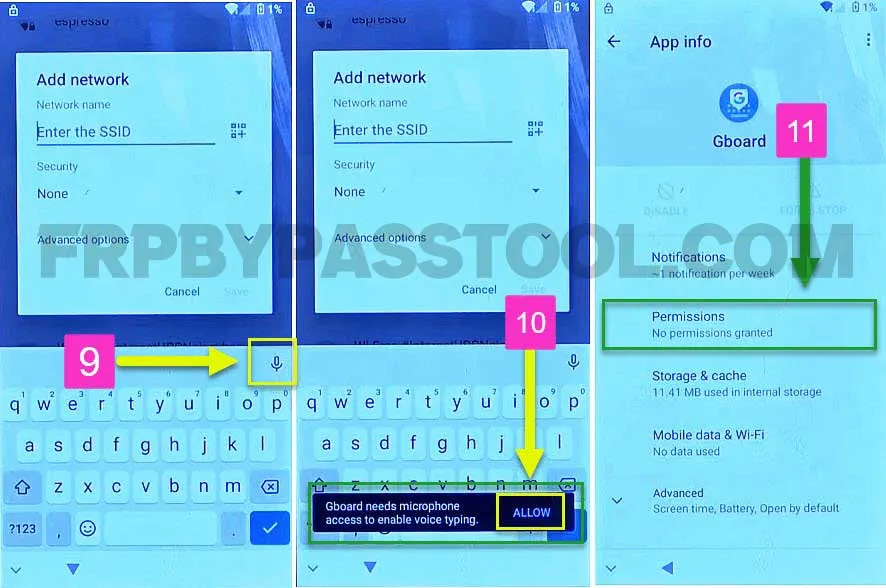
4. This time, the Mic icon will change its color to transparent. Tap on it and then you will see a popup message “Gboard needs microphone access”, simply click on “ALLOW”.
Doing this will open the “App Info” of our ZTE Android 12 device. Open the “Permissions” tab.
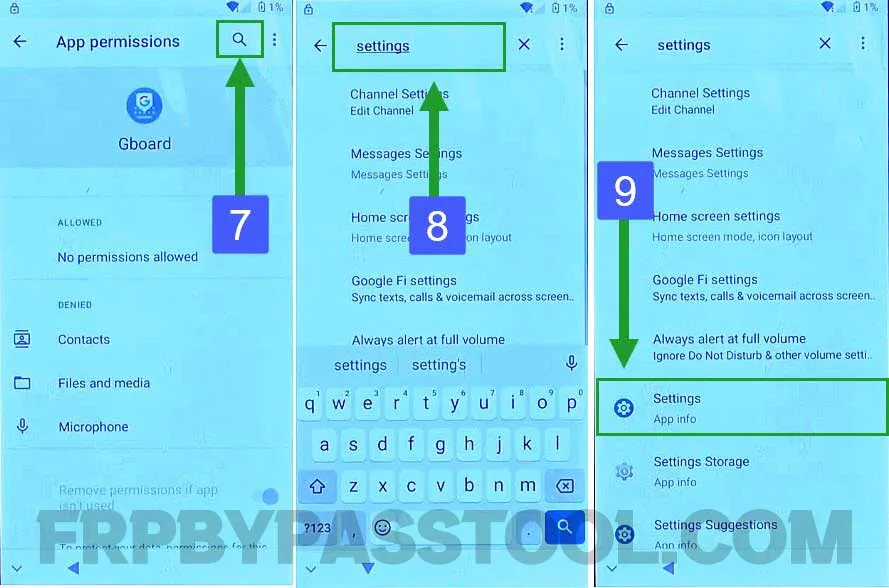
5. Inside it, tap on the “Search icon” and then type “Settings” in the search bar and click on “Enter”.
It will show different applications of settings, you need to open “Settings with App Info”.
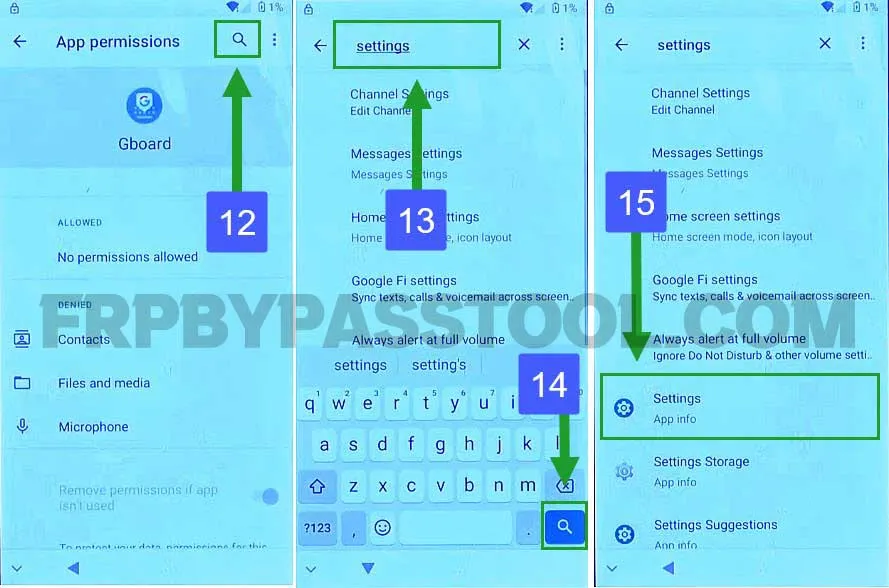
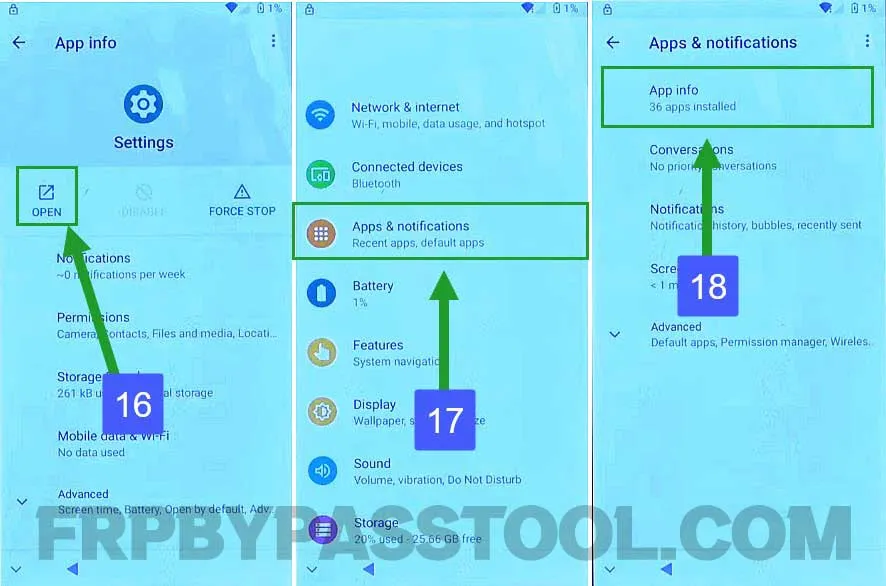
6. Next, tap on “OPEN” to open the Settings and go to “App & Notifications”. Inside it, tap on the “App Info” option.
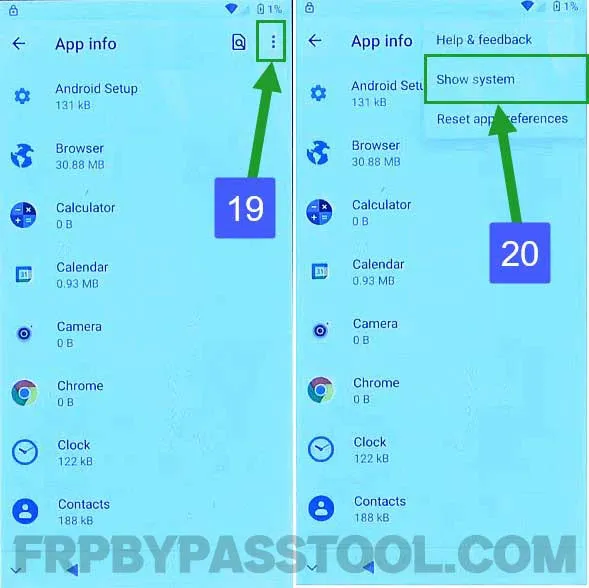
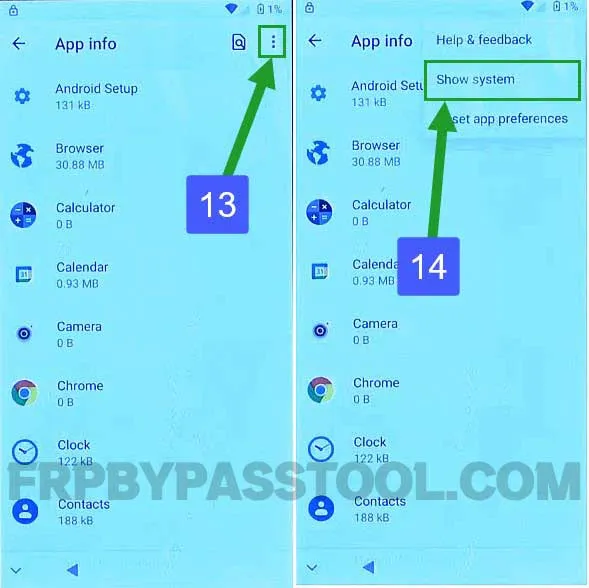
7. Get access to the System applications by enabling the “Show System” feature. Simply tap on the “:” three dots and then select “Show System” from the drop-down menu.
IMPORANT STEPS
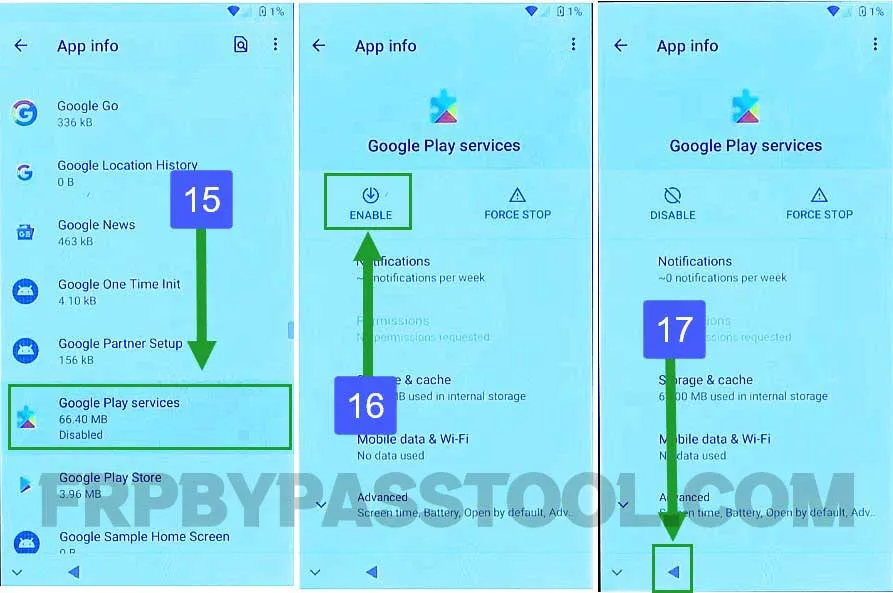
8. After that, swipe up and open the “Google Play Services” app. Disable this application and then Restart the ZTE Android 12 smartphone.

9. Once the ZTE device boots up, tap on the Start button and then click “Don’t Copy”.
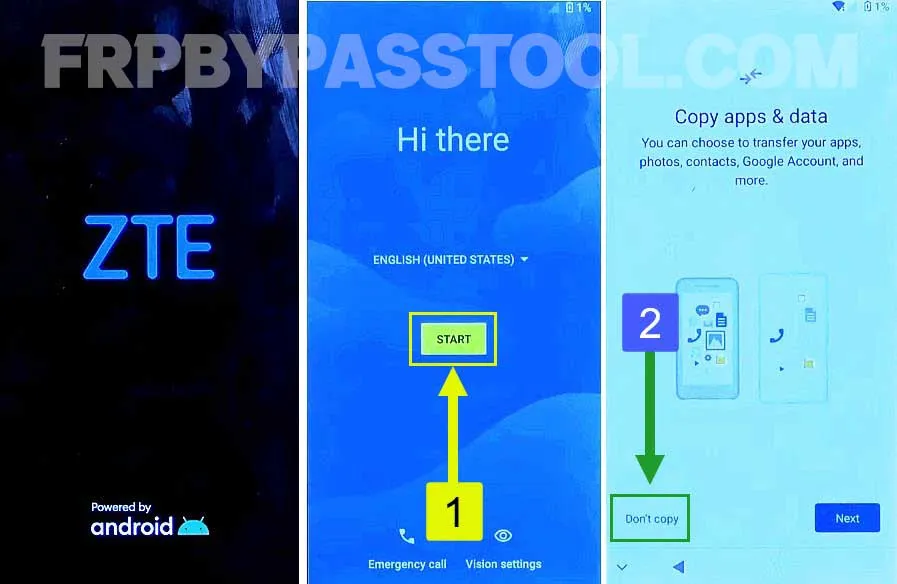
10. Now, click on the “Add new network” from the “Connect to Wi-Fi” screen.
Then click on the “Mic icon”, select ALLOW and open the “Permissions” tab.
11. Now, tap on “Search icon” and type Settings, and then select Settings with app info from the results.
12. Open Settings, go to “Apps & notifications” and then select “App info”.

13. After that, click on “:” three dots from the top right corner and select “Show System”.
14. Swipe up and open the Google Play Services application.
Next, we have to “Enable” the Google Play Services app and then go back to the “Hi there” or Welcome screen.
15. Now, tap on the “Set up offline” option from the “Connect to Wi-Fi” screen.
Tap on Continue and then complete the rest of the initial setup of the ZTE Android 12 phone.
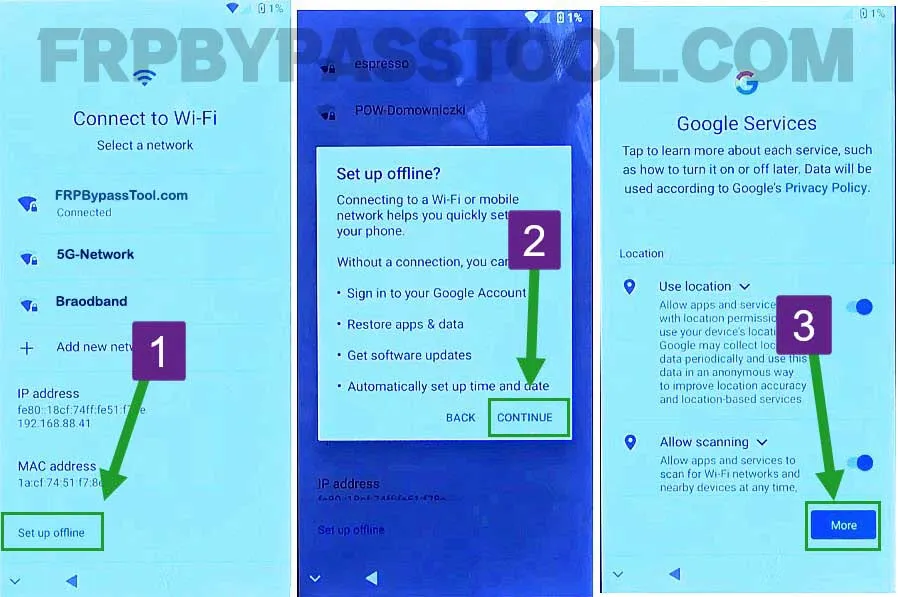
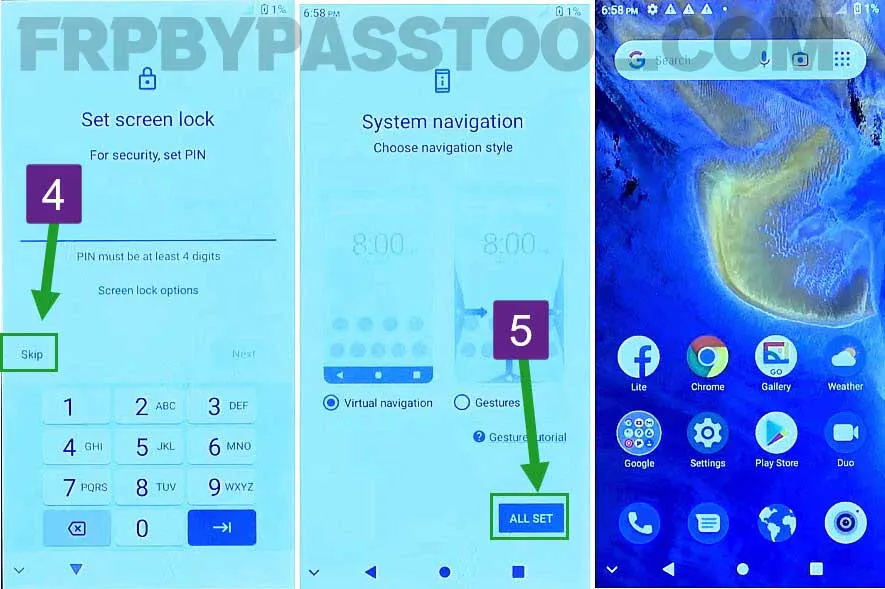
16. During the initial setup, “Skip” the Set screen lock page and you are All Set to use the ZTE device again.
Factory Reset ZTE Smartphone
In general, it is important to perform a Factory Reset after bypassing the Google account verification lock.
Don’t worry, you will not face Verify your account screen after resetting your ZTE device.
Factory Reset will remove all the default settings, data, and including the Synced Google Account from the ZTE device.
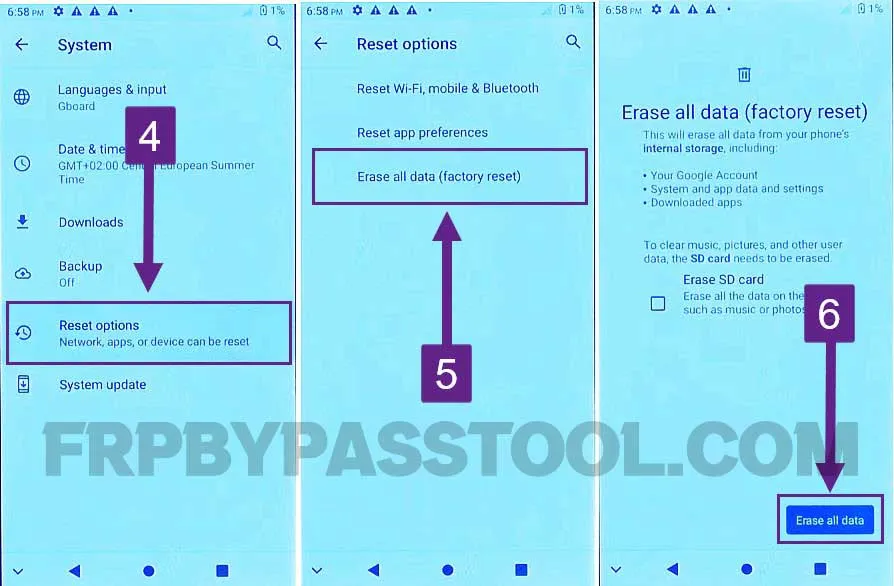
1. Go to Settings, select “System” and then open the “Advanced” tab.

2. This will completely remove all the data from your device, make sure to remove the SD-Card and Sim-Card to save the contacts and other data.
3. Click on the “Reset options”, then select “Erase all data (Factory Reset) and finally tap on “Erase all data”.
Conclusion
Finally, at the end of this amazing FRP unlock guide, I hope you have successfully bypassed the Google account lock from the ZTE Android 12 device. As this guide works without using any paid FRP tool or PC, you may need to try several steps carefully to get the proper results.